The Book : How To Shoot Video That Doesn't Suck by Steve Stockman

I was doing a seminar today called Intro to DSLR Video, hosted by Henry's Newmarket.  We had a marvellous turnout and the folks really wanted to learn more about making great video with their cameras.  We spent most of the session on how-to and gear, but a couple asked about a good book on the subject.  So I recommended Steve Stockman's In my opinion, this is one of the greatest cut the crap, get to the point books on how to make interesting videos.  There's little techno-babble and tons of useful guidance on how to shoot video that will not make your audience want to shove forks into their eyes.

I recommend it highly and if you buy it from Amazon through the link below, you help support The Photo Video Guy.


Q & A : What is "Safe" storage

To ask a question of The Photo Video Guy, send an email with your question to ross@thephotovideoguy.ca Rod writes to ask about storing images. "What's the best means of storage and archiving digital photos.  I read your article on thephotoguy.ca about memory cards.  I find the technical info helpful but I also read elsewhere that flash storage is not long-term reliable. "

Great question Rod, let's take a look at the subject.

There are potentially hundreds of opinions on how best to store and keep your digital photos, and videos.  In the old days of digital, owners would have to create their own image management system of directories, folders, naming conventions and the like, and hope that over time the thing was sustainable, manageable and the the owner could actually find something four years down the road.  It was not really viable then and is the worst option now.

The first rule of safe storage is that no single storage mechanism is "safe".  Storage professionals will tell you that no file is really safe until there are three copies of it.  The three copies include the master, the local backup and the offsite backup.

Physical Media

Before we get in to that architectural conversation, I want to address the comment you have heard that flash storage is not long-term reliable.  The real question is what constitutes "long-term".  In the early days of static column RAM integrity was measured in years without a power application to recharge the chips's ability to retain a bit instruction.  With today's flash memory cards such as high end Compact Flash or Secure Digital cards, reliability is superb.  There are numerous indicators where a card has spent six years underwater in the ocean and been readable.  No electronic storage medium is fully protected from data loss due to strong magnetics or degaussers, but reasonably maintained, the flash memory in storage cards will last a long time.  It's NOT suitable as a long term storage mechanism not because of reliability but because of the difficulty in cataloging.

Solid state drives use a different class of flash memory.  They are more reliable than media cards and as of yet, we have not seen any strong indicators of limited life.  They are extremely fast, robust and make an excellent storage medium but you pay a higher price for this sort of storage.

Classic spinning drives are the most common type of storage.  They are very cost-effective, come in enormous sizes and if you buy smart have superb integrity.  To a large extent you do get what you pay for.  Enterprise class spindles cost a LOT more than consumer grade drives.  They tend to be smaller in capacity, but are built to be used heavily.  An example would be Western Digital Velociraptor drives.  Fast, robust and pricey.

For home storage in desktop enclosures, Western Digital Caviar Black series are proven to be very reliable.  The newer Caviar Red drives vary their rotational speed but are built to be always on in Network Attached Storage.  As an archive target, Caviar Reds are good choices.  The less expensive Caviar Green drives are targeted at the "green" client.  I have lost two of five in two years and will never buy another one.  Similarly, I would never buy any drive from Seagate because of execrable reliability.  Hitachi was my go-to favourite drive but they were sold to Western Digital.  You can get these high quality drives in the external drives from G-Tech.

In laptop format drives, SSD is the way to go, albeit at a higher price.  If SSD is too expensive, then the WD high performance drives are a good choice.  If you are looking for a packaged solution, the G-Tech are excellent.  I used to use LaCie drives but I found them to be sufficiently unreliable such that I do not recommend their products to anyone.  Nice enclosures with really cheap drives.

Also popular are local RAID style drive enclosures.  Systems are available from Promise, CalDigit, Synology and Drobo.  RAID style systems can provide for protection from single drive failure by spanning data but recovery can be a real pain in the butt when something goes wrong.  Drobo made a name for themselves originally but having owned two and having had both units go bad more than once in and out of warranty, I would never suggest a Drobo to anyone.  Synology has developed a very good reputation and while their RAID is not proprietary as are some others, it is based on proven Linux models and works very well.  Be careful buying RAID because while it can look very pretty, upgradeability may be limited when you start to run out of space and be sure that data recovery is simple and proven.

The Storage Model

If you have a desktop computer, I recommend putting your photo / video library on a high performance external drive.  If you have a laptop, I recommend putting your photo / video library on a high performance external drive.  If you run Windows, at minimum your interface should be USB3, Thunderbolt if your system supports it.  If you run Macintosh, go Thunderbolt unless you have an older Mac Pro that has no Thunderbolt capability (like me), in which case get the CalDigit USB3 card and go USB3.  I tend not to depend on the internal drives to hold my libraries.  I capture images on the local laptop drive when in the field but transfer them to the library drive when I get home.  Laptop drives tend to be too small to be viable for long term library storage.

The backup drive should also be external, and use the fastest interface your computer can support.  If you use Macintosh, leverage the power of Time Machine to backup your library from the main external to this secondary drive.  If you use Windows, there are lots of backup applications to use, I am not a Windows user anymore, but I know that the Acronis people do very good software and it actually will perform a restore without dying.  Typically the backup drives are larger than the main drives so you can keep multiple versions.  This is a good use for RAID arrays.  They're usually a bit slower but make good backup targets.

The last piece of storage is offsite.  You can buy externals and move them to and from other sites or lockboxes, but the most effective way to do this is with secure cloud backup.  I have tried most of the services and recommend Crashplan above all others.  Your license will cover multiple computers and does not restrict backing up external drives.  Most other cloud services don't do external drives at all or charge extra for the privilege.  Carbonite gets lots of advertising but their pricing model is onerous and they treat external drives like lepers.

Now that you have a good storage model, let's get to cataloging.

In my opinion a photo editor is not necessarily a catalog system.  Photoshop comes with Bridge.  Bridge is a file browser not a catalog system.  It sucks and blows simultaneously.  While there are lots of editors, there are only two serious editors that also have very strong catalog functions and they are Aperture (Macintosh only) and Lightroom (Windows and Macintosh).  I recommend Lightroom to EVERYONE.  It works, there's tons of free training on the web and you can build your own catalog system and let the Lightroom engine do the majority of the work.

in my world, I set up my Lightroom catalog to store files by the date of capture.  This is the default so not a lot of work there.  At time of import, I have Lightroom make a second copy to a completely different drive as well (so I have three local copies plus cloud).  I used to have Lightroom convert to DNG at time of import, I no longer do this.  At time of Import, I use a preset to apply metadata information including my copyright and rights information as well as IPTC information into each file.  I choose to COPY the original into my Lightroom library so Lightroom can act as my organizer.  I use keywords on each import because I typically do an import after each shoot.  I don't leave cards in cameras for multiple shoots. Keywords help me find files after the fact so I include things like shoot information, lens and camera info, model names etc.  Anything that might apply to the entire import.  Once the import is done, I immediately create a collection for the entire import and give it a useful name.  I then create other collections to subdivide the images into easily findable subsets.  If I'm really bored, I will then specifically keyword select photos but this is a lot of work and hasn't made a real difference so I do it less and less.  Collections are for me the most useful of Lightroom's cross-hierarchy model.  The copy process means that I have a Lightroom library of photos, along with a separate Catalog file, both of which that get backed up to the local RAID array.  That original copy sits untouched on that other drive.  It's my last resort local backup.  I then set Crashplan to backup both my Catalog and my Lightroom library to the cloud.  I've done restores from Crashplan as a test and while not speedy, it works.  I've also done test restores from my local backups to be sure that they work as well.

Because of metadata, IPTC, keywords and EXIF, I can search Lightroom using multiple criteria and I can usually find what I am looking for no matter how old in a couple of minutes.  I don't have to build a structure in a folder system or directory because Lightroom does the job for me.  Transitioning to Lightroom is difficult for those who have built robust manual hierarchies because of the perceived loss of control.  It's all in the head of course, the Lightroom catalog is a much more powerful and much richer structure.

This also allows me to use Lightroom as the launch point for all other editing software.  I launch all plugins and Photoshop from within Lightroom.  This means that anything that goes out of Lightroom to an editor round trips back to Lightroom and updates the catalog.

I set Lightroom to optimize and backup the catalog on every exit.  This adds time to the close operation but keeps things running smoothly.  With over 50,000 images in my current library, performance is still good.

Lightroom does support multiple catalogs, but for my volume I don't need to use this function.  If you are making 150K retained images a year, maybe you do.  I also keep things clean by aggressive pruning of the library.  I make time to go through every import and use the X key to reject anything that I would not want to spend time editing right off the bat.  Then I delete the rejected photos.  Remember, I have that copy of everything that was made to the second drive at time of import if I ever really needed something (I never have) so by keeping my library to only good stuff it's fast and effective.

It's a longer answer to Rod's question but the subject warrants.  There are three considerations, physical media, storage architecture and catalog.  Hopefully this post helps you get a system set up that properly leverages all three.

EXERCISE : Learn to "See" Like Your Lens

This is a pretty simple exercise that you can do with your lenses be they prime or zoom. First get two objects that are three dimensional that are about a foot tall and half that wide. Or two mannequin heads.  Make sure your objects have obvious markings or protrusions at different distances from the front.

Second, set your subjects about 8 feet apart front to back and nearly side by side left to right as in this little diagram.

Lens Exercise


Now position the camera lens combination so that with the camera in portrait orientation (vertical), you fill the frame with the first head and can see all or part of the second head over the the shoulder of the second head.

Open the lens to its widest aperture and shoot a frame.  Close the lens down to its smallest aperture and shoot a frame.  (This is where that tripod is going to come in handy).  Check your white balance and ISO so the shots don't look like mush.

Repeat for your different lenses.  For zooms, do the two shots at a variety of focal lengths.  For example, if you have a 24-105mm take shots at 24mm, 35mm, 50mm, 75mm and 105mm.  If you have a 70-200mm take shots at 70mm, 100mm, 135mm, 150mm and 200mm.

Import your shots into your editor of choice and make a layout so the wide open shots are in a line from widest focal length to narrowest focal length.  Add a second line of shots to your layout from widest focal length to narrowest focal length at the the small apertures.

Congratulations, you've now created your personal focal length / depth of field guide.  By memorizing the look of the shots you will be able to look at a scene and "see" how it will be through the lens, before you put the lens on and make a frame.  It's a critical piece of becoming a better photographer, learning to "see" like a lens.

The "Right" Lens

This past couple of weeks I've become engaged in a number of conversations about the "right" lens for "subject of query".  Many times I am asked about the best lens for portraits, sometimes landscapes, sometimes sports. There is a lot of misinformation out there, and a lot of varying opinions.  Here are mine.

Landscapes and Scenic Vistas

In this case you often want to show a wider field of view and create a sense of space.  Wide angle and extra wide angle lenses create perspective exageration seemingly increasing the distance between the foreground and the background.  Note, that for this to work, there HAS to be something in the foreground.

Full Frame : 24mm f/2.8, 16-35mm f/2.8, 17-40mm f/4

Crop Sensor : 16mm f/2.8, 11-22mm f/4

Lens speed (large maximum aperture) is less critical

Small Groups, Casual Interaction, Street

The idea is to have the shots look sort of like your eye sees but with a bit more environmental inclusion.

Full Frame : 35mm f/2.8 or faster

Crop Sensor : 24mm f/2.8 or faster

Lens speed becomes more important as you may want to go for shallower depth of field, f/1.4 is optimal

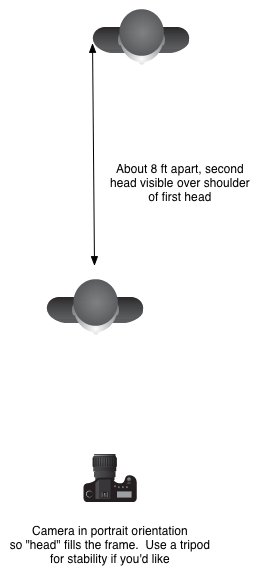
Headshots and Upper Body Portraits

These shots are about making images that are pleasing to the subject and that may be used in a portfolio for a model or an actor.  In these scenarios, shallower depth of field and moderate perspective compression are critical.

Full Frame : 70-200mm f/2.8, 100mm f/2.8 or faster, 135mm f/2.8 or faster, 200mm f/2.8

Crop Sensor : 85mm f/1.8, any of the lenses listed for full frame except the 200/2.8

Lens speed becomes VERY important as you will need to be able to deliver very shallow depth of field.  I've said it before and I'll keep saying it.  The 50mm or Nifty-Fifty IS NOT A PORTRAIT LENS, regardless of what mcmarketing and uninformed retail hypers tries to spin.  Headshots look horrible, and are a great way to make the model hate you.

Full Length Fashion

This one is tough because you need some moderate perspective compression but getting that means having good distance from your subject and being able to maintain shallow depth of field.

Full Frame : 70-200 f/2.8, 85mm f/1.8 or faster, 50mm f/1.8 or faster

Crop Sensor : 35mm f/2.8 or faster, 50mm f/1.8 or faster

Lens speed is very important for depth of field control.  Slower zooms can work but you will need to create more distance between your model and the background if you want shallow depth of field as most of these kit lenses are f/5.6 at 55mm which is not the shallow depth of field you need

General Purpose Telephoto Outdoors

Kind of an all around lens to have, for lots of things.

Full Frame : 70-200mm, 75-300mm

Crop Sensor : 55-250mm, 70-300mm

Lens speed is less important but remember that when the light starts to fall you will need to be pushing the ISO up to keep handholdable shutter speeds

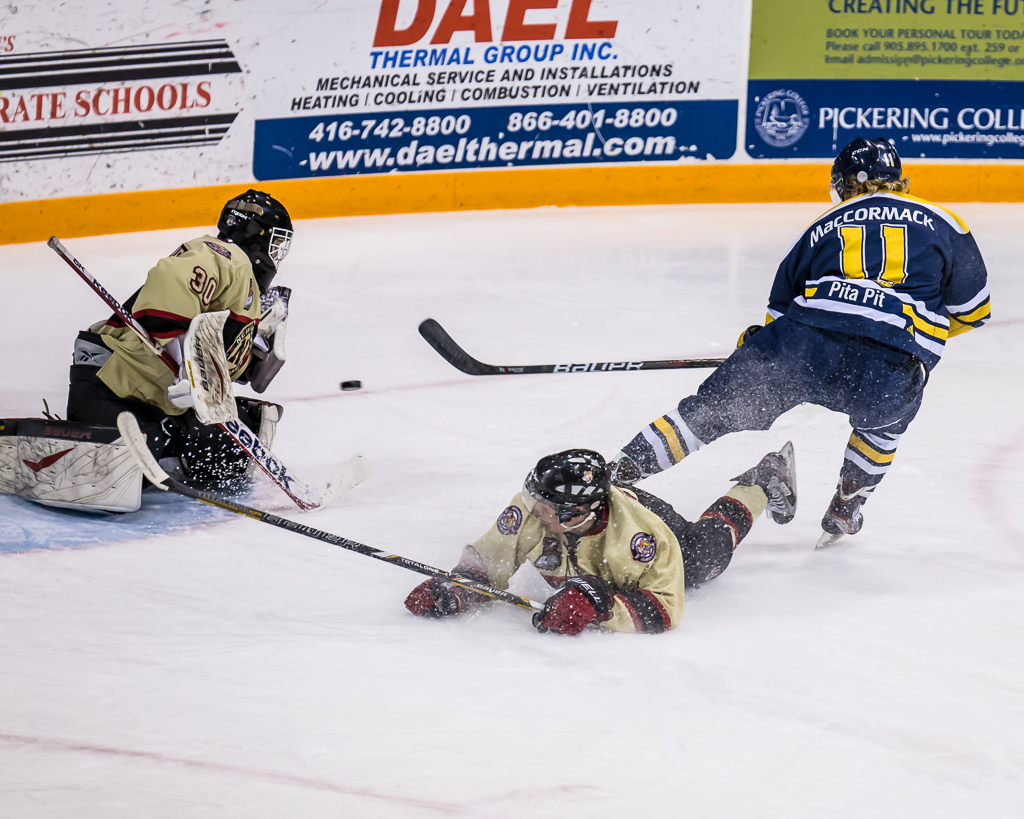
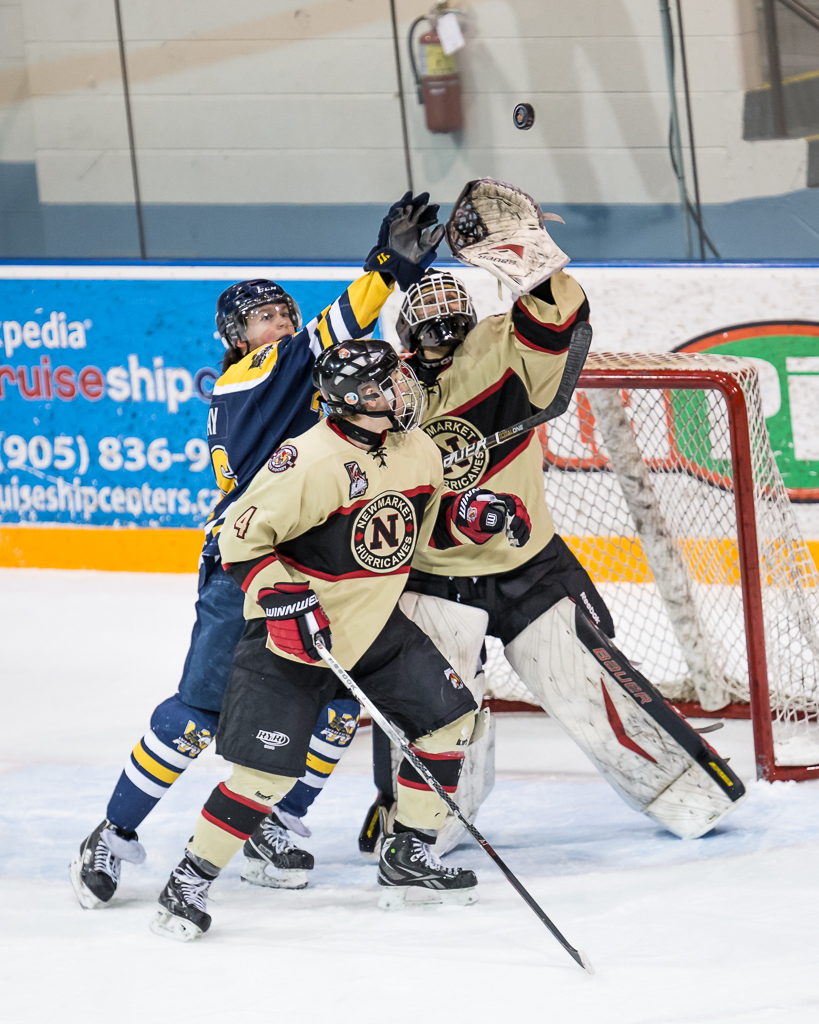
Arena Sports eg Hockey

Here's where the general purpose telephone fits IF it is a fast lens.

Full Frame and Crop Sensor : 70-200mm f/2.8, 1.4x Teleconverter

Lens speed is a killer factor indoors.  A slow lens can work so long as your camera can handle high ISO settings without turning into mush

Field Sports eg Football, Larger Wildlife

Full Frame  : 300mm f/2.8, 400mm f/4, 1.4x Teleconverter, 2x Teleconverter, 100-400mm f/5.6

Crop Sensor : As above, plus 75-300mm f/4

At higher magnification depth of field becomes shallower so your cameras ability to handle higher ISOs without falling apart will define the lens speed mostly, although faster lenses pass more light and so autofocus performance is always better with a faster lens

Birds and Distant Wildlife

This is the realm of go big or don't bother (unless your name is Moose, or Doug or Claude - all of whom are amazing Bird photographers).  The longer and faster the lens the better.  This is also the realm of building a relationship with a lens rental house because unless you qualify as stupefyingly rich, glass in this space costs  like a small car.

Full Frame and Crop Sensor : 100-400mm f/5.6, 400mm f/4, 500mm f/4, 600mm f/4, 800mm f/5.6, 1.4x Teleconverter, 2x Teleconverter

Choose a body that can handle higher ISOs with ease.  The combination of weight and dropping lens speed coupled with the need for higher shutter speeds even when on a tripod or monopod means you will be into the high ISOs and lower grade sensors will enter the mush zone.

Macro Photography

Close up work changes things as all true Macro lenses give the same level of magnification, and the only thing that really differs is the distance between the front element and the subject.  True macro most often means a tripod and very shallow depth of field while focusing so I also recommend a micro-focus rail for this purpose.  Macro lenses start as short as 40mm although I have little use for any macro shorter than 100mm and prefer the longer 180mm personally.  Lens speed is usually in the f/2.8 to f/3.5 range needed for light gathering to make the AF really efficient, although you may find yourself moving to manual focus as you shoot more.

Full Frame and Crop Sensor : 180mm f/3.5, 100mm f/2.8

So that's it.  Your guide to the "Right" lens.  Other folks will have different opinions, and these are mine formed after being a photographer for over three decades.  Doesn't make me "right" but it does offer some perspective.

Tips to Make Better Photos : Shooting Hockey

Shooting sports is not my forte.  I shot soccer and football a million years ago in High School and have been shooting Polo for a couple of seasons.  My friend Susan's son plays in the OJHL for the Aurora Tigers and I went out once last year to provide her some coaching support.  This year was busy but I've been pushing to make time to attend local games.  We're into the Quarter Finals of the OJHL playoffs and the action is great! 1Dx_NmktWhitby_-003020130303-156

What I love about OJHL hockey is that the young players are really committed to the game and are NEVER going through the motions.  I actually prefer this hockey to the NHL, but that's my choice.  I can attend a lot of games at a very fair admittance price, get very close to the ice and shoot like a mad fool without being in the way of the other spectators.  I have the good fortune of being able to attend local team's games as both the Newmarket Hurricanes' and the Aurora Tigers' home ice is reasonably close.

1Dx_NmktWhitby_-003020130303-354These shots are from a recent game between the Newmarket Hurricanes and the Whitby Fury.  I thought it might be interesting to share some of the things I have learned the hard way about shooting hockey.  First, you have to know the game, at least to some extent.  I surely don't know the ins and outs of hockey as well as my wife does, but well enough to set up for shots and to be continuously learning to anticipate where the puck will be, to paraphrase the Great One.

1Dx_NmktWhitby_-003020130303-73

So to get started, one of the first things I learned is that the lighting in Junior hockey arenas is pretty horrible.  It looks ok (mostly) to the eye but is a mess of colour temperature.  In the Ray Twinney Centre in Newmarket, my friend Brian Watts, who shoots hockey professionally, warned me of the "red" corners.  The ice looked fine to me live but once I downloaded the photos the span of white balance was all over the place.  I have tried arriving early to do a custom white balance but that didn't work out well because of the amount of variance so now I shoot AWB and correct in post.  The other thing about the lighting is that it is dimmer than you think it is.  I've shot everywhere between ISO 800 and ISO 2500 and now go in with the ISO set to 2500 and live with slighter reduced tonal range and nominal noise.  This is one place where the low light capability of the 1Dx blows me away.

1Dx_NmktWhitby_-003020130303-79My shooting kit for hockey is as follows;

  • Canon 1Dx in Av, ISO2500 EV, +1 2/3, Focus Tracking in Mode 6, AI Servo, Evaluative Metering
  • Sigma 120-300/2.8 lens either wide open or f/4 and RRS lens plate
  • Gitzo 3551 Carbon Fibre Monopod with RRS MH-02 Head
  • Black Rapid HD Sling Strap

That's pretty much it.  If I want "environmental" images, I put my Leica M9 with Zeiss 35/2 in my coat pocket.  As much as I love the Leica, rangefinders aren't optimal for sports and the high ISO performance need in hockey rinks isn't wonderful.

eos_1dx_03The 1Dx has Canon's new case based focus tracking module and I've tried all the different cases to shoot hockey.  The 5D Mark III has a similar system and I find that Case 6 for subjects that are fast moving and change direction erratically works well for shooting with the long glass.  I get a lot fewer missed shots because the AF is not transitioning in accordance with the game.  In this mode the AF works with me, not against me.  I can now say I understand why pro sports shooters love this camera.  In fairness most all semi-pro and pro level gear has focus tracking of some type built in, but I find the Canon system so fast and so easy to use, I love it.  I set a single focus point and follow the action, using the back focus button (AF-On) to enable the AF in advance so it's locked when I press the shutter.  Obviously I have the AF set to AI Servo mode.  I've tried spot, center weight and evaluative metering patterns and have gone back to evaluative.  It's not perfect but nothing in a hockey rink is neutral grey so my experiment with spot metering linked to the AF point produced a disproportionately high failure rate.

136_120-300mm_osThe Sigma lens is extremely sharp. There are Lightroom profiles for it and I give the Sigma folks credit for their design because the corrections are relatively small, the lens is that good out of the box.  The only downside to the Sigma is that it is big.  I mean really big.  I'm no tiny guy, but if I had to handhold this glass for a full period, I'd need a chiropractor, a sports masseuse and bed rest.  So I go with the Gitzo monopod and the Really Right Stuff MH-02 Monopod head.  This head is AWESOME.  It offers a smooth moving tile mechanism so I can loosen it off and have smooth but not sloppy tilting while panning with my body.  This is a new monopod head for me and I'm looking forward to the coming MH02LRPolo season as it will help a lot.  By mounting a Really Right Stuff plate on the lens foot, I can have the foot in the LR clamp on the monopod and leave the Black Rapid strap with the Really Right Stuff FAB adapter attached at the same time.  Very handy and very secure.


From a shooting perspective, I find arriving early at the arena and surveying potential shooting locations is critical.  Most town arenas have pretty beaten up glass and shooting through it isn't optimal.  You want to be close enough so you aren't cropping out 80% of the shot but also high enough so you aren't shooting partially through the glass.  I can shoot manual but find that Aperture preferred works well for me.  I set the lens at f/2.8 or f/4, depending on the available light and find in most arenas that with an ISO of 2500, I will get shutter speeds above 1/500 of a second.  Yes the lens has optical stabilization and yes I am using a monopod but that doesn't change the fact that hockey moves FAST.  In the sample pictures, I am able to mostly freeze the players yet in most cases, the puck is still blurred.  I like this as it conveys the sense of action.  You'll also note that by default I dial in +1 2/3 stops of exposure compensation to keep the whites from going grey.  I tried just dialing in +2 but I kept running into situations at certain points on the rink where the shot just blows right out.   I can add the 1/3 stop in post processing but if the important stuff gets blown out completely, there's no bringing it back.

Hockey is a blast to shoot.  I'm starting to wonder what sport I will shoot when the season is over other than Polo.  Junior hockey is a professional league and the OJHL is very supportive of photographers (no selling of images is the major rule).  Many other sports leagues are very protective of photographic rights or are against photography at all where youngsters are playing.  If your child is playing, it may be easier for you.

I'm hopeful that both my local teams go all the way.  They have a wonderful rivalry and it would mean plenty of games for me to shoot before season's end.  Many of the players I have photographed this year are going away to school on hockey scholarships next year, so we'll see a new group of players in the 2013-2014 season.  If you want to learn to shoot hockey, your local teams are a great place to go shoot and you'll be supporting your local community.

1Dx_NmktWhitby_-003020130303-272


Tips to Make Better Images : Taking or Making

I admit to being a bit pedantic about this, but there is a substantial difference between taking a picture and making a photograph.  Thats not to say that there is anything wrong with taking pictures but the real joy and differentiation comes when you make a photograph. Youre driving along and see something that grabs your eye.  You pull over and take a few shots with your smartphone and get back to the driving.  Youre sitting at home and the cat does something amusing.  You grab the camera and snap some shots before it bores of you and ambles off to sleep.  Your child comes out of her bedroom with a sleepy face, mussed hair, thumb in mouth and shes just so cute you hit the burst mode to capture this moment in time.  These are all great pictures, fun to share with family, friends and social networks if you go that way.

At another time you decide to make a photograph of a friend.  Before you shoot, you mentally visualize the final image.  You think about light and shadow.  You consider the dimensionality of the image.  You think about the background, and make a decision to throw it out of focus by using shallow depth of field, and check to make sure that it wont create distractions.  You meter carefully to position yourself to maximize soft light and reduce contrast in your friends face.  You make sure that there wont be anything growing out of her head.  You look for wrinkles in the clothing, you have her press her chin forward to streamline her neck and you make sure that her eyes arent buried in shadow.  You tighten up your composition to fill the frame and place her face into a pleasing arrangement.  You decide that a bit of fill flash will help fill shadows under the eyebrows and under the chin, so you add your flash and diffuser and watch that they dont create shadows in opposition to the existing light.  As you press the shutter you watch for an expression that creates a framework for the viewer to create his or her own story.

If the last scenario sounds like a lot more work than the first three, you are correct.  Its the difference between making a photograph and taking pictures.  Both are valuable, both have reason to exist but its the last one that will help you grow as a photographer.  Im not ever going to advocate a 365 anything as I find them to go mechanical very quickly.  What I do encourage you to do is to challenge yourself to make photographs regularly.  Every photograph doesnt have to be museum grade, every photograph does not need to be a saleable item.  While many of our mentors derive all their income from photography, many of us do this for the fun and joy of having and investing in a creative pursuit.  The only viewer you have to please is you, and if part of that pleasure is learning what does and does not work, youre winning.

Tips to Make Better Images : The Roll Film Exercise

1Dx_1010-002120130130-3.jpg

I was recently a guest with friends on their weekly webcast called Daytripper Webtalk.

The primary subject was the value of structured photographic exercises.  We all tried the 10 x10, basically 20 images within the same 10 foot square space, although I messed up thinking it was a 10 inch square space.  Simple gear, no post processing.  Darren and Bryan really focused on seeing everyday things differently, Gabriel took a childs eye view and I tried for a theme of like pairs.

In my case I limited myself to the camera, 100mm lens, on camera flash and a plain black background.  As part of my constructed theme my right hand or portion thereof had to be in each frame.  I tried to find like pairs of things to put in the sequence such as pencil and pen, memory card and film box and fork and spoon.  Coming up with ten pair of like items, shooting them and pushing them out as JPEGs in the span of an hour was a bit challenging.  I found the images I created to be contrived and there was really nothing there I will keep or print, although I did get some ideas for things to do as individual stills.  The real issue I have is that a photograph should set the stage for the viewer to create a story around it, and the slideshow motif really took away from that although a couple of the individual images could be a starting point for more serious work.

The primary outcome of the assignment was to determine if fixed exercises can be beneficial.  We all concluded that they do, if they help you get your head outside of the box.  Each host plus me as guest offered up suggested exercises.  Mine is as follows;

Pick a location and a time.  Limit yourself to a timeslot to capture images.  Now you go to the location and may click the shutter twelve times for twelve images.  No more no less.  Get it right in the camera, because while you will have post processing available, the goal is not to do exposure, white balance, or serious cropping in post.  When I was starting out and shooting roll film this was a very popular exercise to force the photographer to look for and see the images because we could only get 12 shots on a roll of 120 film, although those shooting 645 could get fifteen.  Working with a twin lens reflex at the time, the square format was also a different way of composing that I really enjoyed.

The roll film exercise is a good one.  It creates constraints in multiple vectors and really does help you see

Model Releases, Copyright and Where to Learn More

Last week, the Canadian government changed the Copyright Act to ensure that the copyright to work produced by a photographer is the same as for any other artist.  Simply, you retain your copyright whether you do the work for yourself or are commissioned to do so.  In the past, being prior to November 7, 2012, commissioned work became the property of the commissioning agency unless specifically excluded by contract.  Well done Canada! I regularly listen to Frederick van Johnson who hosts the This Week in Photo podcast.  Like any podcast, some episodes are more interesting than others depending upon what you are looking for.  A recent episode featured Mr. Jack Reznicki and Mr. Ed Greenberg of TheCopyrightZone.com and their critical book, The Photographer's Survival Manual.  (Link to purchase this book at the bottom of the post)

Even though I own the book and recommend it to students, repetition is the mother of skill and so I learn something whenever I listen to these gentlemen.  What was my learning this time?

Electronic model releases may not stand up in court because electronic documents can be edited.

I have looked at, and purchased, electronic model release systems for the iPad, and liked the one from the American Society of Media Photographers very much.  (Others left me underwhelmed).  Until Mr. Reznicki and Mr. Greenberg did their little role play, I missed completely how an electronic release could be challenged in court.  Paper is the way to go.  Listen to the episode of TWIP here.

Support The Photo Video Guy by purchasing the book from Amazon through this link.

[iframe][/iframe]

VIDEO : Introducing Canon's Radio Remote Flash System

I've just made available this new video that introduces Canon's 600 EX-RT flash and ST-E3-RT flash controller. The new radio system is a significant departure so I explain the infrared history of Canon remote flash, where the new system is compatible and where it is not, and offer a comparison to the well known Pocket Wizard radio controllers for eTTL flash. [iframe][/iframe]

VIDEO : Introduction to Macro Photography

Orchid-Canon-180-Macro.jpg

In this video, I introduce viewers to macro photography, discussing concepts, equipment, lighting, exposure techniques and supplemental tips.  I close with some ideas to encourage viewers to make macro photographs quickly and with plenty of learning opportunities. [iframe]<iframe width="640" height="360" src="http://www.youtube.com/embed/2fyHsoHbHlA?rel=0" frameborder="0" allowfullscreen></iframe>[/iframe]

VIDEO : Introduction to Night Photography

I recently prepared a class to help people get started on Night Photography.  Response was very positive so I am including it here for anyone to watch.  


I would also like to recommend Lance Keimig's book as a terrific resource for Night Photographers.  You can support the site by buying it through the Amazon link here.


Light It Magazine Issues 2 and 3 now available

Great news!  There are now more issues of the awesome Light It magazine for the iPad now available with Issue 4 to follow by year end.  For those who got excited by the superb first issue and then wondered what happened, there was a delay in getting the app approved by Apple, but that's all done now and the issues are available.  At $2.99 an issue, I'm not sure there is a better and more beautifully constructed way to learn about lighting.

If you don't have the app, go get it.  If you don't have an iPad, now you have a great reason to get one and to call it "education expense".


Day in Review : Photoshop Power User's Tour Toronto with Dave Cross

Yesterday was my first visit to one of the KelbyLive seminars and with a single exception it was superb.  I credit the Kelby team for keeping to the timeline, staying on track and delivering exactly what they committed to deliver.  Some felt that they did not get what they expected, however, rereading the ad after the fact, Mr. Cross in fact delivered the goods. He was interesting, his topics useful and he kept the day upbeat.  He took time to credit Adobe for great things and to knife them frequently for awkwardly named items and buttons and regularly chastised them for their intent to make features "discoverable".   I am no Photoshop expert, but I would not use the adjective "discoverable" either, finding "obtuse" and "concealed" far more accurate.  Those bits aside, it was reinforced that the product I have been a licensee of for years has much more depth than I have ever encountered.  As Mr. Cross pointed out, if one is self-taught on something new, one has an idiot for a teacher.  The number of topics covered was rich without being numbing and they weren't dumbed down to stuff quantity over quality.

Mr. Cross is both a consummate teacher and presenter.  The two don't always go together and the combination allows Mr. Cross to bond with his audience quickly.  There was always a lineup to ask questions on the breaks and to his credit, Mr. Cross answered clearly without rambling and was very clear when he did not know something, which to my observation only occurred when questions were raised about topics he forewarned he knew nothing about.

The audience was more heavily populated with design professionals over photographers in my observation.  Since I am a photographer with an acknowledged lack of design training, this concerned me at first but every topic was consumable by me, and only one, that of "Type" was not completely new.  I suspect that this was not consistent for all attendees, but feedback on the escalators heading out was unanimously positive.

The venue was a large room, but was still oversubscribed, with good temps, lighting and audio.  One guest complained to me that she could not hear Mr. Cross, but that was due to a severe case of "repeat what Dave said" or yell "yes" Turrets syndrome infecting the person sitting beside her.  Duct tape should be available to silence those who cannot shut up.

My only complaint is around the venue.  Kelby could have let everyone know which building of the Convention Centre the session was being held in.  This would have simplified entry and egress for those attendees who could not take public transit to attend.  In fact, as much as I enjoyed the session, I'm not sure I would attend another one if held at the Toronto Convention Centre.  Toronto roads are consistently plugged solid with traffic, road repair, illegal parking, horrible drivers, delivery trucks and the like.  My drive to the centre is 45 kilometres one way but it took 2 hours to get there in the morning and over 2.5 hours to get home at night.  I would also recommend starting at 0930 instead of 1000 and ending at 1630 instead of 1700 to ease some of the traffic pain.

Should you have opportunity to attend a KelbyLive session, I would heartily recommend it even given my limited sample.  Do be aware of any challenges to get to the venue and be very planful in that regard.  I suspect that they choose venues close to public transit but for out of towners, driving into a city core can be a major dampener on the day.

New iPad app from Kelby Training - Light It

I really get a lot out of my membership in the National Association of Photoshop Professionals (NAPP).  Today I received a release advising of a new iPad magazine and delivery application called Light It.  It is produced by Kelby Media Group, who are well respected for the quality of their materials and sessions.  The magazine focuses on, unsurprisingly, studio lighting and off camera flash.  Since we all hate red-eye and that horrible deer in xenon lights look that comes from on camera or in camera flash, this magazine looks like it will be really useful.

The first issue is free, and Mr. Kelby's dark sense of humour might appreciate that it's a bit like a heroin dealer, the first taste is free.  Kelby Media Group produces excellent content that is not only informative but visually rich and the first issue of Light It delivers on the promise.

Yes you do need an iPad to use the magazine but if you are a photographer and don't yet have an iPad, here's another substantive reason to get one.  I use mine for a multitude of purposes including backup of my memory cards in the field during a shoot, so there's another justification.

The layout of the magazine is clean and elegant, the content is rich and instantly usable and I'm very excited to find this resource.  I've focused on the articles and have not yet determined how future issues will be delivered or what the cost will be, but given my positive experiences with NAPP and Kelby Training, I'm pretty confident it will be a great value.  Perhaps they will use the Newstand functionality that is coming in IOS5.

Take a look, I think you'll be impressed.

Peace.

Ross