Episode 79 - The Photo Video Guy Podcast

Nikon DF prue photography November 5.  Nikon testing OX X 10.9 software compatibility.Nikon 18-140 is a good performer according to DP Review.  Canon releases Q3 results, profits and net sales up Y/Y.  Imaging expectations reduced due to drop in P/S sales.  Canon updates the firmware on the 5D Mk III.  Will there be an M2 on Nov 10th?  Next generation 1D in late 2014?  More rumours on 7D Mk II.  Canon 55-250 STM better choice than EF-S 55-250.  Lumia goes RAW on 1020.  DxO Optics Pro 9 released.  Aperture 3.5 has Smugmug support and icloud photo sharing.

Q&A : Getting Started with Studio Lights - LED or Flash

Kaley writes... "I love taking pictures and I'm good with animals so I thought I would start taking pictures of pets for people, so they could have nice pictures on their computers or even get prints made.  My camera has a popup flash but it always gives red eyes and the pictures don't look nice.  I saw on YouTube that professionals use studio lights.  I didn't get what the guy was saying and I don't have a lot of money to spend because I am starting out.  The guy at "local store" told me to get a flash setup, but by the time he was done it was like a thousand dollars and really heavy.  I left and went back a couple of days later and a different person told me just to use LED video lights because they won't scare the pets.  That made sense but when he showed me some, the shadows were really deep and I don't think the pictures would look good.  They were really expensive too.  I want to see if I can make money at this, not spend a lot of money.  What do you think?"

This is a really good question that Kaley is asking, and very timely because continuous lighting has come a very long way.

To start, we are really talking about the difference between flash and continuous light.  Flash brings lots of power and you can add modifiers pretty easily to soften the light.  While a flash meter is ideal, with digital you can bang away for a few shots until you get the exposure you like.  Continuous light has less power, usually a lot less power, but has the wonderful advantage that you can see what the light looks like right through the viewfinder or on the LCD and your reflected light meter in your camera is going to get the exposure pretty close to ideal without any guesswork.

I want to stick to low cost options since that is a key deliverable for Kaley.  Pets can be, and often are, startled by the big pop of a flash unit.  Cats in particular have very sensitive eyes, and since most cats keep people around as a source for food only, they are just like super models and tend to disappear when annoyed.  Dogs are better with flash in general, and that's about where my experience photographing pets ends.

In the flash world, you need a couple of hot shoe flash units of decent but not blinding power, a couple of modifiers, stands and clamps.  If your camera can control the external flashes using the popup (many Nikons support the Creative Lighting System and many Canons support Canon's flash control system) then you can control the two flashes from the camera and use the vendor's TTL for through the lens flash metering.  Consumer level DSLRs and many Compact System Cameras cannot do this, so then you need to experiment with the flashes on manual and using slaves and triggers to get the flashes to fire.  If this sounds complicated, it actually is until you've practiced a bit.

For Kaley's purpose and in many cases for people as well, I am really liking using continuous lighting systems.  They're easy to set up and the entry kits come very complete.  Something like the Erin Manning kit sold widely has two softboxes, two stands, ErinManningKittwo lamp holders and two big 5500K daylight compact fluorescents.  They run cool and last a really long time.  Setting up is no harder than flash but you get to good exposures very quickly if you are not a flash expert.  No worries about sync speeds and cabling and radio triggers and...ok I'm getting a headache.  Westcott just released the Skylite which is a continuous LED light that takes Bowens modifiers and is pretty soft out of the box.  It has power control and is really nice but it's price is about four times what it should be.  For pets and a couple of people, the Erin Manning kit is ideal.  The only downside is that despite being like 500w lamps in brightness, the bulbs don't put out anywhere near the power that a big flash will.  Move the lights in as close as you can without being in frame and use a mid ISO like ISO 400.  This will give you enough depth of field and decent shutter speeds.  Today's continuous lights do not get very hot and they last a long time.  You can get started for around $400 for a kit such as I describe.

It is possible to use the sort of multi-LED portable video lights that are on the market but they tend to be small and don't have diffusers so the light tends to be harsh.  Some people put a plain white shower curtain in front of them to soften and spread the light.  It works surprisingly well, but the shower curtain can be awkward.  Direct video lights are not that good for portraits and may annoy animals.

Kaley did not mention it but she will need some kind of a background for the shots.  There are all kinds of background stand kits you can get that work well.  Animals are one of those situations where you will need the background to flow from behind onto the floor.  There are painted and dyed muslins that you can get pretty cheap, but the dyes tend to run and the material is a wrinkle fest.  Paper rolls tend to work better, since you can just tear off anything that gets wrecked.  And it will get wrecked.  Covered in hair, scratches, "accidents", paper is cheap.  Go with a neutral background so as not to take attention away from the subject and fill the frame.  Savage has recently released some very neat "floor" backgrounds that could work since the pet tends to be lying or sitting down on something.  Cats may sit on stools, dogs may not.

That's about it.  If you are looking for quick and relatively inexpensive, it's pretty hard to beat simple continuous lighting systems.  Thanks for reading.

Send your questions in via email.

Q&A : Neutral Density Filters

HelioVariND-e1382823410626.jpg

Did something happen to create a rush on ND filters?  As I was preparing this post, I got a couple of other questions on the same topic.  So for the three folks who wrote in, I am going to summarize your questions and try to answer them in a single post.

  1. Why would I need to add a filter to my lens, can't I do this when editing my pictures?
  2. Why would I want a filter to make my pictures blurry?  I thought it was going to make the shutter open longer, but the sales guy said it would make the water blurry.
  3. I have seen lots of fall pictures with leaves and rivers and rocks and the water looks really smooth and like it's moving but everything else is sharp.  How do I do this?

Well I'd be happy to believe that folks could get good advice in any photo retailer, but I know better.  Let's start with what a Neutral Density (ND) filter is.

HelioVariNDA neutral density filter, and I will refer to them as ND filters henceforth, is a filter that reduces the amount of light passing through the lens to the sensor.  Neutral means that there is no colour shift or colour filtration being applied.  ND filters come as either full, meaning the same level of light reduction is applied across the entire filter or as graduated filters that have a range from no filtration to the full effect over some span.  I won't spend time on graduates here, the conversation will stick to full coverage NDs.

Some vendors calibrate their ND filters in stops, for example, 1 stop or 3 stop filters.  Others refer to them as nn x where the nn is a number.  This is perhaps photographically correct but is user unfriendly.  So here's the simple math.  For every 0.3x of filtration that's one stop.  So a 0.6x ND filter cuts the light by two stops.  Now you can be immune to bafflegab.

ND filters are created a couple of ways.  In a popular method, the glass that the filter is cut from has a dye injected while molten.  In another case, a foil overlay is applied to the filter glass.  In the case of Tiffen filters, a Wratten optical gel is sandwiched between two pieces of optical glass to form a laminate.  Because the colour controls in Wratten filters are long proven, and because Tiffen uses proper optical glass, they can be a very cost effective route for ND filters.  Avoid the foil overlay type.  You'll know because they will be very cheap.  Spray painting a UV filter with grey transparent paint gives about the same effect and the same lack of quality.  If you go for the dyed glass model, have your check book ready because then you want top line glass to ensure consistency of the dye base.  This means either Schott or Schneider glass such as the filters from Heliopan or B+W.  For your own sake, stick with one of the three named vendors.

There is a special class of ND filters called Variable Neutral Density filters.  Variables are not made the same way.  They are two polarizing type filters, one mounted in a fixed ring and one in a rotating ring.  As you rotate the front filter, the twin polarizing filters act to cut or pass light.  Variables are incredibly handy because they typically cut light across a range of up to 6 stops, often from two stops to eight stops.  Variables are very demanding optical units.  The Heliopan units are the best out there, although I have used the Tiffen ones extensively and can recommend the Singh-Ray units as well.  B+W also do variables but they are harder to find it seems.

More troubling are the stunning array of craptastic variables that cost less than the price of a single decent polarizer.  These filters have no coatings and because the polarizing film being used is of such poor quality, they produce horrible amounts of moire (an optical interference pattern, click here for a full definition) and also apply a colour cast, usually akin to rotted meat green.  Don't waste your hard earned money on this junk.

So to the questions...

You cannot slow down the shutter speed to create motion effects after the shot is made, claims by post-processing software vendors notwithstanding.  In fact other than a UV and a Polarizer, an ND set or ND Variable is the only filter you need in your kit.  Be aware that if you use a strong ND filter, your autofocus system will throw its virtual hands in the air, so you are in manual focus mode pretty quickly.  Some people like variables because they can use AF with a low setting, lock the focus and then dial up the light cut.

ND filters do not make pictures blurry.  That's the job of the photographer.  However, strong NDs may cut the light so much that to use one without a tripod will result in blur.  Typically we use ND filters to allow for slower shutter speeds in bright light so we can capture the sense of motion, such as in a waterfall or fast moving river.  BTW, if you normally live in AUTO-ISO mode, this is when you want to stop that.  To get slower shutter speeds you want lower ISOs, so pick a low ISO and then determine how much ND cut you want.  You can also use ND filters to allow for shallow depth of field in bright light.  For example, at ISO 100 in bright sun, your shutter speed would be 1/125 at f/16.  If you wanted to shoot at f/1.4 you would need to move your shutter speed to 1/16000 of a second.  Oops, not going to happen.  Add a three stop ND and now your shutter speed only has to move to 1/2000.

If you are shooting video, which typically uses a higher base ISO, ND filters can help you significantly to get good exposures on really bright days or to allow for wider apertures where you want to control depth of focus.  All professional and some consumer grade video cameras incorporate ND filters.  Digital ND is the cheap solution, the higher end kit moves a physical filter in front of the sensor for better image quality.

To get that beautiful creamy water, you need long shutter speeds, and you won't get 30s exposures in daylight.  Adding a 6 stop ND to a less that stops down to f/32 in our above example would get you to a two second exposure even in bright sun, and if the water is moving quickly enough you will have nice motion effect.  If the day is overcast, you could get to 15 seconds.  Nice and creamy.

If you want to really stop the light for really long shutter speeds in bright light, there is an answer from the Lee Filter company.  Lee is best known for superlative gel filters, but they do a line of rigid ND filters that are excellent.  The Big Stopper cuts a full 10 stops of light.  It slides into a lens mounted filter holder because a) your camera cannot focus when it's in place and b) you can't see anything through the viewfinder when it's in place.  It's whole job is long shutter speeds.  It's not an inexpensive option but it works brilliantly and is available to fit most all lenses, including those with big curved front elements like Nikon's brilliant 14-24/2.8.

If you take your photography seriously, at some point you will realize that you need an ND filter.  Or two.  Or a variable.  Also remember that in the absence of directional light, your polarizer is also an effective 2 stop ND, so you are probably already on your way.

Finally some sales people advocate stacking ND filters to cut more light.  Don't.  This is last resort, really.  If you find yourself wanting ND filters, you want them to cut light so go big, 3 stops at the minimum.

Until next time, thanks for reading.

The Photo Video Guy Podcast - Episode 78

Leica releases firmware upgrades for the S, S2 and M.  Nikon releases the D5300.  The D610 us spot free (so far).  Nikon sues Sakar for patent infringement.  Nikon releases the 58/1.4G lens for full frames.  Sigma announces the 24-105/4 ART.  Sony releases the RX-10, the A7 and the A7R and announces new FE lens lineup.  Fuji release the X-E2 and XQ1 and shows some love for the older X100 with new firmware.  Panasonic releases the palm sized Lumix GM-1 MILC and 12-32mm lens.

Recommended : The Grid October 17, 2013

I'm all over the place regarding The Grid.  Sometimes an episode is just fawning dreck, sometimes they just destroy aspiring photographers, and then there are the other times, in fairness - the majority, where they just hit it out of the park. If you've stopped doing HDR because seeing HDRs often makes your eyes hurt, tune in to Episode 117.  The segment on How Not to Hate HDR is extremely well done and worth watching.  Like many people, I have sinned in HDR and produced some truly nauseating offences, including halos, black clouds, HDR where it shouldn't be, HDRs in the worst kind of light and other crap.  I don't publish them, because they suck.  But there are photographers who think HDR is the cure for a lousy image.  The list of things not to do, or to do only when you are absolutely sure is very helpful.  They also show some decent HDRs from RC Concepcion that show how you can sometimes break the rules and get a nice image.  HDR processing is highly subjective, but in this case, I have to say that the list presented is an excellent set of guidelines to leverage.

The first part of the episode deals with the recent plagiarism scandal regarding Jasmine Starr and others.  Scott's presentation is balanced and reasonable and worth a listen.  Because a photographer screws up (and the people involved, screwed up big) does not immediately mean that the individual is a failure as a photographer, or is an evil entity.  They were stupid.  Evisceration is a bit over the top.

Watch the grid on the web at http://kelbytv.com/thegrid/

First Look - Panasonic Lumix GX-7

gx7 The GX-7 is the latest in the Lumix family of M4/3 interchangeable lens mirror less cameras, or as I prefer to refer to them, "cameras".  Seriously, we can stop the whole mirror less vs DSLR crap ok?

LumixGX7-019Quickly, it is a 16MP micro four thirds architecture using the standard M43 mount for lenses.  The LCD is 3" and has 1040K dots for great viewing.  Of course it does video, I'm pretty sure that if you buy a hamster today it does 1080p video.  The camera is WiFi capable and also supports NFC with capable devices.  The body comes in either black or silver.  Panasonic makes a big deal of the Venus processing engine that has superior noise management for improved low light shots.  In my own AUTO ISO test, ISO floats to 3200 still produced really nice images.

LumixGX7-008The GX-7 is like many other cameras of the type.  It's compact, takes great lenses and is really targeted at the more serious photographer.  That's not to say you cannot shoot the camera in P all the time, but you don't have to.  Moreover the choices are not cluttered with a bunch of "picture styles".   Relax there are photo styles, but not in the way.  I shot the camera predominantly in Aperture preferred, using AUTO ISO as well as specific settings for ISO.  I used a number of different lenses on the camera including the Olympus 17/2.8, the Sigma 30/2.8, the Sigma 60/2.8, the Olympus 9-18 and the Olympus 14-150/4.5-5.6.  I had some extra time at the store where I work part time so did my first look there.

The camera uses SD cards and is powered by a Lithium ion battery.  While there were Lumix lenses in the store, I just don't care for the Lumix power zoom or the 14-42.

LumixGX7-024In addition to a very bright and sharp rear LCD that tilts up and down, there is an EVF to the left rear that also tilts.  The EVF has a diopter adjustment hidden on the bottom to adjust for your own eyesight.  The EVF display is awesome with 2764K dot equivalency.  It's bright and easy on the eyes, plus the eye detection system works fast and accurately.

Light in the store was, well it was crappy, so the available shutter speeds even at high ISO were relatively slow.  I was very impressed by the in body stabilization because I typically cannot handhold a 300mm equivalent at 1/60s.  Images on the screen were sharp and easy to check.  Uploaded to Lightroom 5.2 the RAWs were read without problem and all the EXIF data came across.  There are no lens profile corrections at this moment for the combinations I used, but in general the lenses I tried were very good.  Colour balance was excellent even when switching lens brands.  Autofocus is super fast.  I was using my store test card, a 4GB Transcend piece of crap, and writing speed for RAW+JPEG was pretty slow.  I do not blame the camera, I blame the junk card.  When I get a long form test unit, I will use a proper card.

LumixGX7-022There is a built in transformer like articulating flash, but what is better and far more useful is the fully functional hot shoe.  You can use Lumix TTL flashes of course, but I would be more inclined to use a Pocket Wizard to fire real strobes.  The camera's small size makes it very fast to shoot.

The downside for me is that I have larger hands and while the body is very positively grippable, I found I was hitting the buttons and rocker with the base of my thumb when using the camera one handed.  The LCD is a touch screen and because I shoot left eyed, I not only got nose prints on the LCD, I also managed to activate the touch screen.  Not optimal.  Since this was a first look, I did not read the documentation to see if the sensitivity is adjustable.

I love the image quality, think that the camera is extremely usable and the EVF is brilliant.  I look forward to a longer term test but as it sits, after 20 minutes, I put the camera away and won't miss it.  The right side strap lug could not be in a worse place.  It interferes with the grip, it presses into your hand, and it makes using the camera awkward.  Seriously if this were my camera, I would find a way to remove the lug entirely and use a Black Rapid or Cotton Carrier strap screwed into the tripod socket.  It's such a good little camera that the discomfort of the stupid lug annoys me even to write about it.

If you have smaller hands, or less meaty hands and want a really superlative small, fast camera that has access to the pantheon of M4/3 lenses, take a look at the Lumix GX-7.  I think you'll be impressed.

The sample images contained here are the original RAW files, imported to Lightroom and exported as 80% JPEGs, 72 DPI, sharpened for screen.  No colour, WB or any other processing was done.  You can see that the camera produces really nice images, no muss, no fuss.

Full specifications courtesy Panasonic

DMC-GX7

TYPE Type 
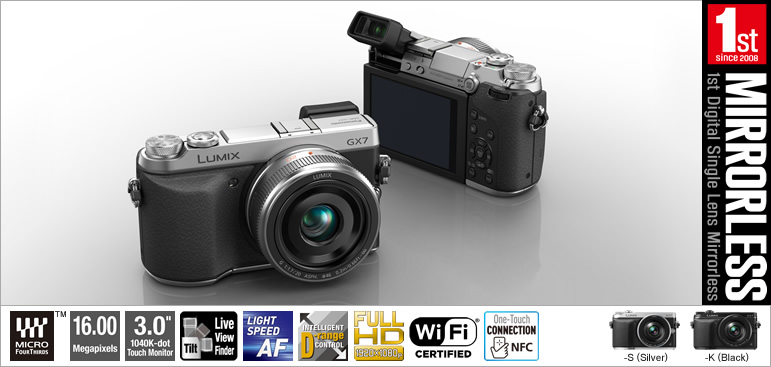
Digital Single Lens Mirrorless camera
Recording Media SD Memory Card, SDHC Memory Card, SDXC Memory Card (Compatible with UHS-I standard SDHC / SDXC Memory Cards)
Image Sensor Size 17.3 x 13.0 mm (in 4:3 aspect ratio)
Lens Mount Micro Four Thirds mount
IMAGE SENSOR Type Live MOS Sensor
Total Pixels 16.84 Megapixels
Camera Effective Pixels 16.00 Megapixels
Color Filter Primary color filter
Dust Reduction System Supersonic wave filter
IMAGE STABILIZATION SYSTEM Image Stabilization System Image Sensor Shift Type
RECORDING SYSTEM Recording File Format
Still Image: JPEG (DCF, Exif 2.3), RAW MPO (When attaching 3D lens in Micro Four Thirds System standard)
Motion Image: AVCHD (Audio format: Dolby Digital 2ch) / MP4 (Audio format AAC 2ch)
Aspect Ratio 4:3, 3:2, 16:9, 1:1
Image Quality RAW, RAW+Fine, RAW+Standard, Fine, Standard MPO+Fine, MPO+Standard (When attaching 3D lens in Micro Four Thirds System standard)
Color Space sRGB, Adobe RGB
File Size (Pixels) Still Image [4:3] 4,592 x 3,448 (L), 3,232 x 2,424 (M), 2,272 x 1,704 (S), 1,824 x 1,368 (When attaching 3D lens in Micro Four Thirds System standard) [3:2] 4,592 x 3,064 (L), 3,232 x 2,160 (M), 2,272 x 1,520 (S), 1,824 x 1,216 (When attaching 3D lens in Micro Four Thirds System standard) [16:9] 4,592 x 2,584 (L), 3,232 x 1,824(M), 1,920 x 1,080 (S), 1,824 x 1,024 (When attaching 3D lens in Micro Four Thirds System standard) [1:1] 3,424 x 3,424 (L), 2,416 x 2,416 (M), 1,712 x 1,712 (S), 1,712 x 1,712 (When attaching 3D lens in Micro Four Thirds System standard)
Motion Image* MP4 NTSC Area [Full HD] 1,920 x 1,080, 60fps (sensor output is 60p, 28Mbps) [Full HD] 1,920 x 1,080, 30fps (sensor output is 30p, 20Mbps) [HD] 1,280 x 720, 30fps (sensor output is 30p, 10Mbps) [VGA] 640 x 480, 30fps (sensor output is 30p, 4Mbps)
PAL Area [Full HD] 1,920 x 1,080, 50fps (sensor output is 50p, 28Mbps) [Full HD] 1,920 x 1,080, 25fps (sensor output is 25p, 20Mbps) [HD] 1,280 x 720, 25fps (sensor output is 25p, 10Mbps) [VGA] 640 x 480, 25fps (sensor output is 25p, 4Mbps)
AVCHD Progressive NTSC Area [Full HD] 1,920 x 1,080, 60fps (sensor output is 60p, 28 Mbps)
PAL Area [Full HD] 1,920 x 1,080, 50fps (sensor output is 50p, 28 Mbps)
AVCHD NTSC Area [Full HD] 1,920 x 1,080, 60i (sensor output is 60p, 17Mbps) [Full HD] 1,920 x 1,080, 60i (sensor output is 30p, 24Mbps) [Full HD] 1,920 x 1,080, 24p (sensor output is 24p, 24Mbps) [HD] 1,280 x 720, 60p (sensor output is 60p, 17Mbps)
PAL Area [Full HD] 1,920 x 1,080, 50i (sensor output is 50p, 17Mbps) [Full HD] 1,920 x 1,080, 50i (sensor output is 25p, 24Mbps) [Full HD] 1,920 x 1,080, 24p (sensor output is 24p, 24Mbps) [HD] 1,280 x 720, 50p (sensor output is 50p, 17Mbps)
Continuous Recordable Time (Motion Image)* AVCHD: Approx. 140 min with H-FS1442A / Approx. 130 min with H-H020A
Actual Recordable Time (Motion Image)* AVCHD: Approx. 70 min with H-FS1442A / Approx. 65 min with H-H020A
Flicker Reduction [1/50] [1/60] [1/100] [1/120] / OFF
Wi-Fi FUNCTION Wi-Fi IEEE 802.11b/g/n, 2412 MHz - 2462 MHz (11 ch), Wi-Fi / WPA / WPA2, Infrastructure mode
NFC ISO/IEC 18092, NFC-F (Passive Mode)
VIEWFINDER Type LCD Live View Finder (2,764,800 dots equivalent)
Tilting Yes
Field of View Approx. 100%
Magnification Approx. 1.39x / 0.7x (35 mm camera equivalent) with 50 mm lens at infinity; -1.0 m-1
Eye Point Approx. 17.5 mm from eyepiece lens
Diopter Adjustment -4.0 - +3.0 (dpt)
Eye Sensor Yes
Eye Sensor Adjustment High / Low
FOCUS Type Contrast AF system
Focus Mode AFS (Single) / AFF (Flexible) / AFC (Continuous) / MF
AF Mode Face detection / AF Tracking / 23-area-focusing / 1-area-focusing / Pinpoint
AF Detective Range EV -4 - 18 (ISO100 equivalent)
AF Assist Lamp YES
AF Lock Set the Fn button in custom menu to AF lock
Others Quick AF, Continuous AF (during motion image recording), AF+MF, Eye Sensor AF, Touch AF/AE Function, Touch Pad AF, Touch shutter, MF Assist, Touch MF Assist, One Shot AF
EXPOSURE CONTROL Light Metering System 1,728-zone multi-pattern sensing system
Light Metering Mode Multiple / Center Weighted / Spot
Metering Range EV 0 - 18 (F2.0 lens, ISO100 equivalent)
Exposure Mode Program AE / Aperture Priority AE / Shutter Priority AE / Manual
ISO Sensitivity (Standard Output Sensitivity) Auto / Intelligent ISO / 125 (Extended) / 200 / 400 / 800 / 1600 / 3200 / 6400 / 12800 / 25600 (Changeable to 1/3 EV step)
Exposure Compensation 1/3 EV Step, ±5 EV
AE Lock Set the Fn button in custom menu to AE lock
AE Bracket 3, 5, 7 frames, in 1/3, 2/3 or 1 EV Step, ±3 EV
WHITE BALANCE White Balance Auto / Daylight / Cloudy / Shade / Incandescent / Flash / White Set 1, 2 / Color temperature setting
White Balance Adjustment Blue/amber bias, Magenta/green bias
Color Temperature Setting 2,500 K - 10,000 K in 100 K
White Balance Bracket 3 exposures in blue/amber axis or in magenta/green axis
SHUTTER Type Focal-plane shutter
Shutter Speed Still Images: Bulb (Max. 120 seconds), 1/8,000 - 60 Motion Images: 1/16,000 - 1/25 (NTSC area / PAL area)
Self Timer 10 sec, 3 images / 2 sec / 10 sec
SCENE GUIDE Still Image Clear Portrait / Silky Skin / Backlit Softness / Clear in Backlight / Relaxing Tone / Sweet Child's Face / Distinct Scenery / Bright Blue Sky / Romantic Sunset Glow / Vivid Sunset Glow / Glistening Water / Clear Nightscape / Cool Night Sky / Warm Glowing Nightscape / Artistic Nightscape / Glittering Illuminations / Clear Night Portrait / Soft Image of a Flower / Appetizing Food / Cute Dessert / Freeze Animal Motion / Clear Sports Shot / Monochrome / Panorama
Motion Image Clear Portrait / Silky Skin / Backlit Softness / Clear in Backlight / Relaxing Tone / Sweet Child's Face / Distinct Scenery / Bright Blue Sky / Romantic Sunset Glow / Vivid Sunset Glow / Clear Nightscape / Cool Night Sky / Warm Glowing Nightscape / Artistic Nightscape / Clear Night Portrait / Appetizing Food / Cute Dessert / Freeze Animal Motion / Clear Sports Shot / Monochrome
BURST SHOOTING Burst Speed Mechanical shutter: H: 5.0 frames/sec (with AFS), 4.3 frames/sec (with AFC, In 1-area-focusing AF mode), M: 4.0 frames/sec (with Live View), L: 2.0 frames/sec (with Live View) Electronic shutter: SH: 40.0 frames/sec, H: 10.0 frames/sec, M: 4.0 frames/sec (with Live View), L: 2.0 frames/sec (with Live View)
Number of Recordable Images 9 images (when there are RAW files with the particular speed) Unlimited consecutive shooting (when there are no RAW files) (depending on aspect ratio, memory card size, picture size, and the setting for the quality)
BUILT-IN-FLASH Type TTL Built-in-Flash, GN7.0 equivalent (ISO200 · m), GN5.0 equivalent (ISO100 · m), Built-in Pop-up
Flash Mode Auto, Auto / Red-eye Reduction, Forced On, Forced On / Red-eye Reduction, Slow Sync., Slow Sync. / Red-eye Reduction, Forced Off
Synchronization Speed Less than 1/320 second (Built-in Flash) Less than 1/250 second (External Flash)
Flash Synchronization 1st Curtain Sync., 2nd Curtain Sync.
MONITOR Type Tilt static LCD with touch monitor
Monitor Size 3.0 inch (7.5 cm) / 3:2 Aspect / Wide-viewing angle
Pixels Approx. 1,040K dots
Field of View Approx. 100%
Monitor Adjustment Brightness, Contrast and Saturation, Red tint, Blue tint
LIVE VIEW Digital Zoom 2x, 4x
Extra Tele Conversion Still Image: Max. 2x (Aspect ratio sets at 4:3. Not effective with L size recording. Magnification ratio depends on the recording pixels and aspect ratio.) Motion Image: 2.4x (FHD/60p, FHD/60i, FHD/30p, FHD/24p in NTSC area / FHD/50p, FHD/50i, FHD/25p, FHD/24p in PAL area), 3.6x (HD/60p, HD/30p in NTSC area / HD/50p, HD/25p in PAL area), 4.8x (VGA/30p in NTSC area / VGA/25p in PAL area)
Other Functions Guide Lines (3 patterns) Real-time Histogram
LEVEL GAUGE Yes
DIRECTION DETECTION FUNCTION Yes
FUNCTION BUTTON Fn1, Fn2, Fn3, Fn4, Fn5, Fn6, Fn7, Fn8, Fn9 Wi-Fi / Q.MENU / LVF/Monitor Switch / AF/AE LOCK / AF-ON / One Push AE / Touch AE / Preview / Level Gauge / Focus Area Set / Zoom Control / Photo Style / Aspect Ratio / Picture Size / Quality / Metering Mode / Highlight Shadow / i. Dynamic / i. Resolution / HDR / Electronic Shutter / Flash Mode / Ex. Tele Conv. / Digital Zoom / Stabilizer / Motion Pic. Set / Picture Mode / Silent Mode / AFS/AFF/AFC / Peaking / Histogram / Guide Line / Rec Area / Step Zoom / Zoom Speed / Sensitivity / White Balance / AF Mode / Drive Mode / Restore to Default
CREATIVE CONTROL Still Image Expressive / Retro / Old Days / High Key / Low Key / Sepia / Monochrome / Dynamic Monochrome / Rough Monochrome / Silky Monochrome / Impressive Art / High Dynamic / Cross Process / Toy Effect / Toy Pop / Bleach Bypass / Miniature Effect / Soft Focus / Fantasy / Star Filter / One Point Color / Sunshine
Motion Image Expressive / Retro / Old Days / High Key / Low Key / Sepia / Monochrome / Dynamic Monochrome / Impressive Art / High Dynamic / Cross Process / Toy Effect / Toy Pop / Bleach Bypass / Miniature Effect / Fantasy / One Point Color
CREATIVE VIDEO MODE Exposure Mode Program AE / Aperture-Priority / Sutter-Priority / Manual Exposure
PHOTO STYLE Still Image and Motion Image Standard / Vivid / Natural / Monochrome / Scenery / Portrait / Custom
PLAYBACK Playback Mode Normal playback, 30-thumbnail display, 12-thumbnail display, Calendar display, Zoomed playback (Max. 16x), Slideshow (duration & effect is selectable), Playback Mode (Normal / Picture / Video / 3D Play / Category / Favorite), Location Logging, Clear Retouch, Title Edit, Text Stamp, Video Divide, Time Lapse Video, Stop Motion Video, Resize, Cropping, Rotate, Favorite, Print Set, Protect, Face Recognition Edit
IMAGE PROTECTION / ERASE Protection Single / Multi, Cancel
Erase Single / Multi / All / Except Favorite
PRINT Direct Print PictBridge compatible
INTERFACE USB USB 2.0 High Speed Multi
HDMI mini HDMI TypeC / VIERA Link Video: Auto / 1080p / 1080i / 720p / 480p (576p in PAL system) Audio: Stereo
Audio Video Output Monaural Type, NTSC / PAL, NTSC only for North America * Check the website of the Panasonic sales company in your country or region for details on the products that are available in your market.
Remote Input φ2.5mm for remote
Microphone Stereo
Speaker Monaural
LANGUAGE OSD Language English, German, French, Italian, Spanish, Polish, Czech, Hungarian, Russian, Chinese (Traditional), Chinese (Simplified), Dutch, Thai, Korean, Turkish, Portuguese, Arabic, Persian, Japanese, Swedish, Danish, Finnish, Greek, Vietnamese * Check the website of Panasonic sales company in your country / region or ask customer support for details of the OSD language available on the products sold in your country / region.
POWER Battery Li-ion Battery Pack (7.2V, 1,025mAh) (Included) Battery Charger
Battery Life (CIPA Standard)** Approx. 350 images with H-FS1442A Approx. 320 images with H-H020A
DIMENSIONS / WEIGHT Dimensions (W x H x D) 122.60 x 70.7 x 54.6 mm / 4.83 x 2.78 x 2.15 inch
Weight Approx. 402 g / 0.89 lb (SD card, Battery, Body) Approx. 360 g / 0.79 lb (Body only) Approx. 489 g / 1.08 lb (SD card, Battery, H-H020A lens included) Approx. 512 g / 1.13 oz (SD card, Battery, H-FS1442A lens included)
OPERATING ENVIRONMENT Operating Temperature 0 °C to 40 °C (32 °F to 104 °F)
Operating Humidity 10%RH to 80%RH

The Photo Video Guy Podcast - Episode 77

Awesome food photographer Nicole Young is on The Grid this week on Kelby TV.  Zeiss releases manual focus 55/1.4 OTUS for only $4,000.  Ricoh releases Pentax K3 and weather sealed 55-300/4.5-5.8.  D610 is out and looks like a D600 with minor tweaks.  D5300 won't arrive until January.  Canon patents 35/1.4 L II.  Canon releases alert on LP-E6 battery issues.  Sigma to release a 24-105/4 full frame lens

ACDSEE Pro Mac 3 - Why would you bother?

I recently installed the 30 day trial of this software to try to help a friend out who was struggling with it. After the usual click forty thousand times to install routine, the product said it installed properly.  Like most programs that start out on the Windoze platform it wants to be the default application for everything, a very customer hostile move.  I declined since it was a) a trial and b) I am very happy with the tools I use that work properly.

I launched the application and navigated to a folder where photos are stored in their original form.  It looked like I would need to Import images (hate this), but when I clicked the Image button that was not an option.  Why show me a button I cannot use?

Not one single image could be opened in either View or Develop mode.  The application claimed that they were all locked or in a format that the application could not read.  And even though I cleared the checkbox to have ACDSEE Pro be the default for all images, it still set itself as such.  F*CKING PIECE OF CRAP.

I checked the help and it said this error could occur with RAW files if they were already open with another application.  Nope.  Wouldn't open JPEGs either.  Hell it wouldn't open file types it arbitrarily decided it should be the master of.  Otherwise Help was helpless.  I opened a ticket with support and the first email invited me to update my ticket.

Fired up Appzapper and completely removed this junk from my Mac.  To help my friend, I will tell him to get rid of this program and use a processing application that is a) Mac intelligent and b) not crap.

So if you are thinking about trying less expensive processing applications on your Mac, run do not walk past ACDSEE Pro 3.  I understand that the Windows version is very good.  I don't run Windows.  The Mac version is lousy.  Don't waste your time or money.

Q & A : Confused about what the 50mm lens is for

John wants to know what the 50mm lens is for.  A great question, and prompted by a ton of bafflegab as you'll see. "Hi.  My camera, a Nikon D3100 came with a 18-55 zoom lens.  My girlfriend and I were told by the salesman that this was a good all around lens, even though it was a kit lens.  He couldn't or wouldn't explain what that meant.  Then we started to see some advertising from Canon on a "portrait" lens and thought maybe we should get one since we take pictures of each other mostly.  We went back to the store, a big Canadian photo chain, and asked about this portrait lens.  The same salesman told us that a 50mm lens was essential to our success and that we should have one.  He pushed a Sigma 50mm lens at us, but the price was too high, nearly as much as our camera, so we bought a Nikon 50mm lens.  We had to bring it back because it would not autofocus on our D3100.  A different salesman said we bought the wrong lens, like it was our fault and then spent almost an hour talking about his photography and what he does.  We got a refund and then bought the right lens online because we figured these people weren't helping.

Sorry for the long email complaining, but we have the 50mm and cannot tell why we bought it.  Pictures look like the pictures from the 18-55 when we set it at 55.  When we ask other photographers we meet, they cannot seem to tell us why we need it either.  We feel like we were lied to.  What is this lens good for?  It is a Nikon AF-S 50MM F1.8 G lens.  Thanks, John."

Well hi John and let me say how sorry I am to hear you got such a runaround.  I work part time in a camera store (the same chain you mentioned, whose name I removed from your email) and I am really sorry to hear about your negative experience.  I know exactly why the Sigma was pushed at you, or can guess pretty well.  The Sigma is a great lens, well built and very sharp, but would be expensive compared to your D3100 kit.  There are often salesperson incentives called spiffs, basically cash, to encourage certain behaviours, and some salespeople will hurl their integrity into the breeze for $5.  Plainly you met one.

Your camera uses what the industry refers to as a crop sensor.  All that means is that the sensor is smaller than the original 35mm film negative size on which most SLR cameras were based.  Because the industry is often confused itself, this means that the 50mm lens that is optically designed to create an image big enough to cover the 24mm x 36mm of the original negative size, when you use a smaller sensor, you see less of the image circle. Does this hurt?  Not at all but it creates the illusion that the lens produces more magnification than it really does.  Why would you care?  You probably don't need to.  Short answer is that the 50mm lens has the look of a 75mm lens on film when used with a crop sensor.

Hence the first effort of mcmarketing.  Back in the days of film, "portrait lenses" were typically between focal lengths of 85mm and 105mm.  Even this is a silly argument because a good photographer can make a portrait with just about any focal length.  This focal length produces shallower depth of field, and a very nice and very subtle level of perspective compression that makes faces more pleasing.  This is completely subjective of course.

Canon decided to play a bit loose with terminology and refer to the 50mm as a portrait lens.  Which it can be, when used well, but they did this because on their crop sensor cameras, it looked like an 80mm would on film which is sort of close to 85mm and then the mcmarketing took over.

The lens you own has a very wide maximum aperture relative to your zoom lens capability. When shot wide open, at f/1.8 it produces very shallow depth of field, meaning not much of the picture is in focus, usually the area between the tip of the nose and the front of the ear on a filled frame shot.  The background is blurred creating nice separation, and this allows the marketing people to drag a mispronunciation of the Japanese word Bokeh into the fray.  Bokeh refers to the look of the out of focus area and is even more marketing abused than calling the 50mm a portrait lens.

The wide aperture of your lens will also pass more light wide open and may allow you to capture images at lower ISOs or without flash, a limitation of the relative optical slowness of the 18-55 lens.

BTW a kit lens means that the lens comes in a kit with the camera.  People who don't know what they are talking about often say that these lenses are poor quality.  Optically they are very good, however to keep manufacturing costs down, the use of metal in the lens body is minimized in favour of high density plastics.  For the most part this works very well but the lenses won't take the same amount of abuse as a "pro" lens costing 10x as much.  It is true that low cost lenses, kit or otherwise, may exhibit more distortions than a pro level lens, but if you are sharing your photos online or on your smartphone, you'll never see these distortions.  They only become obvious in large prints made from RAW and then edited images.

So don't worry about what you have.  You are absolutely right that the 50mm lens produces images that look like what you get from your 18-55 at 55mm.  In fact if you shoot with the 50mm lens at an aperture of f5.6 or smaller, they are going to be pretty much identical.  The advantages your 50mm bring you are as mentioned relevant in low light and wide aperture scenarios only.  Back in the days of film, it was said that a 50mm had the "look" of the human eye.  This is mostly true from a relative magnification perspective.  On a crop sensor camera it doesn't, but I don't think that this matters.  Make pictures that make you happy, using whatever tool you like.  The 50mm is a very good, optically fast lightweight lens.  It doesn't have the focal length flexibility of the zoom but will produce lovely images if you do your job.  Also film was one ISO only for the entire roll.  Today you can manipulate the ISO for every image and with good sensors, low light is less a problem than it used to be.

You have a good camera with good glass.  Go make images and have fun.  Feel free to write again if you have more questions or need information on other lens options.  Always remember that if you are in a store of any kind and you start to feel your personal BS detector begin to ping, you are probably right.

Later,  Ross

The Photo Video Guy Podcast - Episode 76

Nikon announces the D610 which is a D600 in a new logo.  Nikon updates Capture NX to 2.4.4 and files a patent for an interchangeable sensor.  Canon to release a new 18-300 EF-S and 50/1.4 EF.  Adobe Creative Cloud databased breached, 2.9M accounts stolen.  Adobe releases Photoshop Elements 12.  DxO releases Viewpoint 2.0.  Google+ gets better RAW to JPEG conversion.

Q&A : Why don't my images look the way they did on the camera screen?

There's no podcast this week, mostly because there was no news of interest this week.  There was however, the second question in the Q&A offering so here we go. Marco writes:

"I look at the back of the camera when I take a picture and it looks good.  But when I get it into my computer, the colors are flat and the picture looks a bit out of focus.  When I got the camera this didn't happen."

A bit of correspondence with Marco revealed the following:

"When I got my camera, I used it in fully automatic or Program mode most of the time.  I took a class through xxx (store name removed) and the teacher told us that for the best quality to shoot in raw.  I still don't really know why but I did it and I am not happy with the pictures.  Why does raw not make better pictures like we were told?"

This is a common problem suffered by photographers who switch to capturing in RAW without having the full story told to them.  I am constantly encouraging my own students to shoot in RAW, but I also try to make sure I explain the why.  So let's start there.

The out of the box setting for most all digital cameras, and certainly all point and shoot variants is to capture in JPEG.  JPEG exists for a reason, although the initial reason is less valid today.  JPEG is a compressed file format and back when digital storage media was exorbitantly expensive, the smaller files could help people save money on cards.  JPEG compression is destructive.  This means that it throws data away that is non-recoverable by a factor of at least 33%.   If all you will ever do is look at images on the screen of your smartphone, you won't care and JPEG is probably all you will ever need.

But if you want to make photographs and not just take pictures, you might not want to throw all that detail and information away.  Cameras are built and designed for immediate gratification.  Thus, the rear display screen shows only JPEGs.  Actually all the information on the screen, including the histogram if you look at it, is based on a JPEG.  These JPEGs have colour corrections, exposure adjustments, tints and sharpening applied before you see the image at all.  When you look at the camera display, you are seeing a processed image.

RAW on the other hand is completely unprocessed.  Technically it's not even a picture until the data is passed through the RAW codec on your computer.  There are no adjustments, no corrections, no sharpening, no nothing applied.  It's the uncooked image.  JPEG processing, better known as "camera styles" cooks the data to a predefined state.  As a photography educator I sometimes forget that frustration happens when a student captures in RAW but has the camera style set to Vivid.  The image on the rear display is sharp and punchy, but the RAW file has none of that processing done to it.

For those who are shooting in RAW, set your camera picture style to neutral.  This will still display a JPEG on the rear display but it will be as lightly "cooked" as the vendor allows.  There is still processing happening that you cannot see documentation for, but remember that manufacturer goal of immediate gratification.  Now when you import your RAW image into your editor, because now your image MUST be edited (you have a blob of uncooked dough) you can start by setting the manufacturer's picture style for the scene.  I teach Lightroom and Adobe Camera RAW and do not know, or care to know every editor out there, but I can assure you that both Lightroom and Adobe Camera RAW have options to use the manufacturer's picture style.  Or more correctly, a non-JPEG iteration of the style that has some default processing steps.  You may be perfectly happy with one of these settings or you can use it as a place to start for your own customization.  Either way, you are farther edit than simply shooting JPEG because you have not thrown away irretrievable data by going JPEG in camera.

Here are a couple of examples of what I mean.  The first is an unprocessed RAW file converted directly to JPEG for display on the web.  The only thing done to it is to embed a Digimarc copyright protection.  It is what came out of the camera.  It does not look like what I saw on the back of the camera.  It seems softer and the colours are flat.

Unprocessed


It's not pleasing in any way.  The next image is the SAME file that has been processed.  Starting point was to select the Camera Landscape picture style in Lightroom and then work from there.  I added Highlight and Shadow recover, added Contrast and Clarity, applied Sharpening, Lens Corrections and a tiny little bit of vignette.

Processed


It's a better image.  While not everyone would like the image and some might consider it a discard, you can clearly see the difference that processing makes.  That's the difference between taking and making.  If you just want nice pics for Facebook and Email, shooting in JPEG and using Camera Styles could be the right answer for you.  However if you want to truly "make" photographs, you agree to undertake work in the digital darkroom.  Thanks to Marco for his question.

Q&A - Why is the exposure "off" with my TTL flash

I've received my first couple of questions for Q&A.  I want to thank both writers and will address questions in a timely fashion.  I will also keep writer's contact information and full names confidential.  So here's the first one. "Hi.

I have a Canon Rebel model T2i.  The built in flash makes bad pictures so the guy at the store said to get a bounce flash with TTL.  I bought a Canon 430EX II.  When I use the flash sometimes the pictures are good, but sometimes they are too bright.  I have attached two examples.  Is my camera not working with the flash?  The sales guy said TTL gave perfect pictures.

Jacqueline."

Well thanks for writing in Jacqueline.  I appreciate you attaching the pictures for me to look at.  I think I can answer your question.

The sales person was correct in recommending a TTL flash as they do make flash very simple.  In the kit you bought you get what Canon calls eTTL.  It's the same idea.

When you take a picture without flash, the camera sets the exposure based on the light reflected from the subject.  When you use any kind of TTL flash, the camera sets the exposure based on the amount of flash reflected from the subject.  It does this by controlling how long the flash lasts, what we call duration.

In both your example pictures, you are correct that they are too bright.  I assume you are shooting in JPEG because that is what you sent me.  Nothing wrong with that, but correct me if I am wrong.  If you look around your subject's in both pictures, the background is pretty far away.  In the picture of the older couple with the cake, it looks like you shot it in a hall or hotel ballroom, a place with very high ceilings and walls some distance away.

The camera and flash combination are looking at the reflected light from the entire scene as the light hits the sensor.  Because your subjects in both cases take up only part of the total image, the camera is adjusting exposure (flash duration in this case) to try to achieve balanced lighting across the entire image.  Since the walls are so far away compared to the couple, the camera and flash are working hard trying to light the back wall and overpowering the couple with the cake.

This doesn't mean that there is a problem with the camera or the flash.  Actually things are working as they should.  There are a couple of ways you can make this a more successful photograph.  Easiest is to fill the frame with the couple, tightening your composition to exclude more of the background.   Because they are standing up, you could have shot this as a vertical image and thereby tightened things easily.  By excluding more of the background, the meter won't see as much of it and won't work so hard to light it.  The other way is a bit more work but is a very useful skill to develop.

Your camera has exposure compensation, so you can tell the camera to add or take away exposure depending on the subject and the creative effect desired.  Similarly you can compensate for flash exposure with flash exposure compensation.  I've attached a link to a Canon site you can review but here is the quick steps to this.  I thank Canon for making this available.

+++++++++++++++++++++++++++

EOS Rebel T2i, T3i, T3 

1. Press the [Q] button on the back of the camera. The Quick Control screen will appear.

2. Use the [Cross key] buttons to navigate to and highlight the feature you want to change.

3. Once the setting is highlighted, use the [Main dial] (immediately behind the shutter button) to change the setting. There is no need to press the [Set] button afterwards to “lock in” the setting. If you do press the [Set] button, the camera will display a contextual submenu that shows the full range of available options. Use either the [Main dial] or the [◄►] buttons to highlight and select a setting on the submenu.

When using the EOS Rebel T2i, T3i, or T3, the Quick Control Menu is the only way to access Flash Exposure Compensation directly, without going deep into the camera setting menus.

++++++++++++++++++++++++++++

Now how do you know which way to dial your compensation?  If the background is a lot darker than your main subject such as when it is farther away for the flash to light, dial in negative compensation.  Start at -1 and adjust to taste.  If the background is close and very white, the camera is going to try to make that white average to grey so add some flash exposure.  Start at +1 and adjust to taste.  Flash exposure compensation is not some black art, but experimentation is going to be involved as is practice.  Repetition is the mother of skill so the more you experiment and try things, the better you'll get .  TTL flash is a really great system and most of the time it's really good, but even when it isn't right the first time, it gives you a really good place to start.  One other tip.  Since you spent money on a flash that has a tilting head, try adding a reflector to it and point the head straight up and not directly at your subjects.  The Rogue Flashbender system is really good and is not specific to a particular flash.  Because the Flashbender is a much larger element than the flash tube, you will get light that is a bit softer and not so many harsh shadows.  If you are home or in a place with "normal" ceiling height, just point the flash head at the white ceiling.  TTL will do a good job in general of giving you really good exposure and the bounced light will be much more pleasing than the head-on flash.

I hope you found this tip helpful.  Here's the link to the Canon document.


The Photo Video Guy Podcast - Episode 75

Leica confirms flare in 50/2 ASPH.  Fuji unveils X-A1.  Adobe releases ACR 8.2 and Lightroom 5.2   Nikon announces AW-1 and two lenses to use underwater.  D600 and D5100 move off Nikon MAP list.  Canon updates firmware for the EOS-1Dc.  Is an EOS-M2 coming?  Sigma releases new firmware for the 35/1.4 and 17-70/2.8-4 but it might be a trap.

Announcing ThePhotoVideoGuy Q&A

I'm now ready to initiate a new offering for readers and listeners called somewhat unimaginatively, ThePhotoVideoGuy Q&A.  I've been a photographer for quite some time and find myself asked questions about "how to do" pretty frequently.  So if you have a question send an email to qanda@thephotovideoguy.ca.  I will answer your questions on the site and perhaps on the podcast. There is no cost for this offering.

The Photo Video Guy Podcast - Episode 74

Apple announces new iPhone camera, Phil Schiller disses serious photographers everywhere.  New Apple RAW decoders.  Leica introduces the C aka the Lumix LF-1.  Canon announces changes to CPS for 2014.  Canon intros new large format printers and Premium Pigment inks.  DP Review covers the OM-D E-M1.  Olympus releases 12-40/2.8 ED pro lens.  Sandisk offers 256GB CF card.

New kit from Think Tank

My friends at Think Tank Photo just launched two new product lines whose intention is to help those us using Apple® devices have an easier time of organizing our accessories and ourselves. My 2nd BrainMy Second Brain – The four ultra thin My 2nd Brain™ bags were created with pockets specifically sized for Apple® computers and accessories and all the tools needed to support a digital lifestyle. Slide a MacBook Pro® or iPad® into the zippered padded pocket that also has an organizer for pens and more. Keep an iPhone in the top pocket with a pouch for earbuds or a Bluetooth headset. Unzip the main compartment to organize and secure adapters and small items in clear zippered pockets. Stow documents in the rear pouch. Even the removable padded shoulder strap has a clip for full-size headphones.  Buy online

PowerHousePowerhouse – Created for MacBook Pro® laptop power adapters and AC cable plus pens, small cables, USB drives, and other small accessories.  Buy online

Don’t forget, as a supporter of The Photo Video Guy, when you click on these links and order $50 or more of Think Tank Photo gear you receive a free gift, such as a Pixel Pocket Rocket memory card holder. (USA residents only)


The Photo Video Guy Podcast - Episode 73

Nikon to release D610 and D5300. Nikon LD1000. Canon to upgrade all Cine cameras via firmware update. Canon and Zeiss announce new Cine lenses. Still coming, Canon EOS-M, 800/5.6L IS II. Sony reveals QX10 QX100. Sony announces 4K FDR-AX1. Wristwatch live view and HDR-AS30V from Sony. Ilford opens B&W processing lab in California. Adobe offers PS+LR for $10/mth. Cokin revamps. ASMP warns about Facebook changes to ToS.

onOne Software Announces Perfect Photo Suite 8

From my friends at OnOne Software onOne Software Announces Perfect Photo Suite 8 New Perfect Enhance module, Perfect Eraser, Perfect Batch utility, and re-engineered Perfect Effects module create a complete photo editing solution that seamlessly integrates into any workflow

Portland, OR – September 4, 2013 – onOne Software, Inc., a leading developer of innovative and timesaving solutions for digital photography, today announced Perfect Photo Suite 8—the photographer’s choice for photo editing. Perfect Photo Suite 8 is a full-featured, standalone photo editor that integrates seamlessly with Adobe® Photoshop®, Lightroom®, Photoshop Elements, and Apple® Aperture® and it includes all the best tools a photographer needs to create extraordinary images. Key new features include the Perfect Enhance module for essential photo adjustments, the Perfect Eraser with content-aware fill technology, the Perfect Batch processing utility for applying workflows to multiple images at once, and a re-engineered Perfect Effects module with twice as many filters, customizable presets, and integrated FocalPoint™ technology.

The new tools and capabilities alongside Perfect Photo Suite 8’s eight modules—Effects, Enhance, B&W, Portrait, Mask, Layers, Resize, and Browse—allow photographers to enhance, retouch, and stylize images in a layered workflow, replace backgrounds, create high-quality enlargements, prepare images for output, and batch process workflows. The modules share a unified interface, each targeting a specific imageprocessing task. Each module provides only the tools necessary to complete the job at hand, eliminating screen clutter and confusion for the user.

“We listened intently to the digital photography community about what they wanted for their image processing in today’s world of plug-ins, online apps, and subscriptions,” said Craig Keudell, president of onOne Software. “We made it a priority to respond quickly and design a cohesive new product that continues to focus on photography and is built for photographers of all levels, from enthusiasts to professionals. We’ve leveraged our extensive experience as a plug-in company and evolved the Perfect Photo Suite into a complete and powerful photo editor that, unlike existing plug-in collections, works as one, elegantly designed product that seamlessly integrates into any workflow.”

New in Perfect Photo Suite 8: • Perfect Enhance module – Perfect Enhance provides essential tools for basic enhancements. Use it to adjust brightness and contrast, remove a color cast, remove dust spots and power lines, and add sharpening and vignettes. It is an ideal module to start with when using Perfect Photo Suite 8 as a standalone application or when quick corrections are needed. • Perfect Eraser – Using content-aware fill technology and simple brush strokes, the Perfect Eraser removes objects and automatically reconstructs the image with realistic results. • Twice as Many Filters – The Effects module now includes new adjustable filters including: HDR Look, Dynamic Contrast for tonal clarity, Vintage, Grunge, Antique, and more. • Customizable Presets – All built-in presets included in Perfect Photo Suite 8 may be deconstructed by their filter settings and personally customized. • FocalPoint is now in the Effects Module – The best parts of FocalPoint technology to create bokeh, tilt-shift, and selective focus effects after the shot, are now in the Effects module as the Lens Blur filter. • New Browse module – Images can be browsed and directly accessed from Perfect Photo Suite wherever they are stored—on the computer, an external drive, a connected network, and even on a cloud-based storage service like Dropbox, Google Drive, or Apple’s photo stream. • Perfect Batch Utility – Powerful batch processing of actions from one or multiple modules, including the insertion of a watermark. • Multiple File Handling: As a photo editor, you can now open and work with more than one image at a time. Move between images to edit or copy layers from one file to the next. • Improved Masking Bug: Redesigned Masking Bug in the Effects and Layers modules make mask creation easier and more intuitive. • Higher Quality Effects: Performance enhancements improve effects by minimizing artifacts without sacrificing processing speed. • Improved RAW file handling: Open and process RAW files faster and with better quality. Support for new cameras also added. onOne Software Announces Perfect Photo Suite 8, a complete photo editor for every workflow

Availability and Pricing The new Perfect Photo Suite 8 will be available November 26, 2013. Pre-orders are available immediately at www.ononesoftware.com/store. Perfect Photo Suite 8 is available in three editions: Premium, Standard, and an edition for Adobe Lightroom & Apple Aperture. The Premium Edition works with Adobe Photoshop, Lightroom, Aperture, Photoshop Elements, and as a standalone application. Owners of previous versions of Perfect Photo Suite Premium Edition can upgrade for $99.95. New users may pre-order the Premium Edition for $179.95. For a limited time, pre-orders of Perfect Photo Suite 8 Premium Edition will include a complimentary Essential Video Guide to Perfect Photo Suite 8, which provides a comprehensive collection of getting started training videos for Perfect Photo Suite 8 ($40 value).

Perfect Photo Suite 8 for Adobe Lightroom & Apple Aperture works with Lightroom, Aperture, Photoshop Elements, and as a standalone application. It is available for $129.95 | $79.95 upgrade. The Standard Edition works as a complete standalone photo editor and is available for $79.95. New users who pre-order Perfect Photo Suite 8 will immediately receive a complimentary license for Perfect Photo Suite 7.5. Customers who pre-order Perfect Photo Suite 8 will receive all upcoming Loyalty Rewards that will be delivered monthly to owners of the Perfect Photo Suite 8. For those who have purchased Perfect Photo Suite 7.5 on or after August 1, 2013, onOne Software will issue a complimentary upgrade to Perfect Photo Suite 8 via download when it is available. For more information on Perfect Photo Suite 8, please visit http://www.ononesoftware.com.

About onOne Software onOne Software, Inc., is a leading developer of innovative software tools and apps for digital photography and offers time-saving software solutions for photographers of all levels, from enthusiasts to professionals. Leveraging its extensive history as successful plug-in developer for Adobe Photoshop, Photoshop Elements, Photoshop Lightroom, and Apple Aperture, and continued development of cutting-edge technology, onOne publishes unified solutions that offer both full-featured photo editing capabilities and the flexibility of traditional plug-ins. Founded in 2005, onOne Software is a privately held company located in Portland, Oregon. For additional information, visit www.ononesoftware.com.

Press Contact: Amy Chan, onOne Software, achan@ononesoftware.com, 503-968-1468 x 137 General Press Inquiries: press@ononesoftware.com onOne Software Announces Perfect Photo Suite 8, a complete photo editor for every workflow

Online Press Center: www.ononesoftware.com/press onOne Software Blog: www.ononesoftware.com/blog Facebook: www.facebook.com/onOneSoftware Twitter: www.twitter.com/onOneSoftware Google+: www.ononesoftware.com/plus ©2013 onOne Software, Inc. All rights reserved. onOne Software, the onOne Software logo, and Focused on Photography are registered trademarks and Perfect Photo, Perfect Enhance, Perfect Effects, Perfect Eraser, Perfect Batch, and FocalPoint are trademarks in the United States and are the property of onOne Software. Adobe, Photoshop and Lightroom are registered trademarks of Adobe Systems, Inc. Apple and Aperture are registered trademarks of Apple Computer, Inc. All other trademarks are property of their respective owners.

Quick Look : Stick & Stretch Gallerie Wraps

SS_fsAs I've been looking at alternative ways to display prints, I came across this item called Stick & Stretch Gallerie Wraps.  Or at least that's what they are called in Canada.  In the United States, you'll find them under the brand name Hahnemuhle Gallerie Wrap.  Different packaging, same thing. Basically they consist of four sticks, 1 ¼ wide in the Standard version and 1 ¾ wide in the Pro version.  Each stick has an adhesive strip pre mounted, is beveled at the corners and is notched to fit into these moulded corner braces.  You need a set of corner braces to make the system work, so your first purchase should be a Starter Pack that contains four sticks, reusable corner braces, a bottle of archival glue and some corner pins that look a lot like big heavy staples.

If you've ever done a Gallery Wrap the old way, with stretcher pliers and staple guns and hot glue, you know that while the final outcome can be beautiful, getting there is often arduous and frustrating.  Hence this kit.

There are a couple of videos on the web that show how to use the kit, one from Photoplus in 2010 with the inventor, and one with Phil Neilsen from Amplis Canada.  Both are excellent, Phil's is a bit easier to follow.

Making It Happen

  1. You collect your four sticks and by choosing different lengths and widths, you define your wrap size.  Let's say you take 2 14" sticks and 2 17" sticks.  You'll set up your print job to produce (for the standard sticks) a print that is 16 ½ x 19 ½, basically adding 2 ½ inches to the length of each dimension.  This leaves you enough excess canvas to complete the wrap.  If you are using the Pro series, you need to add 3 ½ inches to the length of each dimension.
  2. Print your image onto the canvas of your choice.  This may require a higher end printer, or that you send the image out to a lab.
  3. Once the canvas is dry, hold it up to the light and mark the corners of the printed image on the back.  This is important because you will use these marks to align the sticks.
  4. Peel back the cover of the adhesive on each of the beveled corners and then put the sticks into the corner blocks.  They only go in one way.  Standard corner blocks are blue, Pro corner blocks are red and they are not interchangeable.  Press the sticks down into the corner blocks so the back sides of the sticks are flush with your table.
  5. Peel the remainder of the covering on all the sticks.  Picking the frame up (corners and sticks) place it on the back of your print.  Use the marks you made on the back to align the corner blocks to the corners of the printed image.
  6. Press each stick straight down.  It will release from the blocks and adhere to the canvas.  Use lots of pressure, you are making a bond happen between the stick and the canvas.
  7. Run a razor knife along the outside edge of each stick to trim the canvas.  On larger prints you might want to leave an extra ½" to allow for an optional stapling step.  Extend your cuts square to the corners and remove the excess canvas.
  8. You know have four sticks glued to the back of your image, that are properly placed and what looks like a square canvas area in each corner.  Cut each corner at a 45 degree angle and fold back each section and adhere it to the exposed adhesive on the sticks.  This will produce really nice clean corners when you do the tensioning.
  9. Run a bead of archival glue down the inside edge of each stick.  When you tension, this glue will further adhere the canvas to the front edge of the stick and help address movement in the canvas over time.
  10. Starting with any adjacent pair of sticks, fold them upwards until their beveled edges meet in a nice corner.  Take one of the staples and press it into the predrilled holes.  Don't push it all the way in yet.
  11. Repeat for the other three corners.  There is now nice tension on the canvas.  Inspect your corners and if you are happy, tap with a small mallet or use some flat object to press the staple all the way in, anchoring each corner.
  12. Take the supplied corner brace sticks and press them into place.  The mounting sticks have little notches pre-cut for these braces.  This takes a bit of pressure and then they snap right in.  This further tensions the canvas.
  13. At this point, I like to take a hard rubber roller and press the edges of the wrap again to assist the adhesive to bond.
  14. If you left extra canvas for your big print, now fold the excess over the back edges of the stretcher sticks and put a staple in every couple of inches.  The adhesive is very good but this is sort of belt and suspenders solution.

Thoughts

This is really dead simple.  My first one lost some tension about ten minutes after setting up, and that's why I added the step using the roller.  The second one remains taut as a drumhead.  The pricing for the sticks is pretty reasonable considering that they are all preformed and predrilled, the adhesive is decent, the archival glue works well and the staples are easy to work with.  You will need to buy at least one starter kit for each format to get the proper corner blocks but once you have them, you're good.  You can also buy glue as a standalone product as well as sacs of extra staples.

If you want to see someone do this before you buy, watch Phil's video on the Amplis Store page here.

---

Followup a day later.  I've changed my description of the strip adhesive from good to decent.  It doesn't stick consistently and to my disappointment, both wraps have sections that became unstuck.  So I'm changing my rating and going to call the company tomorrow to vent a bit.