2015 : 10 Ideas to Improve Your Photography

nov_13_2014_09.jpg

As artists, we all want to improve our skills, to improve our abilities with our craft, and to grow as artists.  For your thoughts and perhaps inspiration, I offer the following 10 Ideas to Improve Your Photography in 2015. 1.  Don't trap yourself in filler projects.  A 365 sounds like a good idea until you get tired of it.  Same thing happens with a forced deliverable such as shoot everything with the 50mm.  Forcing your creativity into a box never spawns more real creativity.

2.  Find and tell your own stories.  Repetition may be the mother of skill, but if all you do is replicate someone else's hard work, you cheat yourself of your own innovation and interesting ideas.

3.  Post only your best work.  There's no award for volume, so set your own bar very high.  If you like it, it's worth posting.

4.  Get out of your own comfort zone.  Shoot something you would never normally do.  If you mostly do still life, go shoot sports.  If you shoot only action, shoot a still life.  The steps you go through to master the uncomfortable will make you better at the things that you like.

5.  Assign yourself projects.  Certainly clubs, communities and myriad groups can keep you busy with topic of the day, or the week or the month challenges, but they aren't your projects.  You are building them for someone else.  Build for yourself.  A project can be simple such as shoot to get 10 keepers with a 24mm focal length, all at different lens openings.

6.  Take a notebook with you when you photograph.  Write down jot notes about what you were thinking when you made the photograph.  Don't worry about recording settings, they are in the EXIF data and in the long term won't matter much anyway.  Record your mental perspective or the feeling you had.

7.  Take an image you really like and produce 5 completely different interpretations of it using your digital darkroom to tell 5 different stories with the same core image.

8.  Using only a flexible desk lamp, experiment with different lighting positions on the same subject, using light and shadow to tell different stories and to set different moods.

9.  Carry a camera everywhere you go for one week, shooting anything that you see that is interesting to you.  If something catches your eye, shoot it, and try to use a focal length that mimics your eye, something in the 35mm to 50mm effective focal length range.

10.  Shoot video clips.  Don't worry about the audio.  Shooting motion will give you a greater appreciation of the power of a great still.  Make a hybrid project containing your clips, some stills and overlay some music.  Your computer likely came with all the software you could need to do this.

Above all else, have fun, and make photos.

New release of Snapselect from Macphun

If you bought Snapselect on the App Store after reading the initial and followup Quick Looks, be advised that V1.1 is out.  Your Mac may not be set to auto update and if not, you definitely want this update in your machine.  As they promised, the folks at Macphun have improved the user interface, particularly to help serious photographers and editors who want to use Snapselect in conjunction with Lightroom or Aperture.  If you have not bought it yet, today might be the day.  Do note that like all Macphun software, it is Mac only. I ran into some snags getting it to see images inside folders inside my existing Lightroom catalog, but getting to images in folders or on a card was no problem at all.  I was able to read folders from my Lightroom catalog with a different set of images.  So the issue could have been something to do with the first set being images from a Canon EOS-M.   You can also browse by Collection, a tool that I use all the time, but be aware that with this release Snapselect can only deal with top level collections, not collections stored inside Collection Sets.  While I find this inconvenient, I think it is fair to recall that Snapselect is designed to cull before you go through the whole import and collection building process.

I am not sure which RAW converter Snapselect is using, I suspect it may be the OS X native one.  What I found interesting is that Snapselect was able to open folders and browse images including EXIF and histogram for Hasselblad's proprietary 3FR RAW format.  Photo Mechanic cannot do that and neither can the DXO tools.

Loading of an example folder of 500+ images took just over one minute, including the analysis phase.  The "similar" function is very effective.  I used a folder from a recent hockey game shoot and was very impressed by how the software gathered like images together as there were numerous burst mode sets of breakaways or glove saves.   The timeline view shows the images as they were captured, but as I noted in the third 7D Mk II review, the save sequence with the SD card looks like last frame in the burst first, instead of first to last.

It's also handy to be able to group shots into time intervals.  I used the default example of 5 minute blocks and it really simplifies the edit process.  You only need to know two keys Z is a pick, X is a reject.  This is very quick but inconsistent with the Lightroom Pick/Reject keyset.  I don't see these as reassignable at this point.

While there are other options such as a the much richer and much more expensive Photo Mechanic, Snapselect could very well be the culling program for the majority.  It is fast, easy to use and benefits from the talents of the Macphun developers.  If you shoot more than 100 images in a session, you need a culling tool and at $25, this is perfect, but buy it while it is on sale for $14.99 and you really cannot lose.

Fujifilm releases new firmware for X-T1, X-E2, X-E1, X-Pro1

The folks over at Fujifilm have pushed out new firmware for multiple cameras. The X-T1 gets the most in the way of updates, with the package becoming sparser the older the camera.

For details and to download the X-T1 firmware, click here

For details and to download the X-E2 firmware, click here

For details and to download the X-E1 firmware, click here

For details and to download the X-Pro1 firmware, click here

Always read the documentation before upgrading firmware and be sure that your battery is fully charged before you start.

Nikon Firmware Updates Available for D750, D810

Keeping your camera firmware current is very important.  Nikon recently made two firmware updates available to customers D750 C:1.01 (download)

  • When shooting with an optional Speedlight and Auto FP high-speed sync enabled with On selected for ISO sensitivity settings > Auto ISO sensitivity control in the photo shooting menu, images were sometimes over-exposed. This issue has been resolved. (Enabling auto FP high-speed sync: Select 1/200s (Auto FP) or 1/250s (Auto FP) for Custom Setting e1: Flash sync speed)
  • When menus were displayed with the camera connected to a 4K-compatible TV via HDMI, display in both the camera monitor and on the TV was not correct. This issue has been resolved.
  • Noise that could sometimes be heard when Custom Setting d1: Beep was set to any option other than Off has been reduced.

D810 C:1.02 (download)

  • When playback zoom was applied to an image displayed in the camera monitor (image display enlarged) while the memory card access lamp was still lit immediately after capture, the image was not correctly displayed. This issue has been resolved.
  • When menus were displayed with the camera connected to a 4K-compatible TV via HDMI, display in both the camera monitor and on the TV was not correct. This issue has been resolved.
  • Noise that could sometimes be heard when Custom Setting d1: Beep was set to any option other than Off has been reduced.

Info courtesy Nikon


iTR AF and Auto ISO for Hockey with the Canon 7D Mark II

Another game, another set of experiments with the 7D Mark II.  This time it was the same core kit, 7D Mark II, Sigma 120-300/2.8 and RRS monopod but with very different settings.  I wanted to give Canon's full 65 point tracking autofocus a go and also see what would happen if I let the camera manage the ISO where I set a shutter speed floor and left the lens at f:/2.8.  The results might surprise you.I have four Canon bodies.  An original 7D hacked for video, a 1D Mark IV, a 1Dx and the new 7D Mark II.  I bought the 7Dm2 specifically for sports and wildlife and given that it's winter here in the Great White North, hockey is where the camera is getting its workout. Friday night I went to the Aurora Community Centre aka the ACC (folks in the GTA will get the inside joke) to watch the battle of Yonge Street where the Tigers hosted their local nemesis the Newmarket Hurricanes.  Kim came with and the Canes got a brand new cheering section as a result.

I was quite nervous about trusting AF point selection to the camera.  I had tried this once before and didn't have spectacular results but never on this camera.  So I set the camera to auto select but made the choice to have it start with the centre AF point, the one I usually use all the time.  The first thing you notice is that as soon as you activate the AF, in my case by back button as I have deactivated the AF initiation at the shutter release, you get this jumping bunch of AF points.

As you recompose, they do a decent job of holding focus as the subject moves or you make a viewfinder recomposition.  My usual mode in AI-Servo is to lock focus on the subject and hold the button down and track manually.  The automatic way using iTR AF is certainly quick and less eyestrain than the manual method.  I did find however that shooting in Case 4, if another player crossed in front of the subject I was locked on to, there was at least a 50% chance that the iTR AF would grab onto and follow the new subject.  I considered switching to Case 2 but only after thinking about things after the fact, so that's a future experiment.

I also discovered that the jumping and flickering AF points are a real distraction.  I did not have them set to glow red as is an option and I'm glad I did not because that would have made me nuts.   It seemed the longer I held the AF button down the greater the probability that the iTR AF would wander off.  In high speed play action, I had to learn to release the AF button and relock it quickly if I wanted to hold focus and before I learned this, I missed a number of what would have been great glove saves because they were out of focus.  I don't think I would have had the miss rate if I had been in my usual focus mode.

So I conclude that iTR AF works decently well, but my initial experience is it does not work well enough to depend upon in frantic hockey action in front of the net.  A player on breakaway is tracked very well and so long as nothing distracts the automatic tracking it's pretty good.  I will try the same settings but with iTR AF turned off next time.

Auto ISO is a feature I rarely use.  I am an old film photographer and still equate ISO with noise so I tend to pull the ISO as low as I possiby can, but sometimes doing so results in some motion blur, so I thought I would give it a shot.  Canon's Auto ISO lets you set a range of potential ISOs for Auto to use, I set mine for the range between 100 and 6400.  I also set a floor shutter speed of 1/500 for periods 1 and 3 and 1/250 for the second period, just to see what would happen.

The Aurora Community Centre is fine for viewing and even for video, but for still photography, the lighting leaves a lot to be desired.  The lighting above the north end net is particularly crappy with nearly 1.5 stop drop off.   On a number of occasions I found that the ISO had maxed out and the shutter speed had dropped below the floor in order to get the shot.  It's interesting to note that the defaults will override the lowest shutter speed if the set ISO range tops out.  On the other end of the spectrum though, instead of living at ISO 2500 as I usually have to do at the ACC, in some situations I found that the ISO dropped to ISO 1000 near the south net giving me nice high shutter speeds and crisp images.  There's a benefit to letting the camera handle the ISO but you really need to be cognizant of the range you will allow.  What I did notice is that where in the past I would top out the ISO at 3200 and be a bit grumpy about the noise, the Auto ISO regularly pushed well beyond that and my favourite shot of the night (top of post) is at ISO 4000 and it looks very good.  What I learned is that the noise difference between ISO 3200 and ISO 5000 is marginal so if you have to push it, you can push it relatively hard, and so long as you don't need to crop in at all, and I tend to crop everything a bit, even ISO 6400 is quite acceptable.  I come away from this experience liking the camera more than I had been.

This is the first time that I can recall defaulting writing to the SD card instead of the CF card and I noticed an incongruity in the file naming.  When I use the CF card to save images are saved in sequence when shooting in burst mode.  I had the camera set to low speed burst configured for 6fps for all the games.  This game I was saving to the SD card, also a Sandisk Extreme Pro, this one rated at 90MB/s.  Interestingly the images from bursts are saved in reverse order where the last image is the first saved and has the lower file number. I have never seen this before and it is freaking weird when you are going through your images in the library and the play action appears to be going in reverse.  I'd be curious to learn if anyone else has seen this behaviour.  No images were dropped, nothing was lost, they are just saved in reverse order and only when in burst mode.  I counted the images in each sequence when this happened and the max number of images was five, so no where near the max buffer load of 31 RAW images when using UDMA cards.

Here's a gallery of images from the game with some EXIF info shared so you get a sense of what the camera decisions were.

So the 7D Mark II stays in the shooting stable and as proof of that I have made even more firmware hacks to the original 7D so the likelihood of it coming out of video mode in the future is near zero.  The 7D Mark II with that Sigma 120-300/2.8 APO IS is now the go-to hockey kit.

The other comment I would add is that while my Really Right Stuff monopod does not go as high as the Gitzo it replaced, the leg locks also stay locked instead of loosening off under pressure.   I am also using the Really Right Stuff MH-02 LR monopod head.  Using a monopod without a proper head is way more work than it needs to be.  This head tilts fore and aft and also rotates the mount through 90 degrees so you either mount the camera or a lens plate and have the tilt work in the proper direction.

Followup on Snapselect Quick Look

I am always appreciative when a representative of the company making a product I take a look at makes the time to respond.  Kevin of Macphun sent a quick comment to yesterday's quick look and I wanted to share his thoughts with all of you, particularly his clarification of how Snapselect DOES integrate with Lightroom.  I missed this and really appreciate the opportunity to learn. Here are Kevin's thoughts direct from his reply..

1. It actually works well as a nice companion to Lightroom. You simply open up your LR catalog in Snapselect (as an image source vs. opening a folder), then any selects / rejects are automatically reflected back in Lightroom in two new Collections – Snapselect Picks and Snapselect Rejects. Opening up either of these Collections enables you to then do anything to the images that you would customarily do in LR (e.g. tag, keyword, edit, delete, etc.)

2. Can you do the culling process in LR? Of course (e.g. via flags, stars or keywords). Where Snapselect shines however is greatly speeding up that task by analyzing and presenting you with neat groups of similar images – then you’re laser-focused on culling *those* before turning attention to the unique images from your session.

You can read the other elements of what Kevin had to say in the Comments section, mostly they add on his thanks for the article and how his own workflow has changed.

This is one of the many reasons I like the people and products from Macphun.  They are directly engaged with the customer and are not some faceless corp-droid, not to name any G companies.

New from Macphun - Snapselect

Window_and_Amazing_Photo_Software_by_Macphun1.png

The very nice folks at Macphun are announcing a new photo sorting application.  Like all their software it is Mac only and like some of their software it is sold only the Apple App Store.  It's on limited time sale for $14.99 and sadly you cannot buy it through my affiliate link, only through the App Store.  So let's check out what it does and why it is sold the way it is.As you may be aware, Macphun was built by a bunch of really talented folks who had been originally at Nik Software before it was acquired by Google.  Most of the really brilliant Nik apps and plugins were built involving the people now at Macphun. Macphun has three tiers of apps.   The first tier is the seemingly bottomless pit of mobile device applications.  We know that one of the drivers for Google to buy Nik was the amazing Snapseed.  Well Macphun still does smartphone apps, specifically Color Strokes, FX Studio, Perfect Photo and Vintagio.  They are very good smartphone installed apps.  I don't cover that marketplace but you can read the reviews and the pricing is excellent.

The second tier is the consumer market, where the apps are sold only on the App Store.  It is here that we find the first set of Mac OS X apps like Tonality, Colorstrokes, FX Photo Studio, Snapheal, Intensify,  and Lost Photos.  These are all standalone apps with good functionality at competitive standalone app prices.  This is where Snapselect lives as well.

Lastly are the Pro apps, meant for the more serious photographer / editor.  This is where we find the Pro versions of some of the consumer apps.  They work standalone as well as as plugins to Lightroom and Photoshop.  More features, tighter integrations, more demanding use cases.

Ok, Snapselect.

We've all been in the situation where we have hundreds or thousands of images to go through to cull out the keepers.  The usual route has been to import them to Lightroom or copy all the files to disk and then go through them one by one using some method to select the junk and delete it right away and perhaps at the same time to do some ranking for future work using some other flag system.  Pros have typically resorted to the brilliant and very expensive Photo Mechanic.  Snapselect aims to do this at the consumer level.  Now let's be clear that comparing Snapselect to Photo Mechanic is unfair to both offerings, they are not even in the same species.

With Snapselect you open all the images on the card or hard drive and go through them using a click metaphor to decide what you are going to keep or trash.  Snapselect also uses algorithms to group duplicate or "like" images together, so if you shot 76 photos of the cougar at the zoo, it plunks them all together to make the sorting easier.

Once you've gleaned the images, you can move them to specific folders on your hard disk or push them directly to social media like Facebook, Twitter and Flickr.

The theory then is that you could then import the keepers into your photo management application from the folders and start to work on them.  Snapselect reviews suggest that it works with Lightroom but doesn't really.  I'm not surprised.  A Snapselect Pro (which may appear) might do that more effectively but I really don't see this as an app for the sophisticated photographer / editor.  Got a zillion images from your smartphone to sort through?  That's the fit for Snapselect, or really any use case where you don't do serious photo management.

Research says it is 2-3 seconds per RAW image to render the previews to make the keep/delete decision.  I can get that kind of performance out of Lightroom.  I can also use the X key in Lightroom to flag a photo for deletion then quickly from the menu delete all so marked images.  If I want blazing culling speed, I will use Photo Mechanic.  Lightroom has improved render performance in the last couple of releases, and while it is nowhere near the speed of Photo Mechanic, delivers RAW performance akin to Snapselect, so if you are already a Lightroom user, why add more complexity?

So if you shoot mostly JPEGs and don't do any kind of automated photo management (meaning you manually build folder hierarchy on your drives), have a tendency not to cull and end up consuming storage, this app is for you.  If you are already committed to a management application and know how to leverage its own culling process, this may be too simplistic and too hard to integrate into your workflow.

Good for Macphun continuing to build interesting software.

Round Two : The Canon 7D Mark II for Hockey

Second full game test is now done and I am happier overall. Here's the basic setup.

Canon 7D Mark II, Sigma 120-300/2.8 APO IS, ISO 2000, f:/2.8, Aperture Priority, Flicker Control Enabled, EV +1 ⅔, Stabilization enabled option2, all shots off a monopod.  Focal length anywhere between 120mm and 300mm.

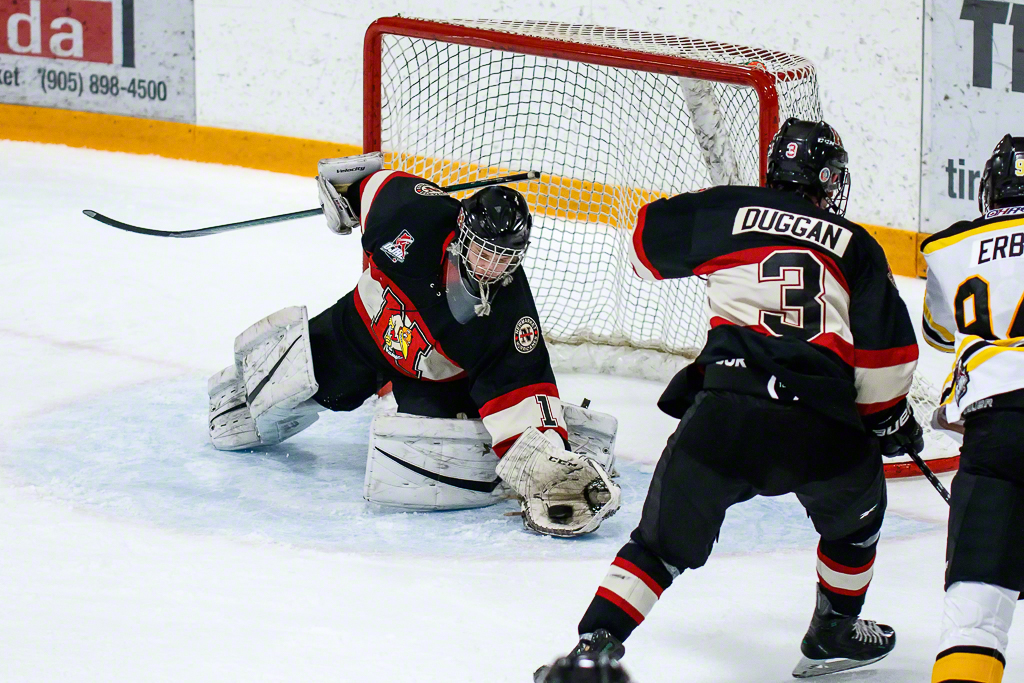
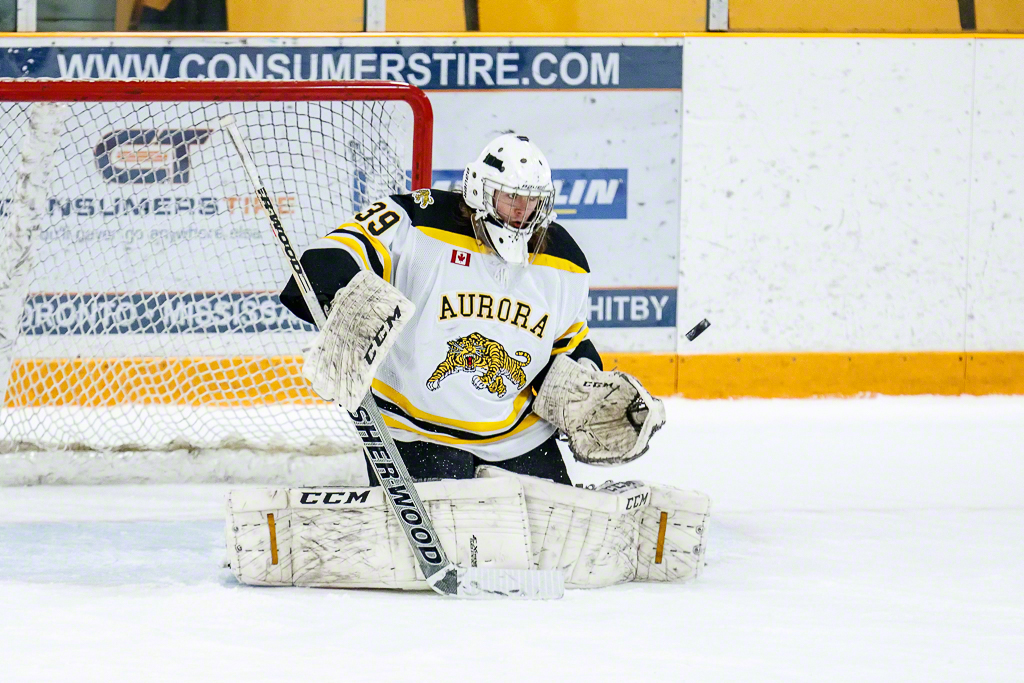
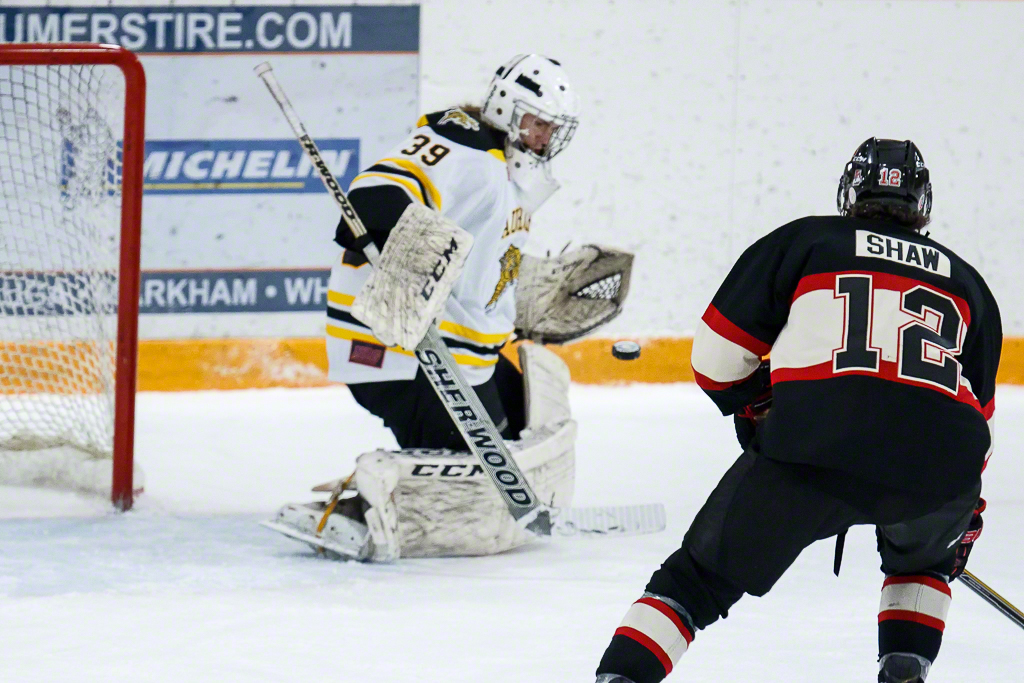
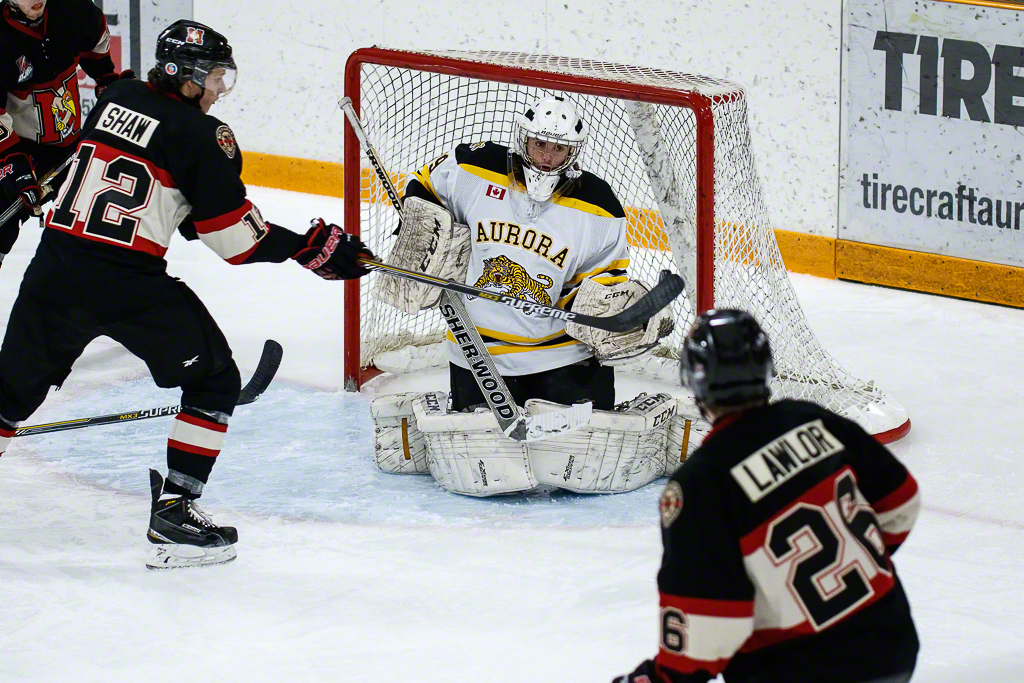
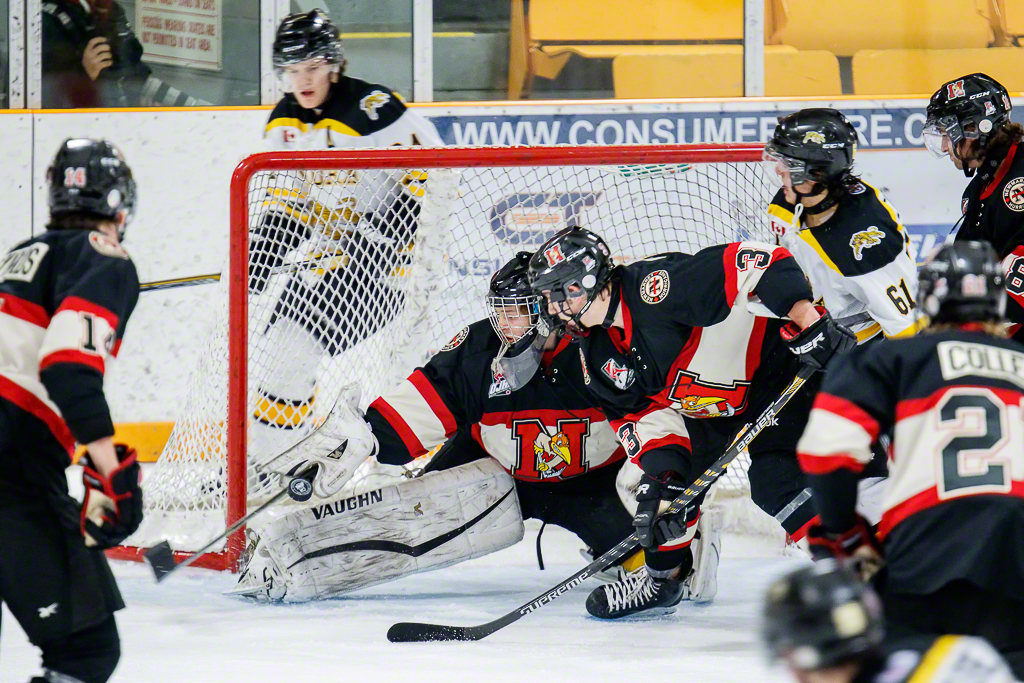
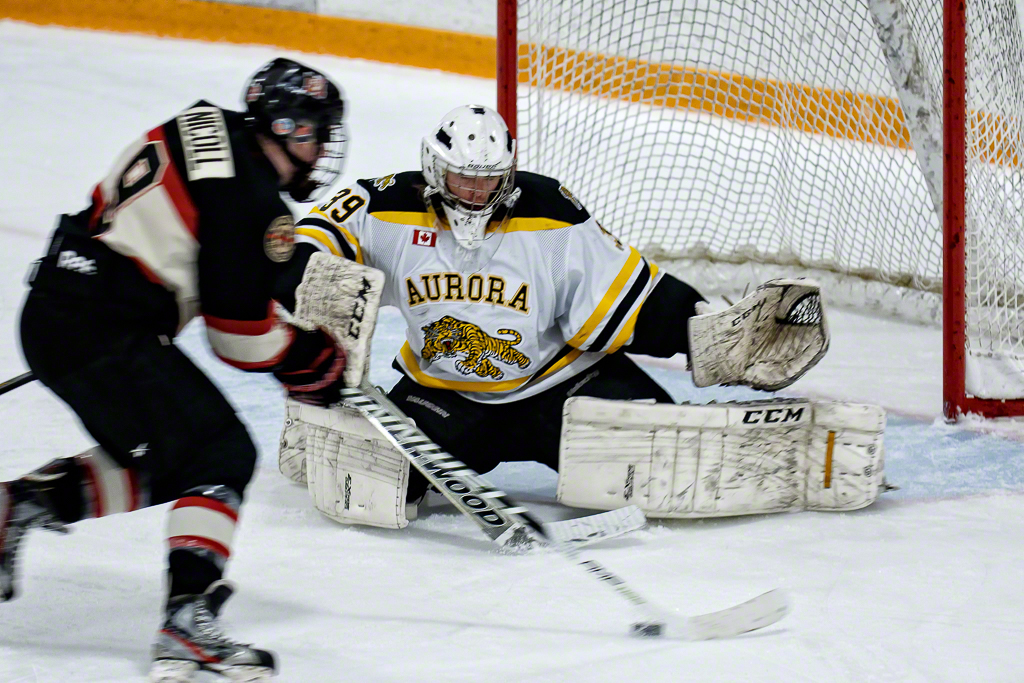
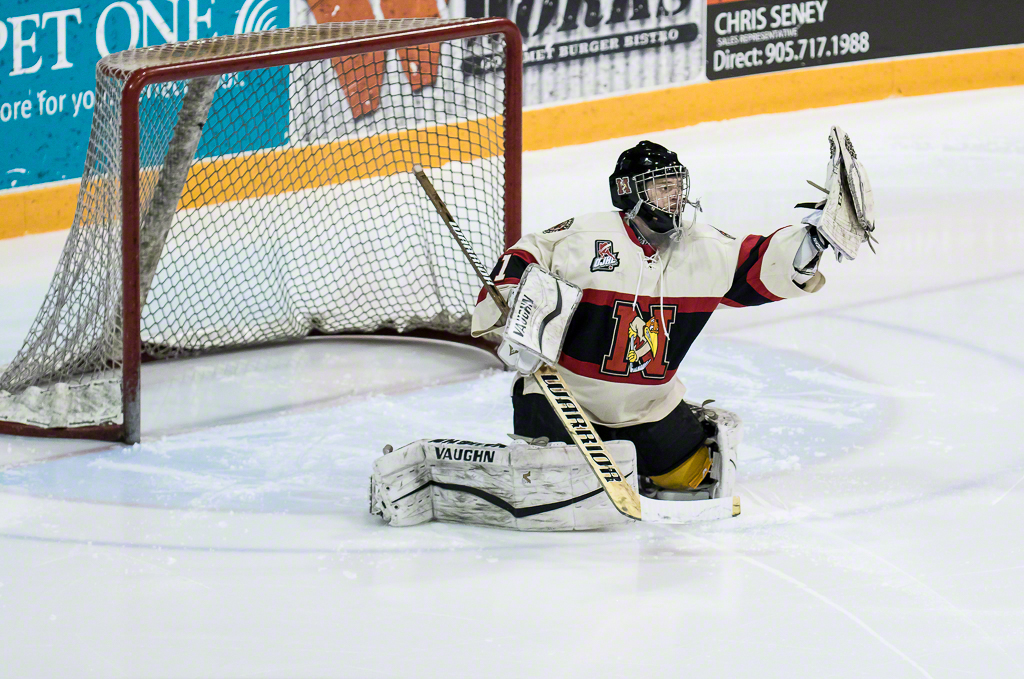
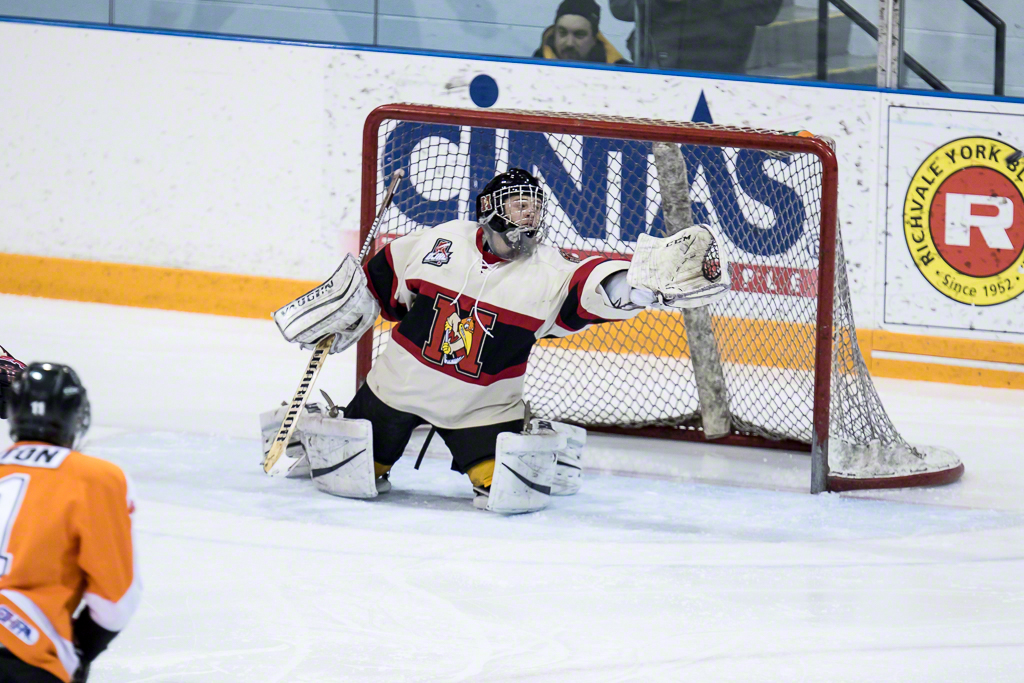
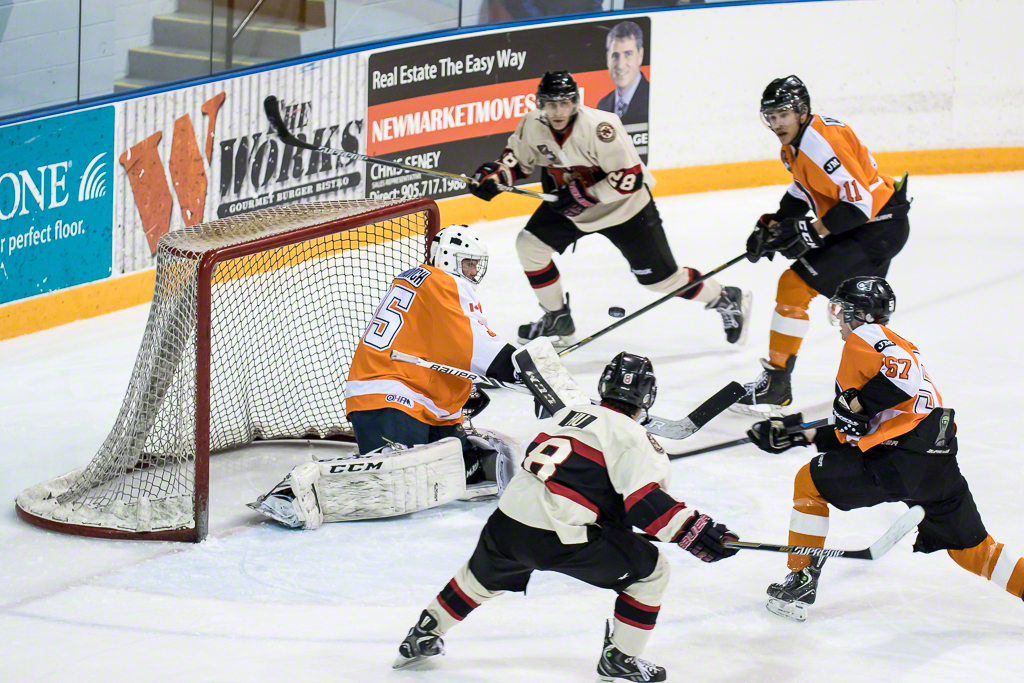
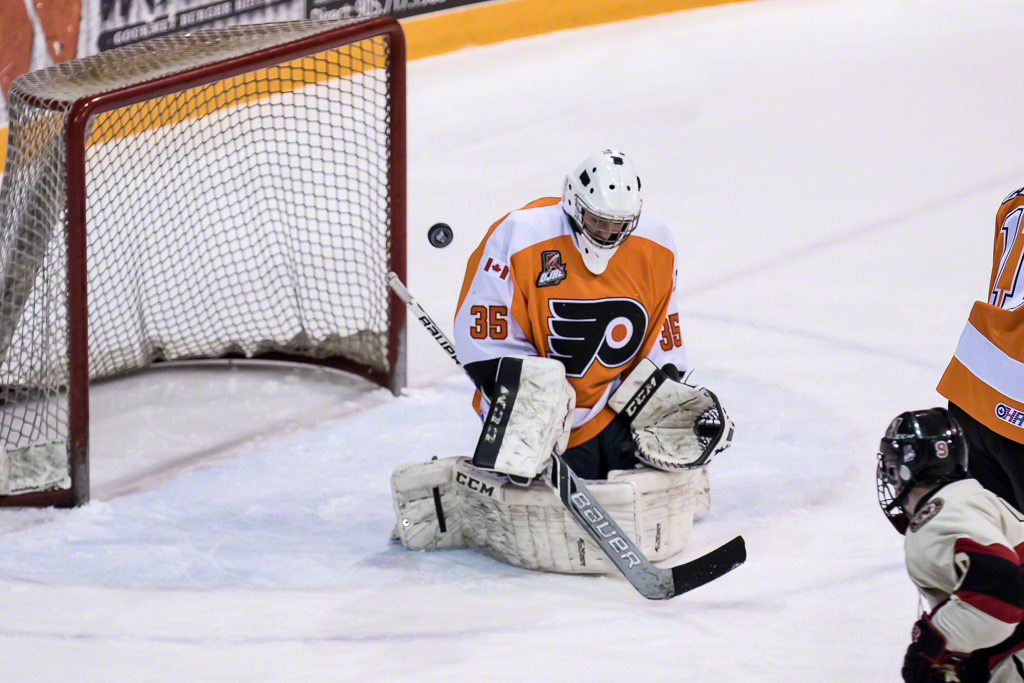
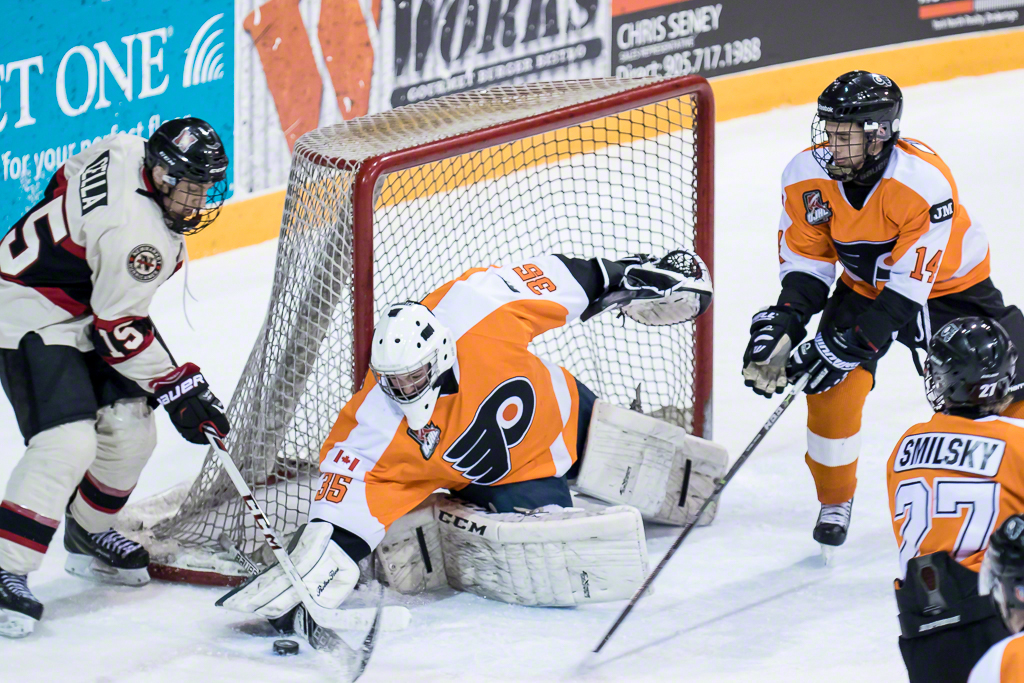
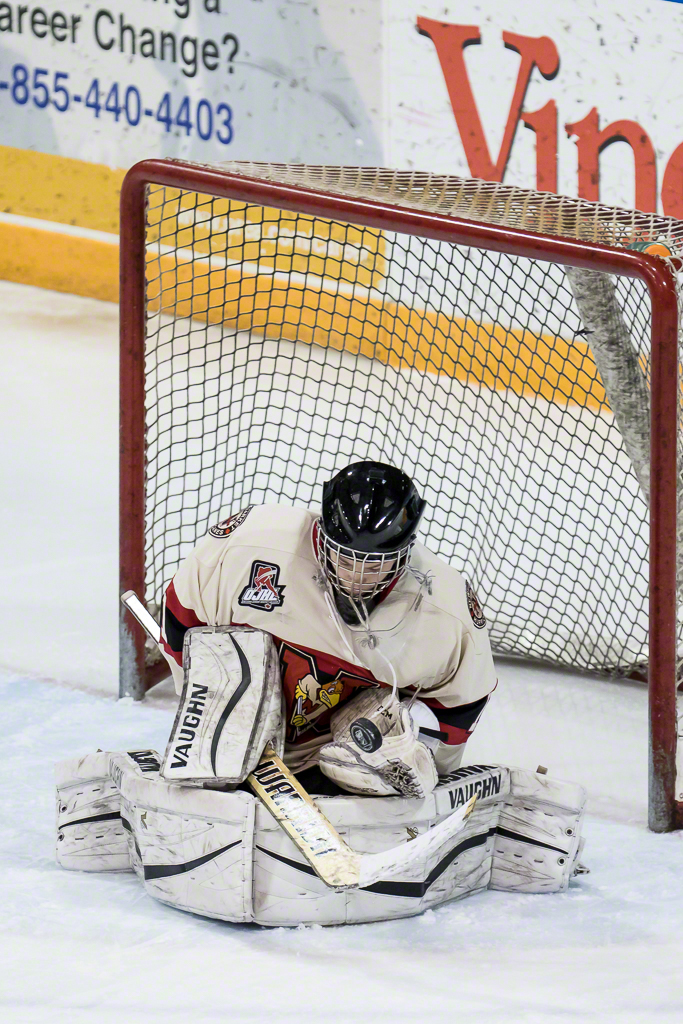
Different arena (Ray Twinney Centre in Newmarket) and different teams, Newmarket Hurricanes vs Orangeville Flyers.  The two teams were very closely matched and the guys played hard all night making for a wonderful game.

Let's see what I learned this time;Autofocus

Set to Case 4, what I usually do for hockey, single centre point spot.  Back button focus only, focus at shutter button disabled.  I found the AF more responsive this time, partly because the lighting was brighter and more contrasty and partly because of disabling the shutter button driving focus as well as the back button.  I still don't like using any more points than 1 for sports although I know the camera is quite capable.

Anti-Flicker

I said I planned to shoot this game with the flicker control disabled but my first two shots were giving me the flicker warning in the viewfinder and it impressed me that it could tell so I turned it on.  Documentation says you may encounter degraded response in shutter release but I did not find this.

Going Longer

I shot the first game with the 70-200/2.8 L IS II and had to crop in too much.  300mm on the 7D is a bit long and I was certainly rolling the zoom a lot more with the big Sigma and its weight requires a monopod unless you are very strong and don;'t fatigue.  That said, I am much happier and I was into the flow of the zoom by the second period.  As this was my second game, I have beaten a lot of the rust off my technique for shooting hockey that showed up in the first game.  Keep rate was much higher.

ISO Choice

I shot the first game at ISO 3200 and I found the contrast loss and noise to be on the edge, especially when cropping.  I forced myself to shoot at a lower ISO for this entire game, in this case ISO 2000 and the noise is much better for the shift of only ⅔ of a stop.  I had to crop less as well so the noise is less apparent.  Next time I am going to raise it again for the light at the Twinney Centre to first period 2500, second period 3200 and third period higher still.  Light with some contrastiness to it benefits the sensor for certain, but I need higher shutter speeds.  I lost too many otherwise good shots due to motion blur and need higher shutter speeds to really get sharpness.

Burst Mode

I had changed the low speed burst from 3fps to 5fps and will bump it again to 6fps.  Hi speed at 10fps is a waste for the speed of these games and 5fps is just on the edge of too slow for the fast action the teams displayed at the game.

Importing and Culling

I verified that my experience last week with corrupted downloads was the Lexar Professional USB 3.0 Dual Slot card reader.  A different reader (Delkin) worked fine with the Sandisk Extreme 120mb/s cards I was using.  I did an ingest with Photo Mechanic to enable the core image culling.  Very fast, nice rendition, and very very quick from image to image.  I also then imported to Lightroom 5.7 from the disk location that Photo Mechanic ingested to.  It went quick enough but moving from image to image is still much slower and there is waiting for each RAW to render fully if you use Lightroom for culling.  With over 700 images, the performance difference means time back in your life.  I know that Photo Mechanic does a lot more than just speedy sorts and IPTC info updates, but I don't get the full benefit because I haven't spent enough time with it.  Their support is excellent and LIVE people talk to you.  If you have a need to import and cull large amounts of images, you should get the free trial for Photo Mechanic and give it a shot.  I don't get any compensation from them so there is no incentive for me to recommend this beyond that it is great.

As mentioned, I imported the ingested and culled images to Lightroom as it is my primary library for images.  It works fine and shows the 7D Mark II CR2 images without issue.  I did a couple of other experiments as well.

RAW Conversion

I was a bit underwhelmed with the image quality from the first game and thought it might be related to the Adobe RAW Converter.  Conversion is often reverse engineering because the camera manufacturers are not inclined to release their RAW formulas and folks like Adobe have to hack their way in to some extent.  This week, DxO released an update to DXO Optics 10 that adds support for the 7D Mark II.  They do their own RAW converter independently of Adobe and Apple.  I tried all three.  Truth to tell I cannot tell the difference from one to the other.

The Sensor

The review by DxOMark of the 7D Mark II got a lot of attention because it called out the new sensor as being a moderate improvement over the original 7D, competitive in its field and having too much noise at low ISO but competitive at higher ISO.  The thing about these tests is that while they are very accurate and extremely scientific, I have to wonder how applicable they are in real life.  I also know enough that the lens in use will have an impact.  Nonetheless because my buddy Bryan asked me, I ran the database results for the 7D Mark II and compared it against other cameras and most of the time, the DxO scores rank it lower than the competitors.  One thing I did notice is that the number of lenses tested is not documented for the 7D Mark II but many lenses are specifically listed for the others.

In my little world, what works for me is whether or not I am happy with the image quality.  For my own work and with direct comparison, the 7D Mark II is an improvement over the original 7D, particularly in the area of higher ISO.  I would say it is better by about 1.5 stops.  It is no Prince of Darkness like the 1Dx, and not even as good as my aged but reliable 1D Mark IV.  The challenge is the lack of consistent points of comparison.  I selected the camera for the reach with long lenses, the frame rate for sports and the weight or lack thereof and expected (and delivered) superior low light performance over the 7D.  Does the D7100 get a better rating? Yes it does, so does the D3300 and the Sony A77 beats them all.

My question to anyone who gets caught up in spec wars is whether you can see a difference.  If you think you can, then let that drive your choices.  DxO rates the 7D Mark II as equivalent to the long discontinued Nikon D300s, which was in its day a leader.   Ok.  I am happy, albeit not overjoyed, with the sensor performance in the 7D Mark II.  But I will wait for a couple of firmware revisions as Canon is notorious for using firmware to throttle the performance of some of their products, with no customer logical reason for doing so.  Time will tell.

Handling

I may have mentioned that I put the battery grip on my 7D Mark II.  I am so used to having a place for my third and fourth fingers to grip, I find it hard to shoot a DSLR without a grip.  I do need to get a proper RRS L-Plate for the 7D Mark II for tripod mounting but for the game I used the plate on the foot of the Sigma to attach to my RRS Monopod head.  While the camera itself is well balanced, you can feel the strain created by long heavy glass so proper support is important.

There is a new rocker switch to allow you to rapidly shift between focus points.  I will cut it some slack because a) it's new and b) I rarely if ever change focus points when handshooting but so far it's in the way.

After over 1.500 shots, I still don't like what Canon has done with the Info displays in playback mode.  There is too much JPEG related crapola and I yearn for a cleaner interface.

Next Steps

I think that my hockey kit will be the 7D Mark II with the Sigma 120-300/2.8  They work well together and if I push the ISO a bit higher in the Twinney Centre and work on being able to crop tighter in camera, I am confident that things will go the way I want.  Polo season is months away here in the Great White North, so my next test will be a complete changeup.  I will be doing a side by side comparison of the 7D with Magic Lantern firmware against the 7D Mark II in a video recording session.

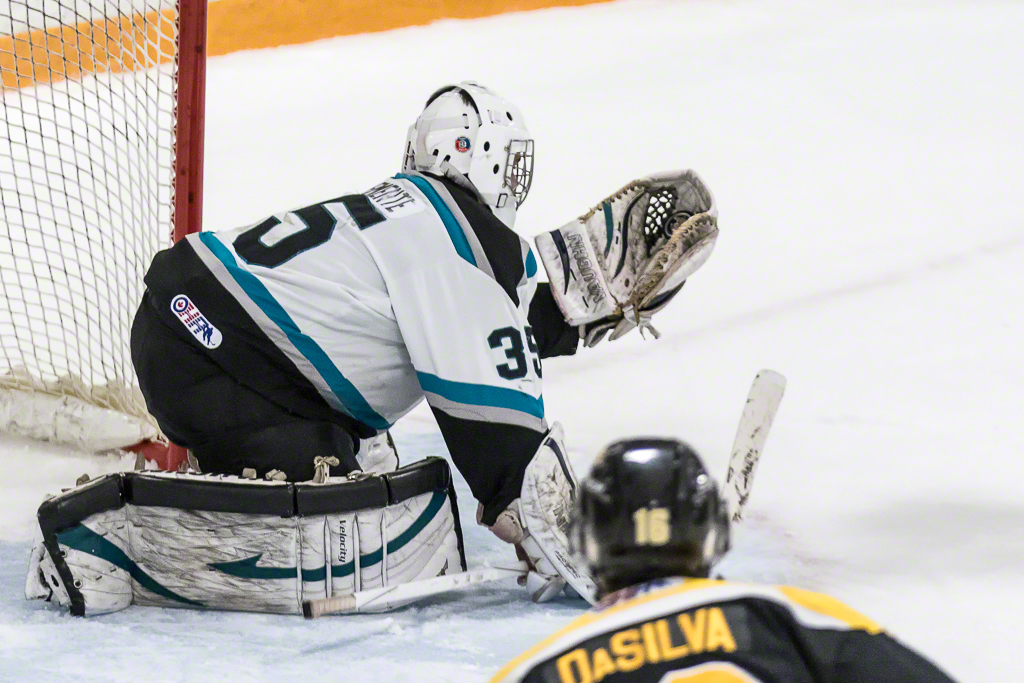
Here are the sample images from the Hurricanes - Flyers game

Busted! Lear Professional USB 3.0 Dual Slot Card Reader

RW0300U_DualSlot_Reader_3.0.jpg

I have used this for a couple of years so probably have gotten my $70 out of it, but since getting Sandisk 120mb/s cards for the 7D Mark II, this reader produces nothing but garbage from these cards.  Checking their site, there is a firmware update from 2012 that adds UDMA7 support which is a great idea.  You install the installer, reboot your machine (STUPID INSTALL TRICK #13) and then run the Firmware update tool. Did I mention that this is a USB 3.0 reader?  Why yes, I did.  The firmware update tool requires a USB 2.0 port to work.  Since my Mac Pro and my Macbook only have USB3 ports, that are actually USB2 backward compatible, this would sound less dumb than it actually is.

It really demands a USB 2 port.  So because I have newer computers, updating the firmware becomes a major hassle.

After checking my available computers, I did find an old POS Windows box with USB 2 ports and was able to get the firmware on the reader updated.  It does now work with the Sandisk UDMA7 cards, although it is slower when reading than the Delkin I bought to replace it.

From a pain in the butt perspective, replacing the Lexar is the easiest route although that is more expensive.  If your time is valuable, you'll burn the cost in futzing around with the Lexar solution, unless you have an older computer with USB2 and you don't mind having to go through a reboot mid stream.

Automatically Set White and Black Points in Lightroom

TigersMuskies-077-51-52.jpg

Mentees, club members and students know that I tend to harp on getting the white and black points correct early in the editing process in Lightroom.  Well today I learned a trick to REALLY speed that up from none other than Mr. Scott Kelby It's very difficult.

Hold down SHIFT and double click on the words Whites and Blacks in the Basics panel in the Develop module.

Man, does this save time.  Thanks to Scott and for the article I learned this from click here

And if I can just say how pleased I am that Scott has taken over Lightroom Killer Tips because there's plenty of new content there.

Think Tank "Perception" Backpacks for Mirrorless Systems

Perception-Mirrorless-backpacks-low-res.jpg

If you've been reading my stuff for a while or have looked at the sidebar, you know that I am a huge fan of Think Tank bags.  Some might say that I am too big a fan because of the number I have bought.  I am also an affiliate so if you buy through my site, you help out The Photo Video Guy.  Which is cool, but let's be clear that I pay for my stuff, just like you do. I was just notified of these new backpacks designed with mirrorless owners in mind.  They look pretty cool and don't scream "expensive camera, please steal" like so many other vendor products.  Let's have a look.

Think Tank Photo just announced that its new Perception backpacks for Mirrorless systems are now available.  The Perception series comes in two colors, black and taupe, and three sizes.  The smallest size, The Perception Tablet™, accommodates a Mirrorless system and an iPad Mini. The largest size, the Perception Pro™, holds a 15" laptop and a 10" tablet, plus one Mirrorless body or small DSLR with a small to medium zoom attached (lens hood reversed).  Plus, the largest size fits four to five more lenses or a large GoPro® kit.

Perception Mirrorless backpacks low res

In addition, Think Tank is offering holiday specials on two of its most innovative products.  You will save 30% on its My 2nd Brain “mobile office” bags for Apple laptops and iPads and 20% on its Suburban Disguise full-featured shoulder bag specifically designed to accommodate standard-size DSLR systems.

Click here to be taken to the Perception Backpacks page

Click here to take advantage of the My 2nd Brain discount

Click here to take advantage of savings on the Suburban Disguise

Remember that when you order using these links, you will receive free gear with these and all orders of $50 or more.  And, as always, you receive free FedEx Ground shipping from Think Tank.

Real World Test : Canon 7D Mark II in crappy arena light

For this story to make sense, I must be clear on something.  I bought the 7D Mark II for two specific use cases, both tending towards longer lenses and both tending towards a preponderance of crappy light.  So you understand, the use cases for the camera are wildlife and sports.  Last night, I along with my good friend Will du Plessis, trundled off to the Aurora Community Centre to photography an OJHL match between the Aurora Tigers and Lindsay Muskies.  We both were shooting the 7D Mark II with the Canon 70-200/2.8L IS II.  To learn how the 7D runs at higher ISOs in horrible lighting, read on...Don't get me wrong.  I love shooting OJHL hockey.  The players really want to be there, work hard and are hoping to get picked for the minors or to head off to University on a hockey scholarship.  The arenas however, leave a lot to be desired from the lighting perspective.  This isn't the Air Canada Centre, the Aurora Community Centre is lit by banks of T8 fluorescent tubes which while white are not particularly bright. I never liked shooting my original 7D beyond 1600 ISO.  After that the noise became annoying and the contrast really started to flatten out.  When I did the test shots with the 7D Mark II, I found that it started to fall off badly after ISO 6400, so I went with the intent to shoot the whole game at ISO 3200.

The camera was set to aperture priority with the lens cranked wide open to f:/2.8.  ISO was set to 3200 and exposure compensation was +1 ⅓ stops.  I hope that this would give me decent enough shutter speeds to freeze action without turning every image into a grainy sack of mush.

Let me say up front that I am not yet acclimated to the 7D Mark II.  Enough has changed to put me behind the curve on it.  Some things are similar to other cameras such as the Case options for AF similar to those in the 1Dx.  When I shoot the 1Dx, I use Case 4 AF and did the same on the 7D Mk II.

My go to kit for hockey up to now has been the 1D Mk IV with a Sigma 120-300/2.8 stabilized lens at ISO 2500.  The Mark IV does a great job and the 1.3 crop gives me up to 390mm effective focal length, that I rarely use.  The 7D Mk II, has a 1.6 crop factor so with the 70-200 that should have ended up about 320mm.  First learning. For a recreational hockey arena where I want tight shots and not to have to crop away dead space more than 30%, 320mm is too short.  So next time out, the Sigma 120-300 is back on point.

The AF in the 7D Mark II is very fast.  It is not fast like the 1Dx but comparable in AF performance to the 1D Mark IV and that's very good indeed.  I was a bit off my game having not shot hockey in a while so I felt out of sync a bit and it showed in the images.  Shots were clean in the viewfinder and accurate on the LCD.

I shot in RAW (as I always do) and using a Sandisk 32GB Extreme card rated at 120 MB/s I never managed to fill the buffer.  I did find that high speed burst at 10fps was overkill and low speed at 3fps was inadequate.  Fortunately the 7D Mark II allows you to set your low speed burst rate.

I tried the anti-flicker setting on the camera.  I honestly cannot tell if it made a difference at all so next time I shoot without it.  I've also programmed the camera for back button focus only because I found that having focus on the shutter button resulted in extra frames because the trigger is a bit light compared to either of the 1D models that I have.

I set the camera to AWB and that worked out pretty darn well and left the Auto Lighting Optimizer turned off.  Never have found a real use for that since I tend to expose to the right most of the time.    Since I shoot RAW I don't worry about the colour space or picture style crap but I do set AdobeRGB and Neutral if only to get the LCD JPEG to look as much like the RAW as possible.

About 700 frames knocked two batteries in the grip down to about 75% so decent enough performance.  Shots on the LCD looked fine but Canon has changed the Info display and it no longer tells me the information I want to see the way I want to see it.  Instead they have replaced it with a scrolled display that shows all the JPEG setting cruft instead of the basic exposure info with a full sized image.  Those Canon folks build a nice camera, but they still do not understand User Interface.

The game was heavily dominated by the Aurora Tigers until the third period so I did not get the variety of images I would have preferred but that happens sometimes.

I pulled the CF card and put it into my card reader to import the images to Lightroom and to my horror, every image looked like it was on an acid trip to LSD World.  Arrrggghhh!  So I tried Photo Mechanic.  Arrrrgggghhh!  Then I decided to stick a fork in my eye and try to get the current Digital Photo Professional from Canon's site since Mac's don't come with DVD drives.  No problem so long as I manually TYPE IN THE THE FRICKING SERIAL NUMBER FOR EVERY DOWNLOAD!  Canon I have two words for you numbnutz and the first word rhymes with truck.  No one would actually steal your crappy software, so pull hard and reverse the cranio-rectal inversion you are suffering from.  Jerks.

Well that didn't work either.  But I knew that the 7D Mark II could save in RAW and to both cards and it worked, so I pulled the card from the Lexar USB 3 Card Reader on Mac Pro the cylinder and went down to the studio to try it in the Lexar Firewire Card Reader on Mac Pro the cheese grater.  Every image is just fine.  Hmmm

Is it the Lexar USB 3 reader?  Is it something in the new Mac Pro?  Is it some ghost in the machine?  I went back upstairs and put the SD card in the reader.  It has some RAW images on it.  They imported fine.  Hmmm I plugged the CF card into the reader again and checked again.  Everything is perfect.  Two hours lost in failed imports and assorted futzing about but it all worked the second time.  I still don't know why but have made a note to myself that unless I am in a rush, to use the cheese grater and push the RAW files right to the NAS and import them from there, rather than off the card reader.  Maybe the card is too fast for the reader on LR import.  Still don't know.

Anyhoo.  Lightroom does actually have a RAW converter for the 7D Mark II.  I am not certain that it is a GOOD RAW converter yet.  As yet, DXO does not have a RAW converter for the 7D, it's due in December.  I have found on other occasions that the DXO RAW converter does a better job than the Adobe one.  I did try Apple's RAW Converter with Aperture and I think it did a better job.  RAW conversion is a big deal to me, and even after post processing, I found the Lightroom files kind of flat, whereas the Aperture versions were better and with a lot less work.

So what about the noise?  Well when I did the studio test using studio heads in big light shapers, the 7D Mark II was excellent to 6400 ISO.  I was less impressed with it in crappy lighting in the arena.  For higher ISOs to look good, you need good light with decent contrast and I just wasn't getting that in the arena.  Noise at 3200 for hockey is about the same as the noise at 6400 with studio lighting.  Still a long way better than the original 7D, but not as good as I hoped it would be.

In fairness, I need to give it another shot.  I may take a trip to the Ray Twinney Centre to shoot a Hurricanes game.  The Hurricanes are my hometown team but the current owners are challenging and I gave up shooting the team about a year ago because for every nag with the Canes, the Tigers arena and people are welcoming.  Sadly the Twinney Centre has better lighting.  I will also turn that flicker thing off and try shooting with the longer glass to eliminate the need for so much dead space cropping.  I was hopeful to avoid the weight of the 120-300/2.8 and it's required monopod but I will give it a shot regardless.

I've attached a few images from the culled stack, none are awesome but they will give you a sense of what you can expect.  All images were processed in Lightroom for a minor exposure bump of +⅓, lifting of the shadows a bit, increased clarity, pushing the black point left and lifting the white point marginally.  Clarity and a bit of vibrance were added.  The image then round-tripped through Nik Sharpener Pro 3 and Nik Dfine 2 noise reduction.

Thanks for reading and until next time, peace.

Ross

TIP : Reduce the size of your Lightroom Catalog

My friend Jennifer is an avid photographer and switched to Lightroom about a year ago.  She came by because she said that things were horribly slow and that she had convinced her husband to get her a new Mac, but what could be done in the interim? I checked all the usual suspects and when launching and exiting Lightroom 5.7 with my usual optimize / backup checked, I had to kill the process after SEVEN minutes.

She had just under 8,000 images in the current catalog and it was over 3.2GB in size.  I went over to my Mac Pro.  My current in use catalog has about 32,000 images in it.  My catalog was under 500mb.  What?

Jen loves to experiment.  She'll try presets, and plugins and sliders to learn what they do and to push her creative bent.   I made a discovery that surprised me.  Lightroom saves your History into the Catalog.  I mean it has to save it somewhere, but I never thought about the "where".

So I did an experiment after checking that there was a solid backup of the catalog and confirming with Jen.  I went to the top of the Lightroom Catalog in the Library module and did an Edit | Select All to pick every image in the catalog.  Then I switched to the Develop module and from the Develop menu chose Clear History.  A dialog box popped up to ask if I wanted to delete the history for the current image or all selected images.  I selected all and then sat back to wait.

=== After I posted this, a comment was made that I missed a step ===

=== Not so ===

Lightroom did the work in the background, and in about five minutes, the Catalog had dropped to 1.8GB in size.    Exiting Lightroom was fast this time, exiting with a full backup and optimization in under two minutes.  The final catalog was even smaller after optimization.

So, if you find Lightroom is dragging, and your catalog file seems disproportionately large, perhaps consider clearing your history.

QUICK LOOK : Aputure Trigmaster Plus II 2.4G Wireless Flash Triggers

trigmaster-plus-II-500x380.jpg

If you are spending money on kit for photography, you know by now that there is a ton of stuff coming out of China to help you do what you want, often at a significantly lower price than you might expect. Sometimes, this stuff is utter junk, but the folks building products under the Aputure brand have been pretty consistent in delivering good value for your money for simple products done well.  That's also true for the Aputure Trigmaster Plus II.Thanks to Chris Atkinson of Henry's Newmarket for making a kit available to test.  The kit has two units, a belt case, batteries (in paired carry sleeves) and sync cables in a single box that sells for $129.99

That's a bit more than the Cactus V5 trigger set that I've written about in the past, but this kit brings so additional value that makes the difference more than worth it.  The cables alone, would cost more than that bought separately, and the packaging even includes the adapters needed to fire off studio heads like a Bowens.  Considering that this kit of two is less than a single Bowens Pulsar receiver, this might be a good deal for some users.

The Plus II name is a nudge to Pocket Wizard because at a glance, the units look like the old Pocket Wizard Plus II triggers.  Like a PW Plus II they stand vertically in your camera's hotshoe and like a PW Plus II these are completely manual triggers, meaning you set your own shutter speed and aperture and control power of your flash head manually.    Unlike the PW Plus II, each unit also has a standard hotshoe to trigger your mounted speedlite.  There is a ¼-20 mount on each unit which also acts as a cold foot.  Each unit requires 2 AA batteries to operate.

Each unit can be set for TX/RX (transmit/receive) or RX (receive only).  The three position power switch offers off, on and Super.  Off and On are obvious, Super is a special mode that is purported to extend the range of the radios to 500m.  I had no ability to test that range but in non-super mode, I can confirm that the units work through multiple walls, multiple floor levels and through metallic lined softboxes without any fail to trigger events.  Super mode supposedly is much harder on batteries.  It may also make your head glow, but as I said, I had no need to try it out at length because normal mode worked great every time.

The units each have a folding antenna and a simple channel selector. They are limited to 7 channels, vs the competitors 16 and 32 but this probably won't be a big deal for most photographers.  Setting the channel is easy.  There is also a Relay mode if you really need to reach far out and need to relay your trigger signal to another receiver.

What is very nice about the system is that like the Cactus V6 transceivers, the Aputure can be set to transmit in up to four separate zones, and you can then configure the receiver to be in the zone you want.  While there is no remote power control as in the Cactus V6, there is value in zone management, and the ability to send signals to only selected zones.  This is very handy when you have multiple flashes and are trying to check the exposure for each zone independently.

Like most of this type of radio flash trigger, the Aputure unit can also be used as a wireless radio trigger for a remote camera, but as usual, you need to order the cable for your camera.

The manual is easy to understand, with plenty of diagrams but if your eyes get challenged by micro-print, a set of magnifier glasses will be handy to have.  That the units are made in China is plain from all the Chinese characters on the box and in the documentation, but in the end the units do what they say that they will do and you can get to work quickly without having to study complex instructions.

I think that the Aputure Trigmaster Plus II kit is a good value for what it does.  Note that there is no TTL support, so flash exposure either becomes a series of experiments or a flash meter will need to enter the picture at some point.  They will get your flash off camera, but all your amazing automation will be gone.  If you're good with going all manual, then this kit is a pretty decent choice.  However, if you want TTL and automatic exposure control and you want radio triggering instead of the somewhat challenging line of sight infrared, get yourself a set of Phottix ODINs, or Hahnel TUFF TTLs or even <chokes> Pocket Wizard TT1/FlexTT5s.

Recommended so long as manual flash management is ok.  Image courtesy of Aputure

QUICK LOOK : Cactus V6 Flash TX/RX - despite all the pins these aren't TTL

cactus-V6-birdview.jpg

I've written before about the very excellent Cactus V5 radio transmitter / receivers for your hotshoe flash.  Great range, simple to use, and pretty much foolproof, so long as you understood power and exposure control were all manual.  Then a seminar attendee was telling me of his challenges with off camera flash and how things would be solved by his new Cactus V6 set because the salesperson told him that they had TTL.  Really?  For about $160 a pair?  I had to check this out.Let's get this cleared up right away.  There is NO TTL in the Cactus V6 units.  What there is, is some tech that profiles TTL flashes so you can control their output power through MANUAL settings from the transmitter.  That is actually quite useful for lighting dorks as as myself, but regular users want wireless flash that works simply and painlessly, and without the line of sight limitations of infrared triggering that is built into most camera / flash systems today. Folks who want this need to move along, because the Cactus V6 systems don't do that.

What they do, is build on the V4 and V5 units to include four zones, with each zone having individual power control from full down to 1/128 power with compatible flash units.  The flash unit list is decent and includes the usual Canon, Nikon, Pentax, Metz, Nissin, Olympus, and Panasonic suspects, along with Cactus brand flash units.  The devices can also "learn" many unprofiled flash systems and operate them as well.

The confusion comes from the hotshoes and the feet of the units.  They have multiple pins, just as you would find on a TTL flash.  In fact the single unit has enough pins that they interface directly with Canon, Nikon and Pentax without having to choose a specific model.

At first glance in fact you would think you could control the flash from the camera menu itself, especially since you are supposed to set the unit configured for Transmit to the TTL setting.  But when you try to access the external flash control menu, it tells you that there is no external flash installed.  Much frustration ensues.

You would also expect that with all those pins, the camera would know that there was some kind of flash signalling device telling the camera about itself and that would give flash ready indicators and maybe even set the proper sync speed.  Yeah you'd expect that, but over 70% of the time, the camera had no idea that the Cactus V6 was in the shoe, in TTL mode, powered up and ready to go.  In fact after futzing around for an hour to try to determine what magic sequence was required for the camera to know that there was a flash trigger present, I just gave up.

When you do get the camera to see the trigger, and understand that you are setting the power output manually across up to four flash zones, the units become reasonably usable.  They have a legible LCD panel, a decent menu system and easy to use zone controls.  I was working in my studio and the zone LEDS were so bright that they looked like red lights.  When I went to a much brighter room, I discovered that the red lights were actually letters, so that is even more useful.

I was very hopeful that the V6 would duplicate the incredible range of the V5 units.  Sadly they resemble the performance of the old V4 units, where while you don't need line of sight, a couple of drywall partitions were enough to stop the radio signal from getting through.  When I put the receiver with flash on it inside a Westcott Apollo Softbox, I had 30% trigger failure, possibly the metallic silvery liner impedes the radio signal.  I've never had that happen with the V5 units, or Canon's radio, or the Profoto radio, or even the ridiculously expensive and requiring of a blood sacrifice cursed Pocket Wizard TT1/FlexTT5 units.

Each unit runs on 2 AA batteries (not included) and comes with a little stand.  The unit can sit in a hotshoe or be mounted to a standard ¼-20 fitting on a light stand or tripod.  There is a very easy to use lever lock to hold the unit in place on the hotshoe, and I credit Cactus.  It's not beautiful but it is so much simpler and more effective than those silly knurled ring systems.  Units are sold individually (about $80) each and come with a quick "lighting options" guide and a tiny manual.  If your eyes are becoming more demanding, you will need magnifiers for the tiny print.

With an accessory cable, you can also use the Cactus V6 units as remote radio triggers for your camera.  So if you happen to need to trigger a remote camera, this could be a useful advantage for you.  My friend Bryan shoots pro wrestling, and it's an advantage to fly a camera above the ring and to be able to fire it from ringside on demand.  You can do this with other trigger systems, including the Cactus V5s just be sure to order the right cable for your camera.

The units have a USB port for firmware updates, but for most every photographer I know this is pointless since it is a Windows only updater.  I do understand that Windows has dominate marketshare overall, but more creatives I know use Macs instead of Windows.  So for me at least, this makes the update functionality completely useless.

Conclusion

While the multiple zones are very handy, and the ability to control output power from the camera across four zones, and potentially multiple TTL flash vendors sounds good, I'm not convinced.  I don't believe that the V6 system solves the flash control problem as well as the more expensive Pocket Wizard system and if you want real flash control from the camera, you are better off with Phottix Odin, Hahnel TUFF TTL or even Yong Nuo radio TTL triggers.  Price point is one thing, usability is another.  Not recommended at this time.

STUDIO TEST : Canon 7D Mark II ISO Performance

Ever since I received my Canon 7D Mark II, I have been itching to see what its real high ISO performance looked like.  I could have tried this with JPEGs but I just couldn't bring myself to do it.  Fortunately, the day I write this, Adobe has released Lightroom 5.7 and the latest Camera RAW that directly supports the new RAW format.  Let's see what I learned.Canon's 7D Mark II produces crop sensor delivered images that are approximately 20 megapixels.  Dimensions are 3648 x 5472 pixels per frame.  This is a standard 2:3 aspect ratio, the same as a full frame sensor.  File sizes at ISO 100 were about 21MB each growing to 35.2MB by the time I got to ISO 51200.  This isn't surprising because the greater amount of noise requires more data points so larger files. The Test Shots

I put the Canon 7D Mark II on a Manfrotto 496 ball head mounted to one of their carbon fibre leg sets.  Usually I use Really Right Stuff but sadly the L-Bracket for the 7D Mark II is backordered so far.  I attached a Canon electronic cable release to minimize camera shake even while on the tripod.  I have found microshake even on this tripod at shutter speeds as fast as 1/13 second, so it's a good idea that you always use a release cable when shooting slow speeds even on a tripod.

I used Canon's 85mm f:/1.2L lens for each image.  While the 85/1.2 produces stunning bokeh, the purpose was to test ISO performance so I set a middle aperture of f:/11 for every shot.  Once I had the depth of field I wanted, I set up the lights.  Because I knew I would be running the gamut from slow to fast shutter speeds, well past the camera's native flash sync, and not wanting to get into High Speed Sync complexity I decided on using continuous light, so I set up the Westcott Spiderlite TD-5 with an 18" x 24" softbox slightly up and 45 degrees left of my usual model Sondra.  Distance from the front diffuser to Sondra was about 2 feet.  On Sondra's left and 1 foot away was a Lastolite Trigrip Reflector clamped with a Manfrotto Spring Clamp mounted on a light stand, using the white/silver striped surface.  I didn't want a really punchy reflector, but more snap than plain white.

Once the light and reflector were placed, and Sondra was in position, I took incident light readings with the dome of the Sekonic 478DR placed at Sondra's chin and pointed at the lens.  I was taught this positioning by Frank Doorhof as this measurement will make the cheekbones just a bit brighter because of the relative distance from the source.  Frank was right, and now it's my standard practice when the light is above the subject.

Once I had my meter reading for ISO 100, I made the first exposure.  For each subsequent exposure, I simply doubled the ISO and halved the shutter speed.  I did check each change with the light meter to verify my math was correct.

The results were very good.  The 7D Mark II delivers a significant improvement in image quality at higher ISOs than the original 7D.  Since the camera will be used most aggressively by wildlife and sports photographers who often have to deal with crappy light, this is a real boon.

To be fair, while it is much better than its predecessor, it's not the high ISO performance you will get out of a Canon 1Dx, Nikon D4s or the respected Prince of Darkness, Nikon's Df, a camera I reviewed and continue to say you can shoot all day long at ISO 25600 and get really good images.

But, the 7D Mark II doesn't go near the price territory of those cameras either, and it's not full frame with larger pixels to deal with the lower light levels.

In the gallery attached you can see images where the only things that change are the ISO and the shutter speed.  Since it is all continuous light, there is no quality shift caused by different shutter speeds so you get a fair representation of the ISO performance.  I started at ISO 100 and by doubling the ISO at each frame got to the camera maximum of 51200 in ten frames.

You can click on any image to make it larger, and as you mouse over, a caption will appear to share the relevant EXIF data.  As I shoot OJHL hockey in arenas where the lighting is often questionable, I used to be concerned about pushing the original 7D past ISO 1600.  Based on this initial test, I am quite comfortable that I will be able to shoot at 6400 and get good images.  By reasonable post-processing, I am confident that I can really make the noise irrelevant.  The images posted here have only had two modifications done in post-processing.  They all have a common white balance set custom using a reading off the grey background, and they all have had the Lightroom lens correction for the 85/1.2 applied, not that it does very much at all.  No other tweaks were applied so this really is the RAW output exported as JPEGs 1024px long side at 72dpi for the web.

Conclusions

This is not meant to be a comprehensive review of the 7D Mark II.  It is a fairly comprehensive single light source test of the ISO performance of this body with a decent lens mounted to it and constraints placed on the camera position and the lens aperture.  Reviews of any kind are always subjective, and in my opinion, the photographer who shoots, Canon, and wants a tough high performance DSLR body with a crop sensor, and who also needs really good low light performance will not go wrong with a 7D Mark II.

Next test will be video, and it will be a bit unfair because the comparison will be with my original 7D hopped up with Magic Lantern video firmware.  I will keep you all posted.


The Size of the Light - Thoughts on the Big Octa

BigOctaC1-005.jpg

When I first started learning about lighting a long time ago, my master (I was an apprentice and he liked being the master) said it very succinctly, "big light up close is good light".  Of course there are  situations where this could be untrue but since I've been tagged as a  lighting geek, I've found that most of the time he was right.  Later, when taking a class with Joe McNally, I asked the dumb ass question, if you could only have one light with one modifier what would it be, he said "big octa"  Then he showed the class why.  This past Sunday, I did a seminar at Henry's Newmarket on getting started with studio flash and I demonstrated a bunch of modifiers.  But due to time and space, I didn't show my favourite.  One of the attendees had heard me speak about the big octa in the past and asked why it is so good.A big diffused source, in close makes for very soft light, but not necessarily flat light that is boring as all get out.  It has dimension and almost a flavour to it.  So the last couple of evenings, I made some space in the studio and erected the Bowens Big Octa.  It's the first really top end soft box I ever bought and while it is large and cumbersome, the light is just magical. bw1650_octo150_front_three_quarter_shot_3Bowen calls this modifier the Octo 150 because it is 150cm across.  Unlike my Elinchrom Deep Octa (called the Deep Throat in Europe, I guess NA is too PC for that) the Octo 150 is a relatively shallow bowl shape as you see in this image.

So that's a five foot in diameter octa box.  It's large and a bit heavy.  You can see the manipulator arm coming out of the back of the mount as well.  This is important because the studio head is mounted inside the Octo 150 and fires backward into the bottom of the bowl. The area around the mount takes a white reflector panel to prevent hot spotting off the internal silver reflector.  This then bounces the light around and out the single front diffuser.  As you see in the image, the white diffuser is a perfect circle, masked away from the octa frame.

Bowen say you can mount any studio strobe in this Octo 150.  Yes, but you need the proper mount adapter for your strobe.  Mine came with, as expected the Bowens S Type mount for the head.  The sample images herein were all shot with a Bowens 500 Pro head with PW Radio Receiver.  The head power was controlled with Bowens IR remote by peeling back the front to make changes.  I kept the modelling lamp off after positioning to keep the heat down.

So why does a big source matter?  There's this thing I hear that light from a big source "wraps around" a subject.  Light doesn't actually bend unless in the presence of a gravity well much bigger than you will find in your studio, but the giant bowl makes for lots of different angles of incidence exiting the front diffuser to give the appearance of "wrap".  All those different angles of incidence also produce a softness you cannot get from a smaller source.

So I asked my regular model Sondra if she would sit for images from the big octa.  As usual, she was completely silent but held the same facial expression for every shot.

1Dx 70-210/2.8, face 3 feet from front of Octo 150

1Dx 70-210/2.8, face 3 feet from front of Octo 150

1Dx 70-210/2.8, face 3 feet from front of Octo 150

1Dx 70-210/2.8, face 3 feet from front of Octo 150


Sondra has very dark brunette hair but one of the real benefits of the big octa is that you get wonderful range of colour tones without having to use masks or over expose the shot.  All these are out of camera as RAW tethered into Capture One and exported as 1024px JPEGs at 72dpi for the web.  No other processing was done.   I moved Sondra only marginally and the Octo 150 not at all, primarily myself and the focal length to obtain different looks.  Even in her painted on eyes you can see the lovely round catchlight from the big octa.

The other benefit is the quality of the shadows.  We want shadows because they give dimension, but the enormous size of the source makes the shadows less harsh and there is a much wider tonal range available across the shadow range.  The big source also has a softening effect overall making it ideal for portraits.

You can certainly do full body shots with a big octa, it has the range to give you reach.  This was powered to factor 4, where the Bowens 500 Pro goes from 1 to 7 so this was three full stops under full power and even then I was getting between f/11 and f/13 depending on the position of Sondra.

The camera was of course in manual mode, which is how I always shoot studio strobes except for the my Profoto B1 Airs that do very good TTL.  I used a Sekonic 478DR flash meter with the PW trigger built in to pop the flash and take meter readings.  I know that you can get to a good exposure with no flash meter in a couple of shots with experience, but I like the convenience and speed of the flash meter.  McNally never uses one, but another teacher of mine, Frank Doorhof swears by them.  For big flash I find them handy.

If you shoot portraits against a neutral backdrop with the intent to put your subject on a different backdrop in post processing the incredible softness of the big octa also makes the placement on a variety of different backgrounds more simple because you are fighting to correct heavy shadows or light that is too harsh.  Back in the day when I apprenticed and backgrounds were stripped out of the transparencies so other backgrounds could be placed, the photographers always went with big soft lights, mostly big white umbrellas in those days, to make the lift more simple.

The Octo 150 is Bowens' version.  Every major studio modifier maker has their own big octa.  Elinchrom does a reverse firing one like the Bowens and Profoto also has a giant octa.  No matter what studio head setup you choose, a big octa is going to produce incredible light quality and you will get great return from the investment.

REVIEW : Canon C300 Dual Pixel Auto Focus (DAF) Upgrade

key_visual_c300.png

I am not a professional videographer.  On my best days, I might be an amateur, but I do try.  Like many folks making videos, I have struggled with the size of my crew, given that it has a count of one, and since I do reviews and training, I am often the camera operator, the director, the producer and the alleged talent.  So when Canon announced the ability to make my loved C300 do useful and speedy autofocus, I gave it serious consideration. Classic camcorders were said to focus really fast.  Not really, they actually used really tiny sensors so any aperture delivered massive depth of field so the focusing effort was minimal.  Not so professional gear that uses DSLR or CINE lenses.  Professional crews have an operator and a focus puller so precise these lenses can be, particularly when they have very wide F or T stops.

But if you are a one person crew, that becomes challenging, particularly if you are also the talent.  The C300, out of the box would actually do autofocus using a select number of Canon's EF-S STM lenses.  STM lenses are silent during focus which is critical for noise control and most of them are of sufficiently good optical quality to produce decent images.  They aren't L glass or Canon or Zeiss CINE glass by a long shot but can help get the job done.

I had been using the STM 18-135 for the one-ups where I was all the parts of the video.  It worked ok, but as I tend to move while presenting there were times it had to work to keep up.  After seeing a C300 with the DAF upgrade and playing with it at a trade event for 10 minutes or so, I decided to bite the bullet and get my own done.

Canon Canada's Service Centre was excellent.  They were friendly, helpful and fast.  I got my camera back in less than seven days.  Once I got it home I put the 18-135 on it and tried a few takes.

The AF is now much faster, more accurate and more usable in real world production.  It looks to the centre of the viewfinder display and shows a rectangle where the focus function is looking.  You can lock focus to hold it during a move, slide or pan if you need to, just like on a DSLR.  I set mine on continuous AF and then sat down at my little set to record a test shoot of a product review.

Despite the head movement and waving of hands, the camera did a much better job at maintaining focus than in the past, so long as I did my job and stayed in the AF area.  In a previous firmware update, Canon had significantly extended the usable range in low light and coupled with this new AF, the camera is even more flexible than it was out of the box.

You can of course turn AF off whenever you wish to, but when it helps, it really helps to have this level of performance.

All new C300s have the modification done at the factory.  The prices have also come down since I got mine.  Ah well.  Some will say that the Canon CINE line is overpriced for what they deliver, but I bought mine with eyes wide open and following adding the DAF upgrade, I think that I will get even more usable life out of the unit.

The DAF upgrade costs $500 and is available for Canon C100 and C300 CINE cameras.  You must return your camera to Canon for the upgrade.

I recommend it to all C100 and C300 owners.

(image courtesy Canon USA)