The Photo Video Guy Podcast - Episode 60

Adobe kills Creative Suite goes all subscription and pisses off most everyone.  Mobile LR will be cloud dependent.  Canon having manufacturing issues?  5D MkIII firmware out.   New Canon TS lenses by Christmas?  No 7D Mark II this year.  Canon misses earnings estimates.  Pentax updates K-5 II family firmware.   RRS and Thumbs Up gear for Leica M.  Zeiss to build lenses for Sony NEX and Fujifilm X.  X100S firmware update and rumoured X-Pro 2.  Think Tank releases new bags for DSLM cameras.  UK IPO says your posted images are free game.

Why Adobe Creative Cloud is a bad idea for photographers

Yesterday at Adobe MAX, Adobe talked about the future of the Creative Suite, or more accurately the no-future of the Creative Suite. As I predicted, this is the last version of the Creative Suite. From here forward, if you want current Adobe software you will only have a single option, that of subscribing to the Creative Cloud. I like Adobe products, but there is nothing in the Creative Cloud that is sufficiently compelling to photographers. In fact, Adobe put so much spin on the "value proposition" that it could torque the top off the Burj Khalifa. Why would Adobe do this?

Benefits to Adobe

  • Single code base, centrally reposited
  • Annuity revenue stream
  • Prevents software piracy on new versions
  • Ability to release new features on availability
  • It's a subscription. No subscription, software stops working
  • Cloud connections allow siphoning of user usage data
  • No public patch library to maintain

Bad for You

  • No local install to use when you want to if subscription expires
  • Pay forever model
  • Over the shoulder data gathering
  • No ability to run older versions

Alleged Benefits to You

  • New features available sooner without waiting for a version update
  • Payable over time, no single large charge
  • No need to buy software assurance
  • Create new workflows across multiple devices

Adobe is a business. They will make decisions that will do at least one of three things, preferably all three.  Not that your happiness is not in this list.

  • Increase Profit
  • Decrease Cost
  • Reduce Risk

When they make these decisions, you and I as customers come way down on the priority list. This is completely normal. Companies say customer first but it's not true. It's always company first spun in a manner to smell like the customer is winning. Sometimes, the customer even does win. The alleged benefits of the Creative Cloud are dubious on their best day. The lie about new features being available faster is a complete pantload. Service packs and updates have been the norm forever and new code and new services have been delivered this way since day one. The Adobe statement is a burning bag of s**t. The illusion that you will save money is another load of poo. You only save money if you have a clear end date when you will no longer use the software and this end date is prior to when you would have paid the traditional license model off. Adobe is SMART. They understand that once they've hooked you, getting off the hook will be hard. What benefit has software assurance ever really delivered to anyone? In a demand marketplace, new versions appear regularly, they are always upgrades and the software assurance will have magically expired or the change will make the assurance not qualify. Microsoft has smoked customers with this line of crap for years. IBM does this today. It's not new, it's an old well proven lie. As a user I may be able to create new workflows across multiple devices but to do so, I will be binding my workflow and devices to Adobe. You're free to work any way you want so long as it's Adobe's way.

The sad reality is that there is nothing really in here for the photographer.  The ability to use Adobe Revel?  Big whoop.  The ability at some point in the future to maybe do culling on your iPad and have that sync to your Lightroom library?  That would be nice, but why would that be tied to Creative Cloud?  If they really wanted to make a clean workflow, there's no reason to force everything into Creative Cloud.

So Why Are They Doing This

In software and as a corporate software developer, you want to get a customer and keep the customer FOREVER.  You want to make it as difficult as possible for customers to use your tools and then leave you for another vendor.  Proprietary file formats, locked file structures, patented screens, patented workflow sequences are all tactics that every major software company has tried.  The plain and simple goal is what the software industry knows to be VENDOR LOCK-IN.  Their goal is to lock you up into their infrastructure so tightly that if you leave, you get to start over at ground zero.  It's not just Adobe.  Oracle and IBM and even Apple have been pulling this kind of scam for a long time.  The difference with Creative Cloud is that you only have ONE licensing option, that being subscription.  Subscription can work.  But only if it is priced correctly.  $20 per month on a minimum one year term for Photoshop may be ok, but I think that the price is high.  $50 per month on a one year minimum for the entire Creative Suite means that after 10 months, I would have paid the upgrade to an entire new version.  Will I get an entire new version in 10 months?  NFI.  And unlike the current licensing model, if I have no need to upgrade, and just want to use the software that I know and love, there's no option.  If I stop paying, the software stops working.  It's about as customer hostile as you can get.

So why would a smart company do this?  Cash money would be one reason.  The ability to lock a customer in for a long time is another.  Building a predictable annuity revenue stream is another.  Note that keeping customers happy is not in scope.

I've been watching the trade journals and at DP Review, Techcrunch, and numerous others, I have not found any kind of proportion of note that likes the plan.  Over 90% think it sucks.  Some do like it.  Some of them also believe that it's for our own good, whatever the f**k that means.  I don't agree.  I think that the Creative Cloud program is nothing but a complete and utter cash and marketspace grab.  So I choose not to play.  I would reconsider if the pricing were reasonable.  People would not pay $2 for a song online but at $0.99 it was a landslide for the record industry.  The movie industry still wants to charge more for a digital movie of lower quality than a physical movie of higher quality.  This is both stupid and exactly what I would expect of those troglodytes.  Adobe needs to fix it's recto-cranial inversion and if they are so frakking committed to Creative Cloud, price it so participation ceases to be a question.

What About Lightroom?

It's been said that Lightroom will not be part of the Creative Cloud. So far. If Lightroom 5 is available as a standalone purchaseable license, I will upgrade. If only available in the Creative Cloud, I'll be getting off. I won't be signing up for Creative Cloud. As a CS6 Master Collection licensee, I could spend years and still not get leverage of all the incredible capability in the software I already have. Moreover, there are LOTS of alternatives in the marketplace for the things that I need to do. Yes, Adobe products do many of them extremely well, but I'm not willing to live by Adobe's draconian model to use their newest offerings. Capture One, Aperture, hell even iPhoto could be ok. Nik (until Google kills it), OnOne, DxO, Tiffen all make great point editing solutions, often available at terrific pricing and NONE OF THEM STOP WORKING IF A SUBSCRIPTION EXPIRES.

You might love Creative Cloud.  If you do, good for you, save time and effort commenting on how wrong I am.  Instead go use your software until they change the terms and conditions without prior notice and feel an enormous pain in your rear end.

Three Tools Photo Editors MUST HAVE

I'm often asked by students and club members what they might need to be successful photographic editors in the digital darkroom. I will take as a given, a decent camera, editing software that fits the person's needs and some training on the software.  You don't get very far without those at least.

But once photography becomes more than a spectator sport, you will need three key elements to help you maximize your returns.

1.  Display Calibration

If your computer display is not set correctly, and if it's not calibrated, it's not set correctly, you won't get what you really expect from your editing.  Moreover images exported for the web and especially those that are printed are not going to match what you saw in your editor.  There are lots of calibrator options out there.  I have bought over the years, the Huey Pro, the Spyder Elite and the Color Munki Pro.  Save time and money.  If you only need a display calibrator buy the Color Munki Smile.  It's all you'll need and does a great job.  I DO NOT recommend either the Huey or the Spyder.  It's your money, spend as you wish but the Color Munki is far and away the best system in my book.  Buy it on Amazon and help support The Photo Video Guy

2.  Tablet

There are a variety of pen enabled tablets in the marketplace.  For any kind of semi-serious to serious editing, there is only one.  The Wacom Intuos 5.  There are multiple sizes, I find the Small to be extremely convenient. There is a minor learning curve to working with a tablet, but once you do, you'll wonder how you ever did any kind of real editing with a touchpad or a mouse. Buy it on Amazon and help support The Photo Video Guy

3. Grey Card

Putting a grey card in the first shot of a sequence will make your white balance and exposure management much simpler. You can certainly get more sophisticated tools such as the ColorChecker Passport that I like very much and use myself, or the dedicated Lastolite popup grey card (and white card for video) but even a basic grey card works well. Put it in your bag and USE it and you'll be surprised at how much better your images are when you edit them. Buy the Passport or Lastolite on Amazon and help support The Photo Video Guy.

The Photo Video Guy Podcast - Episode 59

Nikon delays 800/5.6 Nikon maybe dumps Ashton Kutcher. DP Review reviews D7100. Canon to completely relaunch EOS-M line. Canon firmware out for the 6d, coming for the 5D Mk III and 1Dx. Canon announces patent for 400/4 DO IS II. Sigma to ship USB dock for new lenses. Sigma announces 18-35/1.8 for crop sensors.Black Magic shows Pocket Cinema Camera and new 4K Cinema Camera at NAB. DxO Optics 8.1.5 supports D7100. Adobe makes Lightroom 5 Beta Preview available. Apple adds support for Fuji X-Trans sensor. Photoshop World impressions.

The Photo Video Guy Podcast - Episode 58

Nikon updates firmware on the D600, D800/E, D4, D3, D3s, D3x and D7000.  Canon updates firmware and system apps on EOS-1Dc series.  Leica to increase lens prices in May.  Adobe releases Lightroom 4.4 and ACR 7.4.  Google disavows Capture NX.

REVIEW : The Fuji X-Pro1 - Not getting what the hype is about...

XPro1_Studio_-004920130329-2.jpg

Enough people have been asking me to do an in-dpeth review on the Fuji X-Pro1 that with a long weekend available, and some free time, I arranged with the wonderful Louise Booth of Henry's Cameras in Newmarket to borrow a demonstration unit for this review. I know that some of the requesters were hoping for me to bring my alleged razor tongue to the unit.  Others have challenged my previous assertions about the performance of the autofocus.  Fuji has been a manufacturer of great glass for decades so it was time to give things a shot.  Most of the lenses to fit this camera are primes, but as there was not a prime available to test, I used the 18-55/2.8-4.0 that's often included with the XE-1 although you can certainly get this lens in a kit with the X-Pro1.  So here we go.

Overview

Fujifilm X-Pro1 w 18-55/2.8-4.0 Lens

The X-Pro1 is relatively compact, a bit smaller than a Leica M9 body.  It's very light and there is a finger grip area on the front that makes the camera easy to grip.  It has the common pinhole style strap lugs on the body and unlike the much loved OM-D they don't dig into your hands.  I used a Black Rapid strap attached to the tripod socket instead, more on that later.

The camera uses SD cards, and for my tests I used a Sandisk 32GB Extreme Pro card.  I wanted to use a really fast card because some cameras have been choking on them.  Happy to note no issues with the Fuji.

I only had the one lens for the test so all the sample images are made with the 18-55/2.8-4.0 zoom lens.  Even though it has a nice standard 58mm filter mount, I didn't have one with me so I worked with no filters at all.  The samples were shot in the studio and at the McKenzie Marsh in Aurora Ontario.

I shot everything in RAW that the camera stores as Fuji's proprietary RAF format.  Images were processed in three different RAW converters for reasons to come, specifically Adobe Lightroom 4.4 RC, Capture One 7.1.1 and the Fuji delivered SilkyPix RAW File Converter EX 3.2.12.1

Body

Body layout is decent.  The top controls going from left to right (looking front) starts with a

X-Pro 1 Top View

TTL capable hotshoe in the centre, then the shutter speed dial with A for automatic mode (used for Program and Aperture preferred).  Next up is the shutter release surrounded by a rocker switch to turn the camera on and off.  Far right front is a configureable Fn button and far right back is an exposure compensation dial measured in 1/3 stops from -2 to +2 EV.

The front has the lens mount, the

X-Pro1 Front View

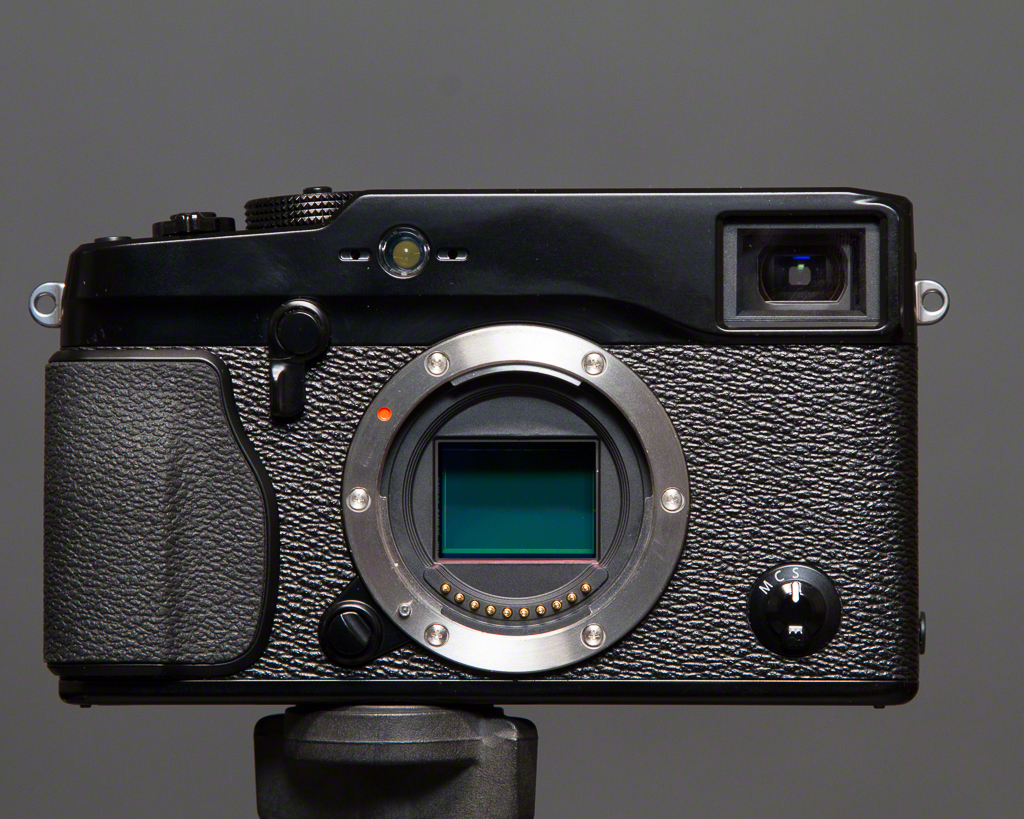
optical viewfinder and a small switch selecting between single shot, continuous and manual focus.  Just beneath the shutter release is a lever that allows you to choose between the optical viewfinder with bright frame lines like a proper rangefinder, or the electronic viewfinder.  Both have their place.  The optical viewfinder is very real, including the incursion of the lens barrel into the lower right of the view.  The electronic viewfinder is very bright and easy to use.  One of the nice functions of the EVF is that it gives you live exposure simulation when you are using exposure compensation.  As I find exposure compensation is sometimes difficult for new photographers to understand, the simulation really gets the point across quickly.  This function is not unique to the X-Pro1 but is nice to have here.

X-Pro1 Rear View

The rear of the camera has the LCD display, a view mode button, a four way rocker with MENU/OK in the middle and a roller switch.  Down the left of the LCD are Drive, AE and AF buttons that do double duty for zoom and discard in Playback mode.  There is also a DISP/BACK button, a green playback button, a quick menu button to be used with the aforementioned roller switch, and a configureable AE-L/AF-L button.  The top of the 4-way rocker also enables a Macro function.

X-Pro1 Right Side


X-Pro 1 Left Side

The right side holds the covered USB and HDMI ports.  The left side has a speaker port, and HOORAH! a PC sync port for flash connections.  The bottom plate holds the tripod socket, and a hinged door to access the battery and the SD card.

For the purposes of the review, I updated the firmware on the unit to V 2.0.3 which is current at the time of writing.
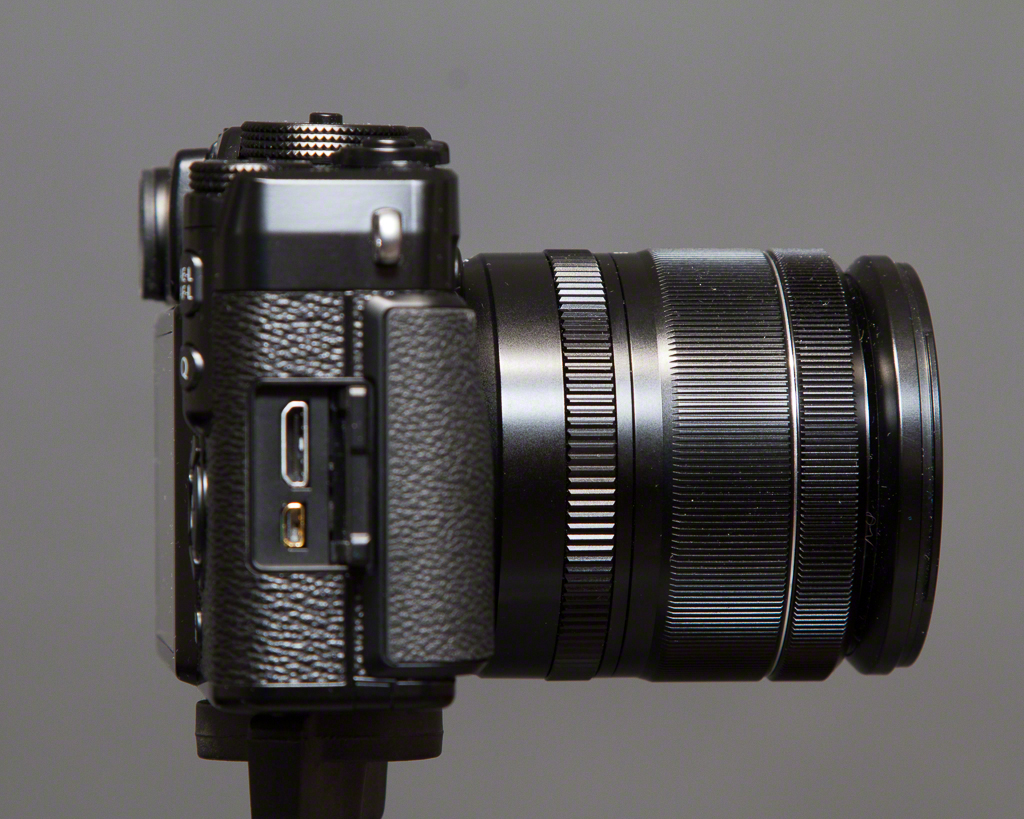
Lens

The lens is about the same size as other 18-55 lenses as found on APS-C DSLRs but feels MUCH more solid, mostly due to the fact that metal is involved in the construction.  The zoom ring is wonderfully smooth and sufficiently stiff not to be sloppy.  The lens has a real aperture ring that you actually use to control the aperture in Av and Manual modes.  The lens uses Aspherical elements and of course has Fujinon's EBC (electron beam coating).  The lens accepts a bayonet style hood, but I did not have it for the test.  There is a two position OIS (optical image stabilization) switch for on / off and selector showing a picture of a diaphragm or A that is used for manual or automatic aperture settings.  Put the switch in the diaphragm mode for Av or Manual and in A for Program or Tv operation.

Positives

The fit and feel of the camera is excellent.  It fits the hand really nicely and you can carry it around without developing hand fatigue.  The rubber is grippy and I never felt like I could drop the camera at any instant.

With the new firmware, the autofocus is much snappier than my tests in store when the unit was introduced.  It's still not Sony RX100 or Olympus OM-D E-M5 fast but it's usable, but I wouldn't pick this camera first for fast action.

As noted earlier, the exposure simulation in EVF mode is really useful.  I really like the placement of the exposure compensation dial, although a bit of practice is needed to prevent knocking it into another setting.  The View Mode button chooses between viewfinder, LCD or auto switch mode.  I used it primarily in the last mode and the switch is very quick.  One thing to note is that if the EVF is active, you are going to see the review image in the EVF, so if you have the habit of looking to the LCD to chimp, it doesn't work that way.  If the viewfinder is in optical mode, the LCD behaves "normally" in review mode.

I found the placement of the AE-L/AF-L button sort of handy but it's a bit of a dance to lock the exposure with the button and lock the focus with a half-press of the shutter.  The AE bracketing function is quite good once you find it in the long menu list, and you can hold the shutter down in this mode to burst brackets handheld.  I also found the Dynamic Range bracketing to be interesting but not really making of a big difference in real world use.

Negatives

I shoot left eyed, which to get a full view presses the tip of my nose against the LCD.  I do not have a large nose and I would feel for a left eyed person who does.  The LCD is a giant nose grease trap and users should have a micro-fibre cloth handy at all times because grease sticks to the LCD with terrifying efficiency.  If I owned the camera, I'd put a Zagg protector on the glass immediately so I could clean the LCD easily.  The auto switch sensor prevents the use of an eyecup so this is a real nuisance to me.

The tripod socket is in a really lousy place.  If you use a strap that connects to the socket, or like to have a quick release plate on your camera, know right away that anything in the socket is going to impede the opening of the battery door preventing simple access to the battery and the SD card.  Given that I use L plates on everything, this is a major PITA to me and I want to smack the designer that approved this with a large dead fish.

The Q button is mostly useful, not that you can easily figure out how to manipulate it without futzing around or cracking the manual, and if you have reasonably sized hands, get used to hitting it regularly, even when you don't want to.  In general the labelling is rarely clear and needs some User Interface smarts applied to it before the next version.

I dislike having to move two different switch settings to switch between modes.  This is just nuisance value.

Fuji has taken a lot of flack for its menus.  I'm going to say that the menu layout is crap and couldn't get to useful with turn by turn directions and prepaid bus ticket.  Particularly annoying is the Drive menu that was plainly designed by someone who has never dealt with a multi-variable menu selection system before.

I tend to leave my cameras in low speed burst mode.  Not this one.  It bursts like a flea on speed if you go near the button.  I ended up with 3-6 shots regularly with a simple button press and as the camera is to its credit very quiet, you could fill a card and not know why until it's too late.

If I want film emulation, I will do that in post.  Unfortunately even in RAW mode, it looks like you are still getting film emulation because Std mode is Fuji Provia.  I don't know if you are getting film emulation but I think you might be based on EXIF data reported by Capture One.  If you can turn this off, I could not find it.  If you can't turn it off, wake the frak up Fuji because not everyone wants the look of your old film.  If you can turn it off, make it clear that it's OFF.

Processing Images

Fuji made big hay about their X-Trans sensor that forgoes the well known and accepted Bayer filter layout.  Unfortunately this means that RAW processing is still a complete train wreck.  I know people who only shoot in JPEG because the RAW conversion sucks and blows simultaneously but I don't find it acceptable to spend this kind of money and have to throw 30% of your bits away just to get a viewable image.  Apple's OS X Camera RAW doesn't work with RAF files.  Lightroom 4.4 RC has a RAW converter for RAF but many reviewers have said it's not very good.  I agree.  I also tried Capture One's new X-Trans RAW converter and it looks a LOT like the Adobe one.  Because I like pain, I also tried the SilkyPix Raw Converter EX.  To call this software a piece of shit insults shit everywhere.

Why am I so negative about the RAWs?  Because if use a 3:1 zoom ratio I can see little rectangles in the images!  If I do this with other RAWs, they may not be razor sharp but they are not obviously pixellated.  I did a direct comparison between images shot with Canon's 18-55 for the EOS-M and the Fuji 18-55 on the X-Pro1.  The levels of sharpness, noise and pixellation are dramatically worse on the Fuji, so much so that this one thing fires up the Danger Will Robinson alert system.

Conclusion

Great fit and feel in a rangefinder style camera.  Great build quality in the lens tested.  Reasonably quick auto-focus and accurate exposure control.  Some wonderful control layouts, compromised by lousy menu structures.  Bad placement of the tripod socket gets in the way of access to the battery and SD card slot.  I cannot tell if the X-Trans sensor is any good because the RAW converters create uniformly choppy images.  They might be doing the job extraordinarily well in which case the X-Trans is an epic fail.  It's also possible that I got a bad version of the camera.  Maybe 2.0.3 is not good firmware.  I don't know, but based on the real world testing, I would not spend the money on this thing.  It would be fine at half the price, but for the kind of money involved, I'd much rather get an OM-D E-M5 because it kicks the X-Pro1's ass down the block and around the corner.

Sample Images

Click this link to go to the sample gallery.  All images are straight RAW conversions unless otherwise documented.

Specifications (provided courtesy of Fujifilm Canada)

Model Name FUJIFILM X-Pro1
Number of effective pixels 16.3 million pixels
Image Sensor 23.6 mm x 15.6 mm (APS-C) X-Trans CMOS with primary colour filter
Dust reduction system
Ultra Sonic Vibration
Storage Media SD memory card / SDHC memory card / SDXC (UHS-I) memory card*1
File Format
Still Image
JPEG (Exif Ver 2.3)*2, RAW (RAF format), RAW+JPEG (Design rule for Camera File system compliant / DPOF-compatible)
Movie
H.264 (MOV) with Stereo sound
Number of recorded pixels L : (3:2) 4896 x 3264 / (16:9) 4896 x 2760 / (1:1) 3264 x 3264 M : (3:2) 3456 x 2304 / (16:9) 3456 x 1944 / (1:1) 2304 x 2304 S : (3:2) 2496 x 1664 / (16:9) 2496 x 1408 / (1:1) 1664 x 1664<Motion Panorama> L  Vertical: 7680 x 1440 Horizontal: 7680 x 1440 M  Vertical: 5120 x 1440 Horizontal: 5120 x 1440
Lens Mount FUJIFILM X mount
Compatible Lens
  • Interchangeable lens FUJINON LENS XF18mmF2 R
  • Interchangeable lens FUJINON LENS XF35mmF1.4 R
  • Interchangeable lens FUJINON LENS XF60mmF2.4 R Macro
Sensitivity Equivalent to ISO 200 - 6400 (Standard Output Sensitivity) AUTO mode : AUTO (400) / AUTO (800) / AUTO (1600) / AUTO (3200) Extended output sensitivity equivalent ISO 100, 12800 and 25600
Exposure Control TTL 256-zones metering, Multi / Spot / Average
Exposure Mode Programmed AE, Shutter priority AE, Aperture priority AE, Manual exposure
Exposure Compensation -2.0 EV - +2.0 EV, increments with 1/3 EV step
Shutter Control Focal Plane Shutter
Shutter Speed (with mechanical shutter) (AUTO mode) 1/4 sec. to 1/4000 sec., (All other modes) 30 sec. to 1/4000 sec. Bulb (max. 60 min.) Time 1/2 to 30 sec.
Continuous Shooting Max 6 / 3 fps selectable
Auto Bracketing AE Bracketing (±1/3 EV, ±2/3 EV, ±1 EV) Film Simulation Bracketing (Any 3 type of film simulation selectable) Dynamic Range Bracketing (100%, 200%, 400%) ISO sensitivity Bracketing (±1/3 EV, ±2/3 EV, ±1 EV)
Focus
mode
Single AF / Continuous AF / MF Distance Indicator
type
TTL contrast AF, AF assist illuminator available
AF frame selection
Area (EVF / LCD: 49 areas with 7 x 7, OVF: 25 areas with 5 x 5) / Multi * changeable size of AF frame: among 5 type
White Balance Automatic scene recognition Custom, Colour temperature selection (K) Preset: Fine, Shade, Fluorescent light (Daylight), Fluorescent light (Warm White), Fluorescent light (Cool White), Incandescent light, underwater
Film Simulation Mode 10 type (PROVIA/STD, Velvia/VIVID, ASTIA/SOFT, Pro Neg H, Pro Neg S, B/W, B/W+Ye filter, B/W+R filter, B/W+filter, SEPIA)
Dynamic Range Setting AUTO (100-400%), 100%, 200%, 400%
Self-timer Approx. 10 sec. / 2 sec. Delay
Flash Modes Hot shoe with TTL contacts; sync terminal Red-eye removal OFF: Auto, Forced Flash, Suppressed Flash, Slow Synchro, Rear-curtain Synchro. Red-eye removal ON: Red-eye Reduction Auto, Red-eye Reduction & Forced Flash, Suppressed Flash, Red-eye Reduction & Slow Synchro, Red-eye Reduction & Rear-curtain Synchro.
Hot Shoe Yes (dedicated TTL Flash compatible)
Flash Synchro Terminal X terminal, synchronized Shutter speed: 1/180 sec or slower
Viewfinder
Hybrid Multi Viewfinder
Optical viewfinder
Reverse Galilean viewfinder with electronic bright frame display Magnifications: 0.37x / 0.6x Coverage of frame area v.s. capturing area: approx. 90%
Electronic viewfinder
0.47-in., approx. 1,440,000-dots colour LCD viewfinder Coverage of viewing area v.s capturing area: approx. 100%
Eye sensor installed
Eye point:
approx. 14 mm
LCD Monitor 3.0-inch RGBW (White) LCD monitor, approx. 1,230,000 dots, (Approx. 100% coverage)
Movie Recording 1920 x 1080 pixels, 1280 x 720 pixels (24 frames/sec.) with stereo sound Individual movies can not exceed 29 minutes in length.
Photography Functions Select custom setting, Motion panorama, Colour space, Colour (Saturation), sharpness, Dynamic range, Film simulation, Gradation, Auto red-eye removal, Framing guideline, Frame No. memory, Histogram display, Preview depth of focus, Focus check, Electronic level, Multiple exposure, Date input, Fn button setting (One-touch RAW, Movie, etc)
Playback Functions RAW conversion, Image rotate, Red-eye reduction, Photobook assist, Erase selected frames, image search, Multi-frame playback (with micro thumbnail), Slide show, Mark for upload, Protect, Crop, Resize, Panorama, Favorites
Other Functions PictBridge, Exif Print, Languages selection, Time difference, Quick start mode, Power save mode, Silent mode
Terminal
Video output
-
Digital interface
USB 2.0 High-Speed
HDMI output
HDMI mini connector
Power Supply NP-W126 Li-ion battery (included)
Dimensions 139.5 (W) x 81.8 (H) x 42.5 (D) mm / 5.5 (W) x 3.2 (H) x 1.7 (D) in. (Minimum depth: 34.1 mm / 1.3 in.)
Weight Approx. 450 g / 15.9 oz. (including battery and memory card) Approx. 400 g / 14.1 oz. (excluding battery and memory card)
Operating Temperature 0°C - 40°C
Operating Humidity 10 - 80% (no condensation)
Guide to the number of available frames for battery operation approx 300 frames
Starting up period -
Accessories Included Li-ion battery NP-W126 Battery charger BC-W126 Shoulder strap USB cable Body cap Metal strap clip Protective cover Clip attaching tool CD-ROM (Viewer software, RAW File Converter etc. *3) Owner's manual
Optional Accessories Li-ion battery NP-W126 Battery charger BC-W126 Shoe Mount Flash EF-20, EF-42, EF-X20 Interchangeable lens FUJINON LENS XF18mmF2 R Interchangeable lens FUJINON LENS XF35mmF1.4 R Interchangeable lens FUJINON LENS XF60mmF2.4 R Macro Protector Filter PRF-52 52 mm Φ Protector Filter PRF-39 39 mm Φ Hand Grip HG-XPro1 Leather Case LC-XPro1 * The lens of focal length at 35 mm or less can be placed in this leather case with the camera X-Pro1.

Sample Images

The Photo Video Guy Podcast - Episode 57

Canon rumours - giant MP camera, new 100-400L and 7D Mark II.  Sigma delays 120-300/2.8 release. Google adds Snapseed functionality to Google+ and releases the full Nik bundle at $149.  Dxo Optics Pro adds 200 lens/camera profiles in 8.1.4.  iStockphoto founder Bruce Livingstone launches Stocksy

The Photo Video Guy Podcast - Episode 56

Nikon D7100 is available and first looks are positive. Nikon's new 80-400 also available. Canon to replace 200/2L and 800/5.6L? Canon announces Rebel T5i and SL1 DSLRs. No 70D for now. Sigma earns DxOmark kudos for 35/1.4. Wacom announces Cintiq HD 13.ACR Beta 7.4 supports D7100 files. Google kills Snapseed Desktop.

Quick Look : Blackmagic Cinema Camera

blackmagiccinemacamera.jpg

Inspiration for this post comes from NCC member Eden.  Eden is making a number of short films, shooting on a Canon 60D and asked the other night about the Blackmagic Cinema Camera.  My knowledge was not really sufficient so I spent time digging into the product to produce this quick look. blackmagiccinemacameraThe Blackmagic Cinema Camera is designed from the ground up for video.  It's architects have built a product for commercials, episodic television, documentary work and feature film creation.  Blackmagic has great street creds in the areas of digital production.  Indeed they make many products that make getting to video simpler for people of all skill levels.

bccelegantThe camera is a compact device taking interchangeable lenses.  There are two models, the Blackmagic Cinema Camera EF and the Blackmagic Cinema Camera MFT.  The EF takes Canon EF and Zeiss ZE cinema lenses and the MFT takes passive micro four-thirds lenses.  PL lenses can be mounted to the MFT using a third party adapter.

Cinema lenses are different architecturally than still lenses, they are built for cinema film work and excel in this space.  Canon's recent foray has brought their C series of cinema cameras as a competitive offering in addition to RED and to Sony.

bccversatile

The Blackmagic Cinema Camera is unique in its price point of under $3000 USD for the body.  That is substantially less than its erstwhile competitors.  It is compact and effectively sized and doesn't look like a classic cinema camera.  As you can see from the pictures herein, it looks like a simple box with a display on the back.

bccssdThe camera houses a 2.5K sensor capable of capturing 12bit RAW footage.  In this format about 30 minutes of 24p video can be captured on a 256GB SSD.  The camera also natively supports Apple ProRes and Avid DNxHD at 1920x1080 pixel resolution.  This means direct interaction with popular Non-Linear Editing systems without the need to transcode, a significant time and quality saving.  Storage is on removeable 2.5" SSD drives.  This is a very innovative approach as it provides the filmmaker great flexibility and huge storage performance opportunity.  Drives can be prepared (formatted) native with Mac OS X or with third party formatting tools for Windows.

One of the real hallmarks of the camera is that it has 13 stops of dynamic range, far superior to that found on still cameras used for video capture which top at 6 stops in good examples.  Focus is manual but focus peaking is built-in to obtain precise focus and an auto Iris button is provided to control the iris to prevent clipping.

bcctouchscreenThe integrated display is 5" diagonally and offers 800x480 pixel density.  It is a capacitative touchscreen design maximizing camera rear real estate.  The display can also be used to add metadata in the field, to make annotations and notes, and to otherwise keep your footage organized as you capture it.

Connection to the computer is via Thunderbolt so extremely fast file movement is available. There is 10bit SDI video out in 4:2:2 and 4 channel SDI-HD bccconnectionsaudio out.  The camera has two 1/4" balanced inputs switchable for mic or line level input.  There is also a built in mono mic and mono speaker for monitoring capabiility.  There is a standard 2.5mm LANC jack for connecting a remote.

The camera follows industry standards offering 48khz 24 bit audio and SMPTE 292M video.

The camera is capable of running for 90 minutes on a fully charged battery, with recharging time taking about two hours.  The camera includes an AC supply and there is a port for external battery packs as well.

bccdavinciresolve bccultrascopeIn addition to the turret cap, sun shield and strap, the camera includes DaVinci Resolve full license software for Mac or Windows and includes the dongle.  Media Express software is included for video capture via the Thunderbolt port.  Blackmagic also includes their Ultrascope software for waveform monitoring via the Thunderbolt port.

All in all, it's extremely impressive.  Yes you will need to buy glass in addition to the camera, and you had better have a computer handy, and yes you will probably want to be a Mac user.

Full specs can be found here.

OPINION : Non-linear Video Editing

I never learned iMovie or Elements or any of the simple to use video editors.  I learned on Final Cut Studio, a monster application with incredible power and a definite learning curve.  I got to a level of not completely dangerous competence.  Then Apple released Final Cut Pro X.  Apparently iMovie users loved it.  I found the transition somewhat difficult and certainly real Professionals had issues with FCP X.  Apple has enhanced the product since release and added in many of the missings that were in Studio and not in X. FCP X works fine and is definitely priced competitively and the Motion application at $50 is a stunning buy.  Regardless, I was regularly frustrated by two things.  If I shot anything on a Canon digital camcorder it had to use this dumb transcode thing just to get the media into a project and then when I was finished, compressing and exporting video was a pain in the butt, many of the direct uploads did not work properly and the encode took a LONG time.

So I was looking around www.lynda.com one day and saw a class by video guru Rich Harrington on moving to Adobe Premiere Pro for Final Cut users.  Mr. Harrington has forgotten more about video editing than I will likely ever know but his teaching style is easy to follow and I worked through the training and was very impressed.  To me, it looked like Premiere Pro had the same kind of structure as Final Cut Pro Studio from an editing perspective.

Since I owned the Master Edition of the Creative Suite (for other reasons) I already had Premiere Pro so I thought I would give it a shot.  It has a learning curve, like any serious product but having the background of sorts in older non-linear editors it wasn't all that hard.  I also took the Lynda class on Premiere Pro with Abby Shapiro, the instructor I had learned Final Cut Studio from.

Usability is incredible and I'm sure I have not even scratched the surface of the product.  What I know is that editing video and audio is straight-forward for me and performing corrections and adding effects is dead simple.  Adding credit rolls and title sequences and lower thirds is very simple.  As with FCP X there are a number of templates included and veritable slew of external offerings available on the web.

What really sets Premiere Pro ahead for me is how it leverages my hardware for high performance.  FCP X could use my Matrox Mini video coprocessor, some of the time, but it didn't seem to add much in the way of performance.  Premiere Pro sees the Matrox automatically and easily leverages the Matrox assisted compression algorithms.  This was like pulling teeth in FCP X.  There was also no real consumption of the GPU in the Mac Pro that I could see.  I recently changed out the ATI 5870 in the the Mac Pro for an nVidia GTX 680 (it works fine with 10.8.x but no boot screen) and I changed a couple of text files in the config and now Adobe's Mercury engine fully leverages that stack of Cuda cores in the GPU.

I also found that the Import in Premiere Pro was instant.  No transcoding or modifications required.  Massive time saver.  Once the editing is done, I select Export, pick the compression type and hit Queue.  The export job goes directly into Adobe Media Encoder and it really screams along.  This is so much more reliable and so much faster than the FCP X or Compressor alternatives that to a working pro, the time savings would pay the price difference in no time at all.

I am not a professional video editor.  Premiere Pro rocks it for me.  I am told that the current release of Premiere Elements is also very quick and very easy, an improvement over prior versions.  I have no personal experience with it but if as rumour has it, Elements contains a lot of the functionality of the Pro release, it might do the job for you.  I'm going to stick with Premiere Pro.

Now to learn enough After Effects so what I make doesn't suck enormously.

The Photo Video Guy Podcast - Episode 55

The D7100 may be out earlier than expected.  The new Nikkor 80-400 releases in Japan this week.  The new Coolpix A is announced.  The 1 Series 32/1.2 appears on Nikon's website.  Canon has developed a full frame CMOS sensor for video.  Zeiss rumoured to release a 28/1.4 and a replacement for the 85/1.4.  Phase One announces three new digital backs.  Wacom to release a touch tablet this summer.  DxO hates the M9 sensor.  Sekonic USA giving away ColorChecker Passport with 478 meters.

The World's Worst Full Frame Sensor?

Recently the folks at DxO released their assessment of the Kodak CCD sensor in the Leica M9, M9-P and ME.  They called it the worst full frame sensor in the world.  Thus Leica fans developed apoplexy and Leica haters took to the internets for group slamming. I own and M9.  It's a freaking awesome camera.  The camera is more than the sensor.  It's the size, the feel, the glass, and the images.  It's not terrific at high ISO, it has no video (YAY!) and it's a CCD.  That and something on the order of a ten spot will buy you some frappy drink at Starbucks.

Why is the DxO review irrelevant?  Because there was no lens involved in the test.  Right.  The tests are mathematical, not image oriented.  How one can offer a qualified report on a camera sensor without using it as a camera, sounds about as likely as oh say, political integrity.  The review also doesn't take into account that the sensor was developed specifically by Kodak to capture the light from a small lens on a large sensor.  As Steve Huff points out, no Kodak sensor, no digital Leicas.

Be that as it may, my Leica is wonderful.  There are things it doesn't do well, and there are things it does better than anything else.  Let's focus on the photography and not the engineering reviews, what do you say?

Tips to Make Better Photos : Shooting Hockey

Shooting sports is not my forte.  I shot soccer and football a million years ago in High School and have been shooting Polo for a couple of seasons.  My friend Susan's son plays in the OJHL for the Aurora Tigers and I went out once last year to provide her some coaching support.  This year was busy but I've been pushing to make time to attend local games.  We're into the Quarter Finals of the OJHL playoffs and the action is great! 1Dx_NmktWhitby_-003020130303-156

What I love about OJHL hockey is that the young players are really committed to the game and are NEVER going through the motions.  I actually prefer this hockey to the NHL, but that's my choice.  I can attend a lot of games at a very fair admittance price, get very close to the ice and shoot like a mad fool without being in the way of the other spectators.  I have the good fortune of being able to attend local team's games as both the Newmarket Hurricanes' and the Aurora Tigers' home ice is reasonably close.

1Dx_NmktWhitby_-003020130303-354These shots are from a recent game between the Newmarket Hurricanes and the Whitby Fury.  I thought it might be interesting to share some of the things I have learned the hard way about shooting hockey.  First, you have to know the game, at least to some extent.  I surely don't know the ins and outs of hockey as well as my wife does, but well enough to set up for shots and to be continuously learning to anticipate where the puck will be, to paraphrase the Great One.

1Dx_NmktWhitby_-003020130303-73

So to get started, one of the first things I learned is that the lighting in Junior hockey arenas is pretty horrible.  It looks ok (mostly) to the eye but is a mess of colour temperature.  In the Ray Twinney Centre in Newmarket, my friend Brian Watts, who shoots hockey professionally, warned me of the "red" corners.  The ice looked fine to me live but once I downloaded the photos the span of white balance was all over the place.  I have tried arriving early to do a custom white balance but that didn't work out well because of the amount of variance so now I shoot AWB and correct in post.  The other thing about the lighting is that it is dimmer than you think it is.  I've shot everywhere between ISO 800 and ISO 2500 and now go in with the ISO set to 2500 and live with slighter reduced tonal range and nominal noise.  This is one place where the low light capability of the 1Dx blows me away.

1Dx_NmktWhitby_-003020130303-79My shooting kit for hockey is as follows;

  • Canon 1Dx in Av, ISO2500 EV, +1 2/3, Focus Tracking in Mode 6, AI Servo, Evaluative Metering
  • Sigma 120-300/2.8 lens either wide open or f/4 and RRS lens plate
  • Gitzo 3551 Carbon Fibre Monopod with RRS MH-02 Head
  • Black Rapid HD Sling Strap

That's pretty much it.  If I want "environmental" images, I put my Leica M9 with Zeiss 35/2 in my coat pocket.  As much as I love the Leica, rangefinders aren't optimal for sports and the high ISO performance need in hockey rinks isn't wonderful.

eos_1dx_03The 1Dx has Canon's new case based focus tracking module and I've tried all the different cases to shoot hockey.  The 5D Mark III has a similar system and I find that Case 6 for subjects that are fast moving and change direction erratically works well for shooting with the long glass.  I get a lot fewer missed shots because the AF is not transitioning in accordance with the game.  In this mode the AF works with me, not against me.  I can now say I understand why pro sports shooters love this camera.  In fairness most all semi-pro and pro level gear has focus tracking of some type built in, but I find the Canon system so fast and so easy to use, I love it.  I set a single focus point and follow the action, using the back focus button (AF-On) to enable the AF in advance so it's locked when I press the shutter.  Obviously I have the AF set to AI Servo mode.  I've tried spot, center weight and evaluative metering patterns and have gone back to evaluative.  It's not perfect but nothing in a hockey rink is neutral grey so my experiment with spot metering linked to the AF point produced a disproportionately high failure rate.

136_120-300mm_osThe Sigma lens is extremely sharp. There are Lightroom profiles for it and I give the Sigma folks credit for their design because the corrections are relatively small, the lens is that good out of the box.  The only downside to the Sigma is that it is big.  I mean really big.  I'm no tiny guy, but if I had to handhold this glass for a full period, I'd need a chiropractor, a sports masseuse and bed rest.  So I go with the Gitzo monopod and the Really Right Stuff MH-02 Monopod head.  This head is AWESOME.  It offers a smooth moving tile mechanism so I can loosen it off and have smooth but not sloppy tilting while panning with my body.  This is a new monopod head for me and I'm looking forward to the coming MH02LRPolo season as it will help a lot.  By mounting a Really Right Stuff plate on the lens foot, I can have the foot in the LR clamp on the monopod and leave the Black Rapid strap with the Really Right Stuff FAB adapter attached at the same time.  Very handy and very secure.


From a shooting perspective, I find arriving early at the arena and surveying potential shooting locations is critical.  Most town arenas have pretty beaten up glass and shooting through it isn't optimal.  You want to be close enough so you aren't cropping out 80% of the shot but also high enough so you aren't shooting partially through the glass.  I can shoot manual but find that Aperture preferred works well for me.  I set the lens at f/2.8 or f/4, depending on the available light and find in most arenas that with an ISO of 2500, I will get shutter speeds above 1/500 of a second.  Yes the lens has optical stabilization and yes I am using a monopod but that doesn't change the fact that hockey moves FAST.  In the sample pictures, I am able to mostly freeze the players yet in most cases, the puck is still blurred.  I like this as it conveys the sense of action.  You'll also note that by default I dial in +1 2/3 stops of exposure compensation to keep the whites from going grey.  I tried just dialing in +2 but I kept running into situations at certain points on the rink where the shot just blows right out.   I can add the 1/3 stop in post processing but if the important stuff gets blown out completely, there's no bringing it back.

Hockey is a blast to shoot.  I'm starting to wonder what sport I will shoot when the season is over other than Polo.  Junior hockey is a professional league and the OJHL is very supportive of photographers (no selling of images is the major rule).  Many other sports leagues are very protective of photographic rights or are against photography at all where youngsters are playing.  If your child is playing, it may be easier for you.

I'm hopeful that both my local teams go all the way.  They have a wonderful rivalry and it would mean plenty of games for me to shoot before season's end.  Many of the players I have photographed this year are going away to school on hockey scholarships next year, so we'll see a new group of players in the 2013-2014 season.  If you want to learn to shoot hockey, your local teams are a great place to go shoot and you'll be supporting your local community.

1Dx_NmktWhitby_-003020130303-272


Tips to Make Better Images : Taking or Making

I admit to being a bit pedantic about this, but there is a substantial difference between taking a picture and making a photograph.  Thats not to say that there is anything wrong with taking pictures but the real joy and differentiation comes when you make a photograph. Youre driving along and see something that grabs your eye.  You pull over and take a few shots with your smartphone and get back to the driving.  Youre sitting at home and the cat does something amusing.  You grab the camera and snap some shots before it bores of you and ambles off to sleep.  Your child comes out of her bedroom with a sleepy face, mussed hair, thumb in mouth and shes just so cute you hit the burst mode to capture this moment in time.  These are all great pictures, fun to share with family, friends and social networks if you go that way.

At another time you decide to make a photograph of a friend.  Before you shoot, you mentally visualize the final image.  You think about light and shadow.  You consider the dimensionality of the image.  You think about the background, and make a decision to throw it out of focus by using shallow depth of field, and check to make sure that it wont create distractions.  You meter carefully to position yourself to maximize soft light and reduce contrast in your friends face.  You make sure that there wont be anything growing out of her head.  You look for wrinkles in the clothing, you have her press her chin forward to streamline her neck and you make sure that her eyes arent buried in shadow.  You tighten up your composition to fill the frame and place her face into a pleasing arrangement.  You decide that a bit of fill flash will help fill shadows under the eyebrows and under the chin, so you add your flash and diffuser and watch that they dont create shadows in opposition to the existing light.  As you press the shutter you watch for an expression that creates a framework for the viewer to create his or her own story.

If the last scenario sounds like a lot more work than the first three, you are correct.  Its the difference between making a photograph and taking pictures.  Both are valuable, both have reason to exist but its the last one that will help you grow as a photographer.  Im not ever going to advocate a 365 anything as I find them to go mechanical very quickly.  What I do encourage you to do is to challenge yourself to make photographs regularly.  Every photograph doesnt have to be museum grade, every photograph does not need to be a saleable item.  While many of our mentors derive all their income from photography, many of us do this for the fun and joy of having and investing in a creative pursuit.  The only viewer you have to please is you, and if part of that pleasure is learning what does and does not work, youre winning.

Tips to Make Better Images : Calibrate Your Monitor

CMUNSML_M1.jpg

As digital photographers, we have the luxury of having complete control of the digital darkroom.  We have not always had this, but with great power comes great responsibility.  (with apologies to Stan Lee and John Romita Jr.) Your responsibility?  Make sure that BEFORE you start working in the digital darkroom, make sure your tools are not lying to you.

Here's a secret.  Unless the magical unicorns of editing sit on your shoulder, your monitor is wrong.  If you are still using a CRT, don't spend money on a calibrator, go buy a decent IPS display and come back after you've done that.

IPS or In Plane Switching displays are a great place to start with for a display.  But maybe you have a general LCD, or LED powered LCD or a laptop display.  Then by default you are seeing issues.  Most all monitors these days have the ability to change their brightness automatically.  Good for word processing and browsing, bad for editing.  Most all monitors come set from the factory to eyeball stunning brightness, crushed gamma and high contrast.  Why?  So they look "better" on the wall in the retail store.  It's just like a TV.  If you bought your TV at a big box store, it was on display in "demo" or "vivid" or "retina burn" mode.  You get it home, turn it on and it hurts.  If you play games on your computer, many games "reconfigure" your display for brightness and contrast, or to make the dark scenery legible so the monster doesn't eat your face, you turn the display way up.

Enough kvetching on my part.  A display calibrator reads the display, measures the display capabilities and produces a display profile called a display ICC.  These are just like a printer / paper ICC file but for your display.  There are lots of vendors out there doing this with the best known being the Datacolor Spyder, the Huey and the X-Rite Colormunki.

CMUNSML_M1I have owned all three.  The Huey was incredibly inconsistent.  Software updates were rare and doing multiple monitors cost extra.  Bad - do not buy.  Until the release of the Spyder 4 Elite (and only that model), the calibrations were never consistent and Datacolor's software is still serialized to a single computer.  Bad choice - do not buy.  The Colormunki line consisting of the Photo, the iDisplay, the Display and now the Smile are easy to use, have great software, are fast and consistent.  The Smile is new and sells for about $120.  If you don't need to profile printers or paper or projectors, buy the Smile, keep the rest of your money in your pocket and get to the calibrating.

I've spoken about calibration on the TV show and at meetings of the Newmarket Camera Club.  A very seasoned member, who has developed a healthy cynicism about tech sent me this email the afternoon after he bought a Smile.

"Ross,

I did the calibrations on my three monitors......quite a difference..
I also took it to work and let the Publication Dept do their monitors.
They now know why the publications look bad.
All of their monitors were way off.
I'd recommed this to anyone who wants to look at real colour on their montors."
The deal was that if he did not see a difference in his displays after calibration, he would return the device, no questions asked.  He's not returning the Colormunki Smile, and I expect the production department at his place of work will be buying their own as well.
Calibration isn't perfect and you should be recalibrating your displays regularly.  I do mine every two weeks.  Since the process takes all of five minutes, it's no problem at all.  If you aren't happy with your edited work not looking the same on paper or on the web, or you do all kinds of editing work on your machine and it then looks like cat yak on a different machine, your monitor is in need of caibration.  Save time, save headaches, save frustration, get a display calibrator and if you want it good, fast and inexpensive go directly to the Colormunki system.

The Photo Video Guy Podcast - Episode 54

Canon 12-24/2.8L prototype in the wild?  Canon to release a 70D at the end of March?  Specs for the next EOS-M.  Leica M (240) now shipping in limited quantities.  Pocket Wizard intros Plus X.  Phase One releases Capture One Express.  Adobe has new release candidates for Lightroom and Camera Raw.  Adobe releases Photoshop Touch for iPhone and Android.

Tips to Make Better Images : Black and White Processing and the Use of Filters

It appears I start many tips the same way, so in keeping some consistency... Back in the days of film...

Happy now?

Black and white processing for digital images has come a long way from the horrible B&W converters of old or just dragging all the saturation away in a colour image to make a black and white one.

We now have superior post processing tools designed specifically for the creation of black and white images.  The two that I am inclined to recommend are Nik Softwares Silver Efex Pro 2 and OnOne Softwares Perfect B&W.

Both products offer a number of really well done presets that could be the end or the beginning of your black and white creations.  The primary thoughts that go into black and white digital processing are a) maximizing the dynamic range of the exposure and b) getting the contrast to the right levels to facilitate story creation.  By removing colour, the viewer must become more engaged in the story making process and so our artistic intent has more power, given that the pretty colours are stripped away.  Think of the multiple fall leaves images or sunsets you have seen and think of what story they initiate if devoid of colour.

One of the lesser used functions in black and white digital processing is the use of coloured filters.  When we shot B&W film, we carried an assortment of coloured filters that by filtering out their own colour, would change the look of the black and white image, sometimes substantially, to help create the storyboard.  With digital processing you dont need to carry sleeves of filters for b&w anymore although you can if you wish.  Its just a lot easier to do this in post.  Lets take a look at the effects of some of these filters.  Note that most of the these filters can be applied in post processing, but two of them, the Neutral Density and the Polarizer are only effective when used at time of Image Capture.

Yellow

When I started shooting film, one of my mentors at this time, an awesome fellow by name of Jim Brotchie, told me to go out and get a Yellow filter and put it on the lens ALL THE TIME when shooting b&w.  He convinced me to set an adjustment on my handheld meter (my camera at the time had no internal meter) to compensate for the light loss when shooting with the (Y2) filter.  Yellow filters reduce the yellow and so enhance blues and improve contrast overall.  You do have to watch that they dont increase the visibility of human blemishes too much but the effect is nearly always an improvement.  If you dont know where to start when processing b&w images, try adding a yellow filter first.

Orange

Go figure that an orange filter is like a yellow filter only stronger.  The same guidelines apply, but you have to be more careful with reddish subject matter going lighter.  This filter is very useful for b&w images of fall colours since it lightens oranges and reds while darkening greens and blues.  Some really stunning images of Chicago blues musicians with very dark chocolate skin had beautiful contrast and texture appear, when an orange filter was applied.

Red

Red filters were most commonly used with the old infrared films, but work very well on some landscapes as they deepen the blue of skies and make reds nearly white so you can get very interesting juxtapositions with red leaves and blue skies.  Whites, greys and blacks transit mostly unchanged so you can really make outdoor images pop.  Red filters for people produce a very pale skin on caucasian people and whiten reddish areas like lips and blemishes.  For the most part a red filter is not optimal for human beings.

Light Blue

A light blue filter makes blues light and darkens reds.  So not particularly optimal for landscape work but wonderful to soften blemishes and to create contrast between skin and lips on light skinned people.  Pretty much the go to filter for b&w images of women.  Use caution because very bright blue eyes can take on a possessed look.

Dark Blue

Not really useful as they tend to block up contrast heavily and darken most colours.  Try as an experiment but not a filter you are going to use a lot.

Green

Greens will lighten foliage and may increase contrast in clouds.  Some people like the effect on skin in portraits.  Again something to experiment with, but certainly not a go-to filter for black and white.

Neutral Density

We know what ND filters do.  They reduce the light transmitted to the sensor.  This allows us to slow shutter speeds or increase the aperture size for creative effect.  These filters should be in every photographer's kit and are one of the two that you really need to be using at time of capture.

Polarizer

The Polarizer is most often considered to deepen blue skies or to remove reflections in colour photography.  It adds the same value to a B&W image so if the plan is to go make images that will be B&W processed, use the Polarizer for the same reasons you would for colour.  The Polarizer must be a real filter and is used at time of capture.  Polarizer effects in post processing or for the most part, lousy.

Tips to Make Better Images - HDR 101 by Guest Writer Darren Gahan

The guest writer for this article is Darren Gahan.  Darren is a professional real estate photographer in addition to being a superb Lightroom and Photoshop Elements educator.  I've had the pleasure to teach with Darren in the field and be a guest on the Daytripper Webtalk show with Darren and his co-hosts Bryan Weiss and Gabriel Bousquet. ----------------------------------------------------------------------------------

HDR 101 with Darren Gahan

What is HDR? High Dynamic Range. What is Dynamic Range? Contrast, as in dark areas and bright areas.

Why would I be interested? Our eyes see a much larger range of light and dark detail than the camera can capture. We use HDR Photography to make the photo the way our eyes would see it. HDR Photography can also be used to enhance or modify a regular looking photo into an exaggerated brightness and or colour photo.

Do I need special equipment? No, you can use any camera as long as there is a way to make the images brighter and darker. Most cameras have a feature called "Exposure Bracketing" that will change the brightness automatically after every shot.

Do I need a tripod? No, but it would help and make things easier.

Can I do a HDR of moving subjects? Not really. Because it has to overlay each image exactly on top of each other, things that move will create a problem called "ghosting" .

How would I set my camera to do this? Set your camera to the Aperture Priority Mode. A or Av (If it doesn't have this mode, use the P or other advanced mode where it will allow you to use Exposure Bracketing. Find the Exposure bracketing feature of your camera and turn it on. It may be helpful to also turn on your continuous shutter release or burst mode.  Try to hold the camera steady and not move it while it is recording the photos. Take a deep breath, hold it for a second, then when you start to slowly let it out, press and hold the shutter button down and the camera will take the required number of photos then stop, and then you release the shutter button. This is where a tripod is very useful.

What if there is a range of exposure values in bracketing? Usually a difference of 1ev (also called 1 stop) is enough. Feel free to experiment.

How can I tell if it worked? Play back the photos. If it worked, there should be 3 photos of the same subject with 3 different brightness levels.

TIP: You are looking for a normal or middle brightness photo, and 1 darker than normal and 1 brighter than normal. Your camera may have them in a different order, but usually in this order: Normal -> Darker -> Brighter, but this doesn't matter.

What if I have 2 dark photos and 1 normal brightness photo? This means you need to find and use your exposure compensation control, and set it to a value of +1 (plus 1 ev).

What if I have 2 light photos and 1 normal brightness photo? This means you need to find and use your exposure compensation control, and set it to a value of -1 (minus 1 ev).

Does it matter if I shoot in JPG or RAW? No it doesn't make any significant difference. In fact, if you aren't comfortable with shooting in RAW or you don't know what it is, don't worry. Some software may only work with JPG images or with RAW images converted to a different format, such as Photoshop Elements. (Which does have a RAW converter)

What software do I need to process my photos? There are many different software packages out there, each with a specific advantage. The best bang for your buck would be Adobe Photoshop Elements. Available at Henry's for around $99. (Henry's also has workshops on Photoshop Elements. I teach at many of GTA locations. I also offer my services directly and can do customized training in Elements, CS5 & CS6, Lightroom or Apature) You can also download a FREE 30 day trial fully functional of Photoshop Elements from the Adobe website.

In Photoshop Elements (Version 9 and above) open up your 3 (or more) photos from your bracketed set. (If they are in the RAW format, make sure you select all 3 at the same time before you choose Open,<Click the first one, hold CTRL <<CMD on a MAC>> and click on the other 2, release the CTRL key> and then in the Camera RAW editor, select all 3 images <<The same way>> and then choose Open Images on the bottom right. ) Go to File -> New -> Photomerge Exposure. Play with the 3 sliders till you are happy. File Save As a jpg file and you can have it printed or shown anywhere.

The Photo Video Guy Podcast - Episode 53

Nikon announces the D7100 and the Wr-1 radio remote.  Nikon is rumoured to be bringing out a 16MP fixed lens compact.  Nikon issues a service advisory for the D600.  Canon issues a service advisory for the 1Dx and the 5D Mk III.  Canon's EOS-M firmware update won't address slow AF performance.  Rumour mill specs are out for the 7D Mk II.  Testers unimpressed with the Sony RX-1.  Sony introduces NEX-3n and A58 along with new A lenses, a 50/1.4 and 70-400/4-5.6G.  Prerelease reviews of the Leica M (240) gush with praise.  Cactus releasing laser trip releases.

Tips to Make Better Images : Choosing the Right Lens

All too often we look at adding lenses to our kit, and when we enter the camera store or go online, we are directed to a particular brand or range.  Back in the days of film, zoom lenses were growing in popularity but it was acknowledged that they were a compromise, more flexible than a fixed focal length lens (what we now call primes), but never as sharp or as contrasty, or as bright.  Photographers made the hard decision to go zoom or prime, and serious shooters often had zooms that overlapped the primes.
Today lens technology has changed dramatically.  We no longer have to pay thousands and thousands of dollars for lenses with extra low dispersion glass, or apochromatic elements.  Multicoatings that actually do the job are no longer solely the province of the camera manufacturers, or as it was then, the glass manufacturers.
However, one size RARELY fits all and I am seeing an increase in the number of vendors pushing the one size fits all lens.  While I don't dispute that the very expensive Nikon and Canon 28-300 variants are quite good, we pay a price for their flexibility still.  And when we look to the non- L Canons and the non-FX Nikons as well as pretty much all of the third parties we are giving up even more.
Theres an old saying that you can have any two of good, fast and cheap, and this applies to lenses to some extent although fast and cheap is hard to find outside of the 50/1.8 sub $200 offerings.  Before you run out and buy the kit zoom or that new exciting 18-270 take some time to consider your own needs, not what the seller wants you to buy.
Wide to tele lenses are ALWAYS compromises.  They all vignette in the corners when wide open, and all display some level of barrel distortion at the wide end and pincushion distortion at the tele end.  My friends Quyen, Bryan and I have done eye level tests and there are lenses on the market where the distortion is not just there, it's so obviously there, that potential buyers should run, not walk, from those lenses.
We also find that the wider the zoom range, the slower the lens is.  By this I mean that it has a relatively small maximum aperture and one that varies depending on the focal length selected.  Have you ever noticed that top line lienses have the same aperture through the zoom range while consumer grade range from 3.5-6.7 and beyond?
I also see a significant shift away from using a flash.  Since our default lenses are slower optically and people dont want to use flash, even though flash has never been better than it is today, how can they make successful images in low light?  There are only two options, slow shutter speeds, or pumping up the ISO.
Certainly film never had the ISO range of today's digital cameras that can produce decent results up to ISO 3200 in most cases.  But do an experiment and take the same shot on a tripod at ISO 200 and ISO 3200.  The difference in image quality is enormous.  Colour saturation, contrast and digital noise are very different.  As we push the ISO higher we give up saturation and contrast in exchange for noise..  If we go to slow shutter speeds we need a tripod and may still get motion blur if the subject moves.
Fast lenses, those with larger maximum apertures cost more.  People keep cameras between three and five years, but often keep the glass much longer.  Should you not consider having fewer lenses that are faster, or consider zooming with your feet instead of zooming in the lens?  The wide range zooms make great snapshots, but I consistently see that the best work of photographers is captured with primes or with the top of line zooms.
It's your call, but do think about what you want out of the photographs you will make.  That will define the route to follow for glass.