Episode 84 - The Photo Video Guy Podcast

Tamron announces 150-600/5-6.3.  Leica lens prices go up today.  Fuji announces 10-24/4 OIS for March.  Sinar announces mount for Leica S system.  Apple RAW update adds support for Nikon Df and Sony A7.  Sony updates formware on QX series.  Nikon dumps the SB-400.  Nikon D4 is very scarce, replacement coming?  Nikon drops J3, removes price limit on D3100.  Canon announces patents, likely for EOS-M lenses including 16-120, 18-55, 18-200 all STM

Canon 600 EX RT - no optical slave capability

600ex.jpg

Well this is annoying... When I sold off my Metz 58s, I missed something as I moved entirely to 600 EX-RT hotshoe flashes.  Don't get me wrong, Canon's radio system is terrific, and I love it and even did a popular video on how great they are.

But...

Last night I was commissioned to shoot portraits of the guests at a big party.  My main lights were Elinchrom BRX strobes and I wanted a hair light up on a boom that wouldn't be stupid heavy.  So I packed along a 600 EX-RT assuming (yes I know) that like any decent flash it would do simple optical slave triggering.

Wrong again honey.

Canon flashes do infrared slave, radio slave and remote slave from other Canon lights.  But no optical slave.  In fact even the 580 EXs didn't so I should have known years back.

This is in my opinion, really stupid on Canon's part.  Nikon doesn't remove functionality when they add to CLS, Canon didn't need to remove functionality when they added radio. One more hard to navigate menu selection would not have made that much of a difference.

We figured a way around the problem using the 600 EX RT in manual mode, controlled from the camera shoe with the ST-E3 RT, and setting the Elinchroms to fire using their built-in optical slave triggers.  The night went fine, except for the annoying fact that guests using their cellphone flashes kept triggering the very sensitive Elinchrom triggers.

So I am going to go fire up the old Metz 45 CT1 with a connected slave and dial it down to be my light weight hair light flash because I know that this works, but I'm also going to go take a look at the Elinchrom D-Lites for smaller lighter lights that I can control and group from the single Elinchrom Skyport transmitter.  I had thought of taking my Quadras, but I failed to charge them up prior and while they would have been ideal I had lots of AC available so the need to hang the battery pack would have necessitated a third C stand and boom instead of the much lighter Manfrotto 420B boom combo stand that it is my drag everywhere light stand.

The New Year's Revolution - 14 Tips to Be Better

Revolutionary?  Probably not, but at minimum evolutionary and at best game-changing.  Here are my 14 thoughts to help you make better photos and videos in 2014.

  1. Make only interesting images.  Challenge your eye to see before you press the shutter or start recording.  Ask yourself why you will make this image or clip.  What makes it interesting or special or unique?  Make a note of your rationale.  Treat yourself to a Hemingway-esque Moleskine notebook and write down what you are seeing.  Sound like a lot of work?  Yes, but you will become a better artist because you do so.
  2. Instead of spending money on more gear, go somewhere interesting.  For a day, a weekend, or longer.  Photographers and videographers routinely drop hundreds and sometimes thousands of dollars on new kit.  Use the money to take yourself somewhere where you will see different things and make interesting images or clips.
  3. Make a portfolio if you do not have one.  Use SmugMug or Squarespace or Wordpress or whatever tool you like but make a portfolio.  Restrict yourself to no more than twenty-four images.  Place only your best work.  You may not have two images of the same subject in your portfolio.  Never post "work in progress" or "just okay" shots on social media.  You lower your personal bar when you do.
  4. If you have a portfolio, it needs cleaning.  If there is anything more than two years old in it, it's housekeeping time.  Keep only your very best work in your portfolio and tighten up your themes.  Some pros advocate separate portfolios for different types of work to maintain continuity for the audience.  If you are selling work, or your own ability, this is very good advice.  If you shoot weddings, your wedding portfolio should be nothing but weddings.  If you also shoot full contact rugby, that's a completely separate portfolio.
  5. Whatever editing tool you use, learn the speed key to delete images.  Import everything since you cannot tell if an image or clip is worth keeping by looking at the LCD on the camera display, but after the import is done, the first job is vicious deletion.  If you went out to shoot the Caledon badlands and came home with 300+ images, you have no reason to keep them all.  In fact if you are keeping many more than 40, you are building the editing rod for your own back.  Most pros plan for a keep ratio of between 6% and 10%.  If you are retaining more than this, you're probably not being honest with yourself.  Shaky footage goes in the can.  So do any pictures of people where the eyes aren't sharp.  Sports images where you cannot see the player's eyes are not keepers.  Bad exposure, bad white balance, bad audio tracks that are critical to the video track are all learning experiences.  You should learn from them and throw them away.  There's no prize for the size of your Lightroom library or Final Cut project bins.  Keep only the really good stuff and you won't end up wasting time on work that's mediocre.  There are plenty of people who are expert at mediocre and they are already posting enough for the rest of us.
  6. Last year, I said that before you specialize you need to become adept at most any kind of photography.  I stand by that statement, but there has to be something you prefer to shoot.  No one actually loves shooting everything.  This doesn't mean you cannot focus on skills development in a new space, but identify the things you love to shoot.  I am capable, and have earned income as a wedding photographer and as an assistant in wedding videos.  That doesn't mean I enjoy doing the work so it will never be a specialty because I don't like it.  As the great philosopher Carlin said, "you got to wanna".  What's your specialty?  I know that Rick Sammon says "I specialize in everything".  Neither you nor I is Rick Sammon.  Pick your shot.
  7. Learn your gear.  I meet lots of really nice people with a good eye who come away unhappy because they didn't get the image that they saw in their mind's eye.  They saw the image but did not know how to use their tools to capture it.  Vendor's produce manuals to be read.  If you haven't read your manual since you got your camera / lens / flash whatever, you're missing something.  Read it again.  Read it until you know the device inside out, and then practice changing settings without looking and without referring to the documentation.  Only then does the tool not get in the way of the work being done.
  8. Get a mentor.  None of us know everything.  I go to classes, take workshops and watch a lot of video training.  I also ask people I respect for guidance.  I've been at this 35+ years.  If photography or videography is still relatively new to you, or if you've hit the creative wall, get yourself a mentor to help you along.  I offer eight week mentoring programs at a very fair price.  For the first time, the programs can be delivered using Google Hangouts, not just live in person.  So do others.  But be demanding.  "I want to get better" is not sufficiently demanding.  Contact me at ross@thephotovideoguy.ca to learn more about my mentor program.
  9. Get a critique.  Your friends and family, and everyone on Flickr and sadly Google+ will trip over themselves to tell you how great your stuff is.  No offence, but all of it is not  great.  Get a critique from someone who genuinely wants to help you, not just destroy your hopes and dreams like many of the "judges" in photo contests.  A professional critique is not an emotional experience, and you will likely find you learn exactly the undefinable thing you didn't like about the shot.  I do critiques for people.  In the past they were only ever live.  I am now offering critiques using web tools.  A professional critique asks you as many questions as perspectives are shared.  This is how you tell the pros from the amateurs.  Contact me at ross@thephotovideoguy.ca to learn more about arranging a critique.
  10. Learn composition.  Whether you are shooting a film or stills, composition is all.  Everytime I hear somebody say "rules are made to be broken" it usually ends up meaning that they never learned the rules in the first place.  True 90% of the time.  Learn and apply the rules.  The worst thing that happens from learning composition is that you get better images and better footage.
  11. Learn about lighting.  Photography and videography are 100% about light.  It's not the gear, it's not the model, it's not even the subject.  It's all about light.   Great light can make a staid, boring subject interesting.  Crappy light can make the most incredible subject flat and lifeless.  A great landscape filled with atmospheric haze is a crappy image.  A beautiful dancer filmed in bad light is a bad film.
  12. If you shoot video, become an expert on audio.  Nothing destroys your cinematic masterpiece faster than bad audio.  Good audio is very hard, you have to match the spatial layout of the video footage and still ensure that your actors are heard properly and have proper nuance.  Not everything is a head's up product pitch.  Learn about equalization and filtration, about compressors and dynamic range management.  Great sound keeps great video great.  Lousy sound destroys your video work.
  13. Get out and shoot.  Looking at your kit does nothing.  Until about ten years ago, I was a very serious competitive shooter (the other kind of shooting).  To hold my skills I had to shoot at minimum 200 serious practice rounds a week.  To improve, I had to push to 500 rounds and at least one, sometimes two competitions a week.  It was incredibly demanding and a lot of fun.  There were ladies and gentlemen much better than I.  They made it look easy.  What I learned from everyone I took classes from is that repetition is the mother of skill.  If you aren't making images or clips constantly, you aren't likely to grow.  As Einstein said, "if you aren't failing, you aren't learning".
  14. Print your work or burn your films to media.  For a still photographer, there is nothing like holding a big print of your own work.  It's incredible.  For a filmmaker, putting your work on a Bluray or DVD and showing it to friends and family on the biggest screen you can connect to is absolutely awesome.  It's transformational.  One of our friends in the local club, who is, in my opinion, a brilliant wildlife photographer, only just started printing.  He practiced and learned and moved to large canvas images.  Literally in weeks, he went from being a respected web poster to a seller of his incredible images as prints for people's homes.

Most of all, have fun!  Yes, a person dedicated to his or her craft can turn it into a revenue generating tool.  Not to be harsh, but I have seen too many folks who really loved image or filmmaking pack it in or become jaded after turning it into a "job".  Never forget the magical feeling you had when you first decided to get better.  Cheers!

Q & A : What's the truth about memory cards

To ask a question of The Photo Video Guy, send an email with your question to ross@thephotovideoguy.ca John writes (yes it's his real name :) ) "I swear I have heard every possible story about what memory card I should use, what the numbers mean, and why the most expensive card is the ONLY answer, or why it doesn't matter at all so long as the card is Class 10, whatever that means.  I don't think most salespeople know what they are talking about, and I believe that most of them are making it all up.  Can you tell me the real story?  And don't try to sell me something please."

Ok John.  Deal.  No selling.

Full disclosure, I do work part time in a camera store and I do sell memory cards to clients.  I always give a straight-forward answer and I have encountered enormous amounts of customer frustration given the amount of fabrication and outright falsehood they have been fed from computer stores, big box stores, the convenience store and "pro" camera shops.

So let's cut to the key details of multiplier (the number in front of the X), Class, and MB/s transfer rates.

What is the X Number?

For some readers, the idea of measuring the performance of a CD-ROM drive will sound like ancient history.  The first decent drives delivered READ performance of 150kbps.  That is kilobits per second.  In today's world, think snail speed.  That reality was never impacting on some marketing types so we still see 133x, 400x, 600x used as advertisements on cards.  What does this really mean?

What about the other numbers?  And all the letters? And the little pictorials?

133x = 19.95 megabytes per second or an approximate READ performance of 20 megabytes per second.  That translates into about ten 2 megapixel image read from the card per second.  Fascinating but pretty irrelevant because that is the data transfer rate for getting the data OFF the card.  As photographers and videographers, we must be most concerned about getting data ON to the card, to free the buffer for the next shot.  So this means that for any camera using an uncompressed image storage format, this card is pretty much useless.  The Write speed for these cards is usually undocumented so unless otherwise specifically stated, assume Write speed is about half of Read performance.

The bus type used by the card manufacturer, and even the card architecture has an impact on performance.  Bus types include Default, High Speed and UHS-1.  Faster cards need faster busses.  But to take advantage of the faster bus, the host (your camera, your card reader) also needs to have the same bus capability.  A UHS-1 bus is backward compatible.  A high speed bus will never leverage a card with a UHS-1 bus properly and will always treat it as a high speed bus card.

Accessing the memory on the card uses Direct Memory Access aka DMA.  Newer cards offer UDMA at different levels.  The higher the level the greater the maximum theoretical performance.  Today UDMA 7 has a theoretical cap of 256MB/s but there are no cards presently performing near that level of throughput.

But wait!  There's more bafflegab!

As noted in the 133x example, card manufacturers have an annoying tendency to quote READ performance in big type and WRITE performance in no type or ½ point typeface that requires a microdot reader to see.  In fact, in my research, I found only two cards where the READ and WRITE performance match and are guaranteed minimums.

Class?  Who has class?

Class was created to make it easy (hahahaha) for video camera users to get a card that would work in their cameras.  Most consumer video cameras today shoot at 1080p resolution, so 2 megapixel frames on average at 30fps.  But they also do VERY aggressive compression using H.264 and AVCHD amongst other methods.  The Class number is a number and basically guarantees a megabyte per second rate based on the number, so a Class 10 card guarantees 10MB/s read/write performance.  If the camera were doing a less compressed video stream, such as DNX, ProRes 4:2:2 or any of the other more serious video formats (less compression = better footage), a Class 10 card could not promise to keep up.  The brings up the new VPG graphic, a little film frame with a number in it that sort of guarantees a level of READ/WRITE throughput beyond a Class number.  It's a bit spurious.  For example, the Lexar 1000x cards are one of the very few that guarantee 150MB/s READ and WRITE performance.  I can run them continuously in my Canon C300 that pushes video onto storage at 50MB/s in ProResHQ 4:2:2.  Yet the cards only hold a graphic that says VPG-20.  Huh?  Sandisk's Extreme Pro cards read at 150MB/s, write at something slower but carry a VPG-65 marking guaranteeing 65MB/s write speed for video.  No wonder sellers and buyers get confused.

Here's a little table that might help...

  Bus Type CF / SD Naming Memory Architecture Megabytes/s (READ)

Megabytes/s (WRITE)

Video Class Assignment CF/SD

133x Normal SD-XC DMA

20

6

6

200x High Speed SD-XC I DMA

30

15

10

400x High Speed SD-XC I DMA

60

60

10

600x UHS-I SD-HC I DMA

90

45

10

800x UHS-I   UDMA 7

120

<=120

VPG-20 / 10

1000x UHS-I   UDMA 7

150

<=150

VPG-65 VPG-20 1 Class 10

About the Memory...

CF and SD card memory is known as flash memory.  It holds content for a very long time without constant power so is called non-volatile.  This probably sounds like the flash storage used in Solid State Drives in laptops (SSD) or flash storage built in to computers, such as the flash storage found into the recently announced Mac Pro.

Yes they are both flash memory.  No they are not the same flash memory.  Flash memory used for "hard disk storage" is much more stringently tested and is much more fault tolerant than the flash memory found in memory cards.  That's why SSDs are so expensive.  This does not mean that the memory in memory cards is not good.  Lexar and Sandisk would not do lifetime warranties if they weren't very sure they would not get uptake on the warranty.  Because we know that a warranty is only offered when the manufacturer expects never to have a claim.  Did someone just call me cynical?

Hoodman tells me that their memory cards use SSD quality memory.  Ok.  I know that their cards are great and they do offer much tougher casings to help protect the card if you drop it and walk on it.  I don't know that the memory is really any better, but they say it is and they are a good company.

There are very few manufacturers of flash memory in the world.  Samsung in South Korea is one of the world's largest manufacturers.  The other is Micron Technologies based in the United States.  Lexar is the card brand of Micron.  There are lots of card OEMs though so how do you know which ones are good.  Look at the warranties, read reviews and read the specs, or observe the lack thereof.  I have never had an issue with either a Lexar or Sandisk product.  I do like that Lexar gives their recovery software with all their serious cards for free.  Sandisk gives a 12 month time bombed edition with their serious cards.  That's enough to be annoying.

This means that every other card is buying memory from someone and repackaging it.  Not necessarily a bad thing, but in my research I have found that memory comes to OEMs at different prices based on anticipated reliability levels.  100% reliability costs a lot more than memory rated at 85%.  Because these cards (mostly) use the old DOS style FAT file system, the format process automatically creates extra areas so bad sectors can be marked bad without data loss.  If you are a snap shooter, you need a card only fast enough for your most important project.  If you are a serious photographer or videographer, your requirements and standards might be much higher.  Personally, I have replaced every third party card with either Sandisk or predominantly Lexar.

How many....

It's also pretty common to get the question "well how many pictures can I get on a card?" I've put together a table with some popular cameras, along with the uncompressed RAW file size and the largest JPEG file size.  These are maximums based on the camera sensors and also assume 12 bit images.  8 bit images would take less space.  Some cameras let you capture lower bit count images.  I have yet to understand any logic in that since there's usually a JPEG export in the workflow somewhere and more than half the info gets tossed in the trash at that point so why capture at a lower bit rate...  The math is done for a 32GB card.  Divide by 2 to get approximates for a 16GB card, multiply by 2 fro a 64GB card.  Video is a very different question because it depends greatly on the compression type, the bit depth and the quality level.  Consumer camcorders are typically 8 bit devices with high levels of compression.  DSLRs can be 14 bit for stills but be 8 bit for video and then use H.264 compression to further reduce file size.  Pro cameras are 10 bit or higher and may deliver anything from RAW video (you must own a storage company) through a variety of professional codec models.  I created a sample chart for the Canon 7D for stills and its native video and added a column for what the video consumption would look like if using an external recorder and ProRes 4:2:2 like an Atomos Ninja.  Pro video is VERY demanding of storage.

Popular Camera File Sizes and Capacity

Camera

Canon 1Dx

Nikon D800

Sony A99

Canon 5D Mk III

Sony A7

Nikon D5200

Canon  T5i

Canon 7D

Nikon D7100

Rated MP

18

36.3

24

22

24

24

18

18

24

Pixel Dimensions

5202x3533

7360x4912

6000x4000

5760x3840

6000x4000

6000x4000

5184x3456

5184x3456

6000x4000

RAW File Size (uncompressed)

27.5

54.2

36

32.2

36

36

26.9

26.9

36

JPEG Fine File Size

12.25

24.1

16

14.75

16

16

11.94

11.94

16

RAW shots on 32GB

1,164

590

889

994

889

889

1,190

1,190

889

JPEG Fine on 32GB

2,612

1,328

2,000

2,169

2,000

2,000

2,680

2,680

2,000

Comparing Still Consumption to Video Consumption


# RAW 12 images

# JPEG Fine Images

Hours of 4:2:0  1080P Video (H.264) max 21GB / Hour (Canon 7D)

Hours of 4:2:2 1080P Video (ProRes HQ) max 77.36 GB / Hour

16 GB

595

1,306

0.76

0.21

32 GB

1,190

2,612

1.52

0.41

64 GB

2,379

5,224

3.05

0.83

128 GB

4,758

10,449

6.10

1.65

256 GB

9,517

20,898

12.19

3.31

I have to thank the SD Card Association, Lexar, and Sandisk for producing such useful materials that helped in the creation of this article.  I did go to the Compactflash Association website as well but they were more interested in selling me their specification books than providing education.  I hope that this helped reader John and the rest of the folks who are regularly confused or misled on this subject.  It's more cumbersome than it should be but you now have enough information to make better decisions.

When I first moved to Ontario as a child, there was a fellow called Sy Sims, a clothier in Buffalo, who advertised on the local TV station.  His slogan was "an educated consumer is my best customer".  Some retailers don't want you to be educated it seems.  Fight back against that attitude.

Episode 83 - The Photo Video Guy Podcast

Sony's RX-10 quite a hit.  Nikon firmware update disables third party batteries and Nikon batteries in third party battery grips.  Canon exec hints at EOS-M3 for second half 2014.  Canon 5D Mk III not working with third party batteries.  Canon releases firmware for the 7D that doesn't matter.  Latest 7D Mk II rumour is that there won't be one.  DxOMark says that the Nikon Df outperforms the Nikon D4 in low light.  Leica releases 6 Summicron C cine lenses.  $97,500 takes the set.  Adobe releases Lightroom 5.3, DNG Converter 5.3 and Adobe Camera Raw 8.3.  Cameras added include Nikon D610, Nikon D5300, Nikon Df, Sony A7/A7r, and Olympus OM-D E-M1 amongst others.

Q & A : How do I make a High Key portrait?

To ask a question simply send an email to ross@thephotovideoguy.ca Reader Jens sent in the following question. "I have seen some portraits called high key on the web.  The picture looks very light and the background is completely washed out, but there is still lots of detail.  How do I do this?  I have a Nikon D7100, a 105mm micro and a SB-910 flash.  I think I need a background and more flashes but I am not sure.  Is this an expensive method? Can you help?"

Thanks for writing in Jens and yes I can help.  High key as a style has come in and out of favour over a long time.  I like the look myself and it's pretty easy to do.  You will need at least one, probably two, more flashes but you don't have to spend a ton of money on the other flashes since purely manual ones will do.

It will help if you have a flash meter but it isn't completely necessary.  I will tell you how to do it without a flash meter using all the flashes in manual mode for simplicity.  You will definitely need a white background, preferably a paper roll to reduce wrinkle shadows, a background stand of some kind and a diffuser of some sort for your SB-910.  Fortunately you have a D7100 that supports Nikon's Creative Lighting System so this gets easier to get your flash off camera.

Let's work back to front.

Start by putting your paper roll on the background stands and rolling it out to make a smooth backdrop right to the floor and forward on the floor a bit.  You want white on the ground for more reflection.

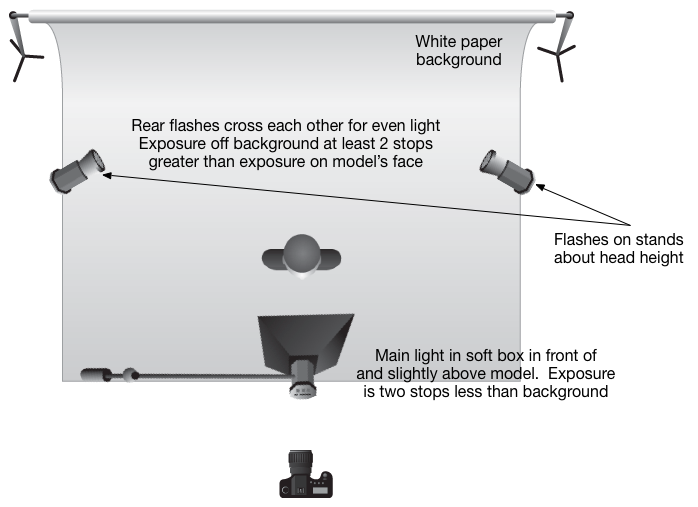
Put a simple manual flash head on either side of the background and angle them so the beams "cross" each other to make even light coverage on the white paper.  Set the flashes at full power to start and make sure that their slave mode is enabled.  This will cause them to fire when they detect your main flash going off.

Put a mark a few feet in front of the flashes where your model with stand or sit.

Put your SB-910 in manual mode at say ¼ power and put it on a stand and use a soft box.  If you are doing only head shots, a 20" x 20" soft box will do the job, go bigger for more coverage.  A good place to start is the Lastolite Ezybox Hotshoe.  I recommend the Joe McNally version for high key because the box is lined with white instead of silver, producing a softer light.  The box comes with the bracket for your flash, you will need a light stand and tilter bracket as well.  If you already have a flash diffusion system, you can get by with what you have.

Position the soft box so it is in front of the model and aiming down towards the model.  This produces a sort of beauty dish style light but one that is softer.

Set your D7100 to Commander mode so the popup unit will trip the SB-910 but not contribute to the light.  You might need to fiddle with the sensor orientation on the SB-910 to get it to read the popup.  If this is a hassle or you are shooting right under the soft box, you will need a set of radio triggers.  Get the Cactus V5 system and you are good to go.  They don't do TTL but you will be just fine without it, and it doesn't really work for high key anyways.

What you want is the light on the background to be AT LEAST two stops brighter than the light on your model.  So if your test exposure says that you get a very nice exposure of the model at 1/125 and f/5.6, you want the exposure on the background that gives completely white response to be at least 1/125 at f/11.  This is why you turn the back flashes up high and the front one down a bit, to help get this ratio happening.  You aren't using TTL because your camera would be trying to turn down the background making the model silhouette out.  This is where manual is best and actually easiest.

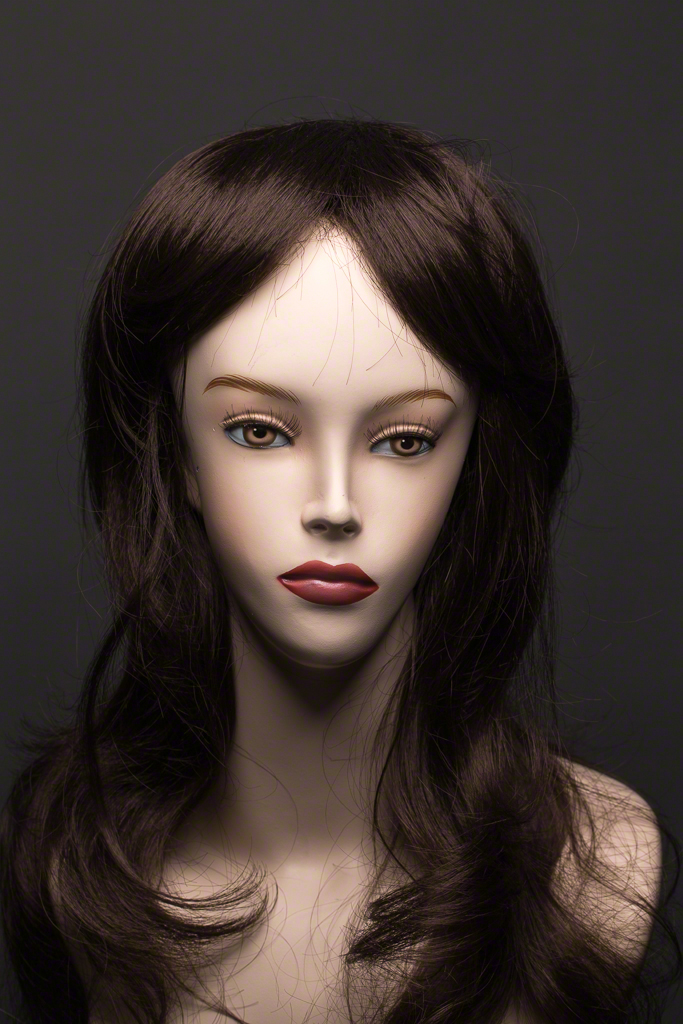
I've attached a simple diagram so you can see what I mean.  Keep your main light close to the subject so it's really soft.  You may need to dial down the power on the SB-910 to get the right ratio, just keep adjusting until you get the initial exposure on the face right and then manipulate the power on the two rear flashes so they are at least two stops brighter.  This will give you the washed out background, some nice spill around the model's periphery and that high key look.

Now start experimenting with some over exposure of the main exposure.  If the "correct" exposure is 1/125 at f/5.6, shoot at f/5, f/4.5 and f/4 to see which you like best.  You'll be overexposing the background as well but there's a lot of subjectivity that goes into what the "right" exposure from your main light is.

Lighting Diagram for a High Key Setup


Now, if you have a flash meter, it gets easier because you just meter the light coming off the background when the rear flashes fire and then set the output level on the main flash to be at least two stops less.  What does this get you?  It saves you time getting to your starting point.

Ideal Gear Scenario

  • 3 Flash Heads of similar output, manual mode, output power control, slave function
  • 2 Light Stands with hotshoe flash mounts
  • 1 Light Stand, Boom optional
  • 1 Softbox, flash bracket and tilter head
  • 1 Background Stand Kit
  • 1 Wide Roll White Background Paper
  • 1 Radio Trigger Set from Camera to Main Flash
  • 1 Flash Meter

Note that the gear listed is going to be useful for a lot more than just high key portraits and will be valuable for all kinds of different shooting scenarios.  I've recently discovered the Lastolite Hilite, a dedicated popup background specifically for high key.  It's a 6' x 7' pop up system with an outer white diffusion panel and an inner white reflector stitched together by separators about 16" wide.  It comes with four 16" rods to hold the front and back sections apart and has zippers on all four sides that open to allow you to get the front of the flash heads inside the enclosure.  It's not inexpensive but it is readily portable and collapses into a disk about three feet in diameter.  I've just ordered one in and will provide a review in the future.

Thanks for the question, I hope that this has been useful.

My Top 12 Holiday Gifts Under $250 (mostly)

Every holiday season the family and friends of photographers go seeking gift ideas.  Every year they ask the photographer or videographer what he or she would like.  Every year the answer starts with a 400/2.8 at eleven grand and the buyer gives up.  The Photo Video Guy is here to help with my top 12 gifts under $250 (mostly). If you buy from B&H, OnOne or Amazon through my links, you help support The Photo Video Guy. If you buy from Adobe or Google, you're getting the deal and if you buy through the Henry's links, well you help them out because Henry's doesn't have an affiliate program. Adobe Creative Cloud Photographer's Bundle

At $9.99 per month if you sign up before December 31st, this is a killer deal.  You get Lightroom 5.x and Photoshop CC for less than the retail price for Lightroom.  Yes it is subscription and yes there is a web activation component, but you get the newest hottest code and the ability to run on two machines simultaneously.  Adobe has listened and this is a great deal.

Adobe Photographer's Bundle

Set of Extension Tubes

It's hard to beat a great macro lens for closeups but this is the entry way to do it.  Using a set of extension tubes enables pretty much any lens to do close up work.  If your gift receiver already has a macro lens, this kit makes it capable of even greater closeup work.  I recommend the set because the kit of three costs about the same as one tube from a manufacturer and works just as well.

Aputure Tubes Canon and Nikon - Henry's Canada Tube Set for Canon Tube Set for Nikon

Kenko Tubes - B&H USA

Tube Set for Canon Tube Set for Nikon

Google Nik Collection

When Google bought Nik, post-processors were terrified.  The Nik Collection used to be $600.  Now it's $149 and contains amazing post processing plugins that work with Lightroom, Photoshop and Aperture including Color Efex Pro, HDR Efex Pro 2, Silver Efex Pro, Sharpener Pro and Dfine Noise Reduction.

Nik Collection

Lastolite Ezybox Hotshoe / Ezybox

Nothing makes a hotshoe flash look better than getting it off the camera and softening the light.  The Lastolite Ezybox hotshoe straps right onto the head of your hotshoe flash and produces really nice light.  If you have an off camera cable or wireless system, you can control your flash centrally and just hold it at arm's length for significantly better flash shots.  Want a bigger source?  Go for the Lastolite Ezybox Softbox.  It includes the bracket and flash mount, all you need is a simple light stand and tilter bracket.  Nothing sets up faster than an Ezybox and the dual diffusion panels make the light beautiful

Henry's Canada - Softbox

B&H USA - Softbox

Henry's Canada - Ezybox Speedlite Kit

B&H USA - Ezybox Speedlite Kit

Cowboy Studios Shoulder Rig for DSLR Video

You could spend a fortune on a shoulder rig to shoot live video with your DSLR or Compact System Camera.  You don't have to.  The Cowboy Studios kit is an amazing value and it just works.  Designed specifically for DSLR and mirror less style cameras, you forego weight and cumbersome rods for a solution that is simple, lightweight and incredibly effective. Also includes a follow focus for less than the price of a standalone follow focus.

Shoulder Rig w Follow Focus

Polarizing Filter

You can do most anything in post processing with digital filters except for true polarization.  Every photographer and videographer will benefit from a polarizer to manage reflections and deepen blue skies on clear days.  Buy the one to fit the largest diameter required and step down rings to use the same filter on lenses with smaller filter sizes. I personally prefer the B+W and Heliopan brands.

Various sizes and prices, check out Henry's

Piccure

I see too many potentially great shots where a bit of camera shake creates enough micro blur to make the shot less than ideal.  Piccure is a plugin that does one thing really well and that is to correct for camera micro shake.  The plugin works with Lightroom or Photoshop.  If your photo enthusiast is complaining about micro blur, this could be the answer.

Get Piccure

OnOne Software Perfect Photo Suite

Full disclosure, I am an affiliate with the great people at OnOne Software, and if you buy the software through my link I earn a minor commission.  That said, Perfect Photo Suite 8 rocks.  The Suite contains Perfect Effects, Perfect Enhance, Perfect Portrait, Perfect Resize, Perfect B&W, Perfect Browse, Perfect Layers and Perfect Mask.  And the full suite is on sale right now.

Cowboy Studio Continuous Lighting Kit

This is a very inexpensive multi-head continuous lighting kit that is perfect for someone starting out.  You get in a easy to handle kit, two light stands, one boom stand kit with bracket, a lamp housing with soft box for the boom, two 5 lamp housings with two 20"x28" soft boxes, 10 45w bulbs, 1 65w bulb and a carrying case.  Because it is continuous lighting based on CFL bulbs it's perfect for photography and videography and the lights run cool so you don't bake your talent.

Manfrotto Boom/Stand Kit

Every photographer needs a light stand.  They also need a boom.  They usually find out that they need a boom after buying a light stand.  Then another trip to the store to buy a sandbag to keep everything from being tippy.  Save time and money with the superb Manfrotto 420B Combi-Boom Stand.  It folds compactly and is all most folks will ever need in a complete kit with a boom that doesn't creep like some sold for more money.

Henry's Canada - Manfrotto 420B

B&H USA - Manfrotto 420B

External Hard Drive

Photos and videos take up space.  Many photographers and videographers have limited space on their preferred laptops so an external drive is the way to go to hold libraries and projects.  You can build your own using components or buy complete units.  The WD Passports are complete kits that work pretty well as are the G-Tech series.  I've had bad experience with LaCie myself but many people love them.  My greatest success comes from buying a case and putting an SSD into it.  Screaming fast and easy on energy.

WD 2TB USB3

Aputure HDMI Monitor

That little LCD on the back of the camera just isn't big enough to confirm sharpness and a good shot, especially with video.  Every videographer needs an external monitor that runs off the HDMI port to check their recordings.  The videographer is often in the "shot" and an external display can be positioned to help the talent see what's going on.  The Aputure 7" display does a great job at a really low price.

Henry's Canada - Aputure HDMI Monitor

Episode 82 - The Photo Video Guy Podcast

Canon announces the EOS-M2 but only for Japan.  Canon releases patents for more lenses with built-in teleconverters.  DP Review likes the Nikon AW1, turnaround for the maligned Nikon 1?  Sigma announces some lenses will not autofocus on Nikon Df.  Adobe extends PS/LR deal.  DxO updates software.  CamRanger wireless tripod head.

Episode 81 - The Photo Video Guy Podcast

Piccure - micro camera shake correction.  Nikon D5300 has focus issues with some Sigma lenses, fix maybe.  Nikon Df shipping.  Nikon stock poor performer in 2013.  Nikon to release Nikon 1 V3 in January.  Google RAW coming to Android.  Fujifilm announces digital magazine for X Series owners, updates X series firmware again.  Canon C300 gets new firmware and wins Asia Silver Award.  Canon to release new non-L primes in 2014 with IS.  Adobe deal on PS/LR for $9.99 / mth ends Dec 2nd.  Leica prices go up Jan 1, 2014.  Leica takes over Sinar.  Leica M240 deisgned by Jony Ive and Mark Newsome sells for $1.8M at auction.  Olympus releases new firmware for the OM-D E-M1.  Roger Cicala writes the Devil's Photography Dictionary.

Q & A : The Best Lens for Portraits

To get your question answered, send it via email to ross@thephotovideoguy.ca  You'll be glad you did! I've actually known CJ since he was an infant, because I know his folks.  He's been into photography since his teens and as a young adult is starting to make his way as a professional photographer.  He's been published and is a very talented fellow.  He recently asked me this question, after adding a beauty dish to his lighting kit.  "What's the best lens for portraits?  I'll be doing head shots and half body shots.  I've narrowed it down to 2 lenses, the Canon 85/1.2 L and the Canon 100/2.8 L Macro.  What do you think?"

Well CJ, it's a great question.  My preferred portrait lens is actually the Canon 70-200/2.8. It's awesome but I hold +Scott Kelby accountable since it was his articulate treatise on the subject that led me this way.  That said, I own and like both the lenses you asked about and I will hold my answer to one of your selections, (which is what I actually did do).

CJ is using a Canon 7D.  We tend to toss this off as "oh a crop sensor camera" as if that meant some kind of disease.  The ONLY think that really matters with having a crop sensor is the effect it has on relative focal length.  A crop sensor sees a smaller image circle, so if a lens that produces a full frame image circle is used (as in these two lenses), the sensor only sees part of the total image giving you the effect of shooting a longer focal length.

This is true for crop sensor built lenses too with the difference that they WON'T work on full frame cameras.  If you think you'll ever move from crop to full, or have both, only buy glass that will produce the image circle required by a full frame sensor.

The Canon sensor has a crop factor of approximately 1.6x.  So simply this means to get what the effective focal length is, multiply the physical focal length by the crop factor.  In the example of the 100mm lens, this means it gets the look of a 160mm lens.

This can be awesome and horrible.  For sports and long distance it's wonderful.  For super wide it's a nightmare.  But CJ asks about portraits.

Back in the olden days, there was an ongoing bun fight over what lens was better for portraits, the 85mm which allowed you to get really tight, had a super large maximum aperture and had lovely focus falloff, or the 105mm which allowed you a bit more standoff distance and gave slightly more perspective compression.  I know CJ asked about the 100mm, but when I was coming up, the portrait lens I yearned for was the Nikkor 105/2.5 AI.  It was SO good.  Well that bun fight still goes on.

The reality is that either of the 85mm or 100mm will do lovely portraits if you do your part.  The 85mm that CJ asks about is the f/1.2 variant.  Think sees in the dark.  Also think very razor thin depth of field wide open.  On a headshot with focus on the eye, the tip of the nose is definitely soft.  It's an incredible look if you use it properly.  The lens also has wonderful bokeh (no rants on mispronunciation or vendor BS dumps about Bokeh - I Promise).  Out of focus areas are really rendered beautifully.  The downside is that the AF performance is slow.  Like you can watch the lens turn slow.  And this is the II iteration which is faster than the first series.  It's also surprisingly heavy.  On a 7D, it acts like a 136mm/1.2 lens which is really wonderful for faces and still works for half-lengths if you stop down a bit, say f/5.6.

The 100mm f/2.8 is a different animal entirely.  This is by design, first a macro lens.  It delivers up to 1x life size on the sensor without additional kit.  It's tack sharp and focuses very quickly, given the sophistication that goes into macro lens design.  It's fast enough optically but doesn't produce that razor thin depth of field as we find in the 85mm.  It does produce beautiful bokeh, because that is a design criteria for top end macro lenses.  This is not well known but may help explain why so many photographers love the bokeh in macro lenses.

There is a lot of noise about the number and style of the blades.  Odd numbers of blades produce star effects with twice the number of points as blades, even numbers of blades produce star effects with the same number of points as blades.  This has NOTHING to do with the choice of lens for portraits.  More blades tend to produce rounder apertures as do curved blades and many people think that this produces more pleasing out of focus highlights.  I'm one of those people.

Having shot both lenses a lot, I favour the 100mm most often.  I love the look of the 85mm but since I shoot most often with a full frame now, in my opinion, the 85mm focal length pushes me too close to the subject for a headshot, particularly if the subject is not a model who may be more comfortable with big glass in her (or his) face.  The 100mm give just a bit more standoff and I have not found that to be a problem in the areas where I shoot these types of portraits.  I also love getting really close (eyes are awesome) and the macro is wonderful for that sort of thing.  If I'm doing low natural light work, that's really where that f/1.2 comes into play on the 85mm.  Here are a couple of shots of my wonderful model Sondra shot today and attempting to get a similar perspective with the different lenses.  For those all gear interested, lighting is a Bowens 500 Pro tripped by radio via Pocket Wizard at lowest power shooting through the Bowens Beauty Dish with the added diffusion sock.  Camera is a Canon 1Dx in manual mode at 1/100 and f/9.0 ISO 50, no exposure compensation.

Lens Comp 85mm

Lens Comp 100mm

Yes, I should have brushed her hair.  Bad me.

Again, although it wasn't in the criteria that CJ asked about, I encourage you to take some time to think about a 70-200/2.8  Both the Canon and Nikon variants are really exceptional and they are extremely versatile lenses.  Both are extremely sharp with excellent distortion control so great for head shots, plus the zoom gives you very quick compositional changes.  The downside of this route is always going to be the physical size and intimidation factor.  Please also note that I would never go with a lens optically slower than f/2.8 in such a zoom if portraiture was part of my expected outcome list.

A Second Look at Piccure

I am always interested in hearing alternate perspectives.  Recently I wrote a review of a plug-in called Piccure and indicated that it wasn't right for me.  Lui from Intelligent Imaging Solutions GmbH wrote with some suggestions on how I might improve my results.

His first suggestion was to read through the Handbook that they make available.  I had scanned it, and did not read it word for word.  I read it and there is a recommended workflow that I did not follow.

Lui suggested that Piccure be the first thing I do, before any other editing, stating that other filters are destructive.  While Lightroom is non-destructive by design, a saved file like a TIFF as used by any plug-in has had filtration applied if editing has been done.  Ok, while this is completely contrary to my normal workflow, just like Nik's Pre-Sharpening, I will do start with Piccure before doing ANYTHING else.

The Handbook says Edit in Piccure using TIFF, 16 bit and sRGB.  I would never have tried this as I prefer the proper and full colour gamut of ProPhoto RGB.  Lui honestly states that in the current release Piccure doesn't work very well with ProPhoto RGB or Full RGB.  It works best with sRGB.  This is sub-optimal in my view but in respect of his courtesy to write, I agreed to give it a shot.

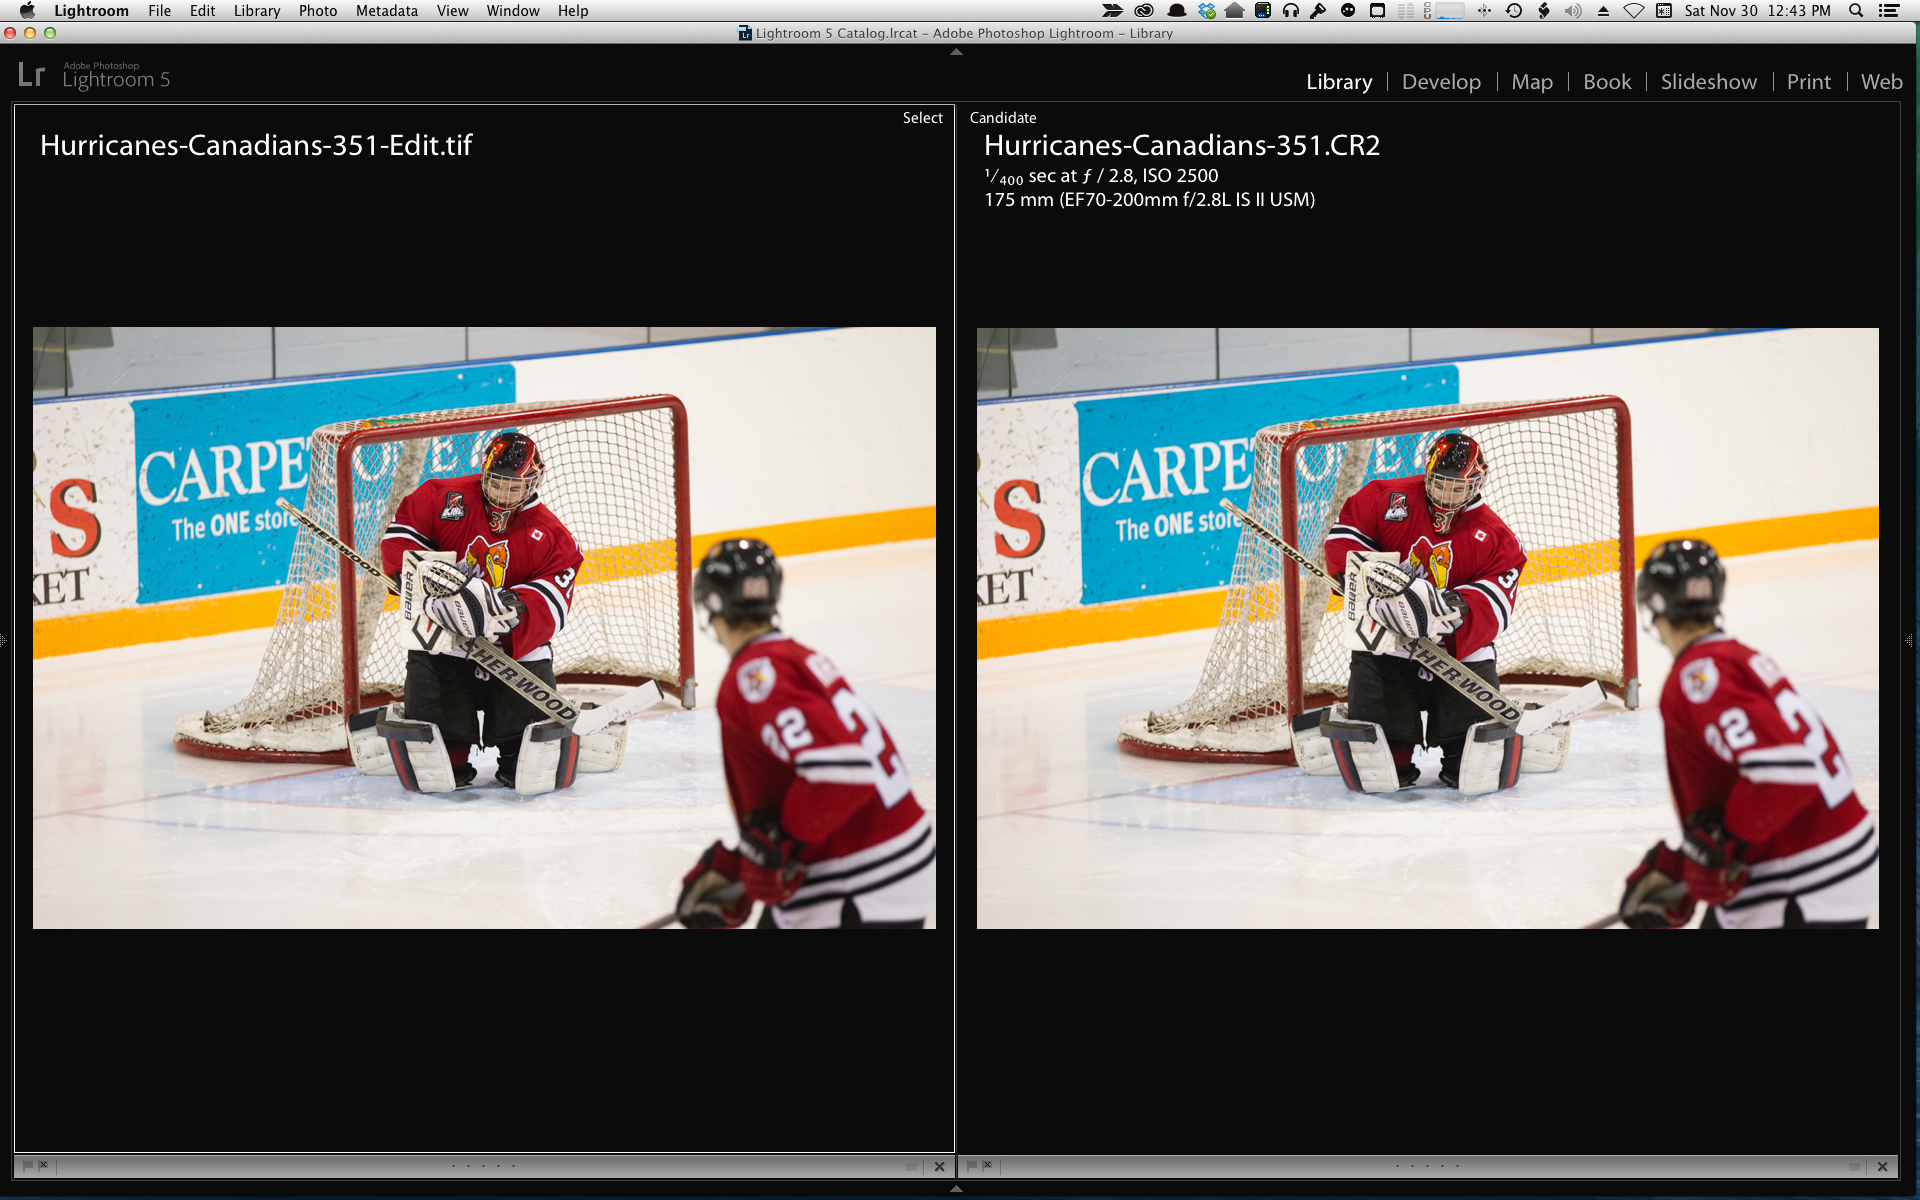
He also suggested using a Smartspot.  I had tried this but didn't see a difference, but again, I will do so.  He also coached that the Micro setting is a better place to start than the default of Medium because the design precepts behind Piccure are solely to the micro evidence of camera shake.  Here's a comparison screen grab with Piccure on the left and the original RAW on the right.

Compare_Piccure-3

So here's what I learned from following the Handbook and the guidance from Lui.

The sRGB choice, while I don't like it, makes a significant difference in Piccure's success.  No longer are the colours skewed and the image is no longer made crunchy and as noisy.

Cautious placement of the Smartspot helps a lot.  I tried placing the Smartspot where recommended and then also in a number of other places.  This is time consuming because of the processing load to recalculate with each placement, but it definitely makes a difference in Piccure's success.

Lui also suggested manually tweaking the defaults.  I had already done this in my first review, and so I agree that this is always a good idea.

Edited first in Piccure as TIFF, sRGB, 16 bit, then further adjustments in LR 5.2

Outcome

Ok I stand corrected.  Piccure does a VERY GOOD job when you follow the instructions.  If I did not already have a subscription to Creative Cloud (I do) and micro camera shake was something I was concerned about (it is - I shoot sports and wildlife with long lenses), Piccure is a very good solution.   At $80 it may be all you need.

What I Liked

It's a very focused offering.  I can alter my workflow to put Piccure first when I use it.  I'm still not completely clear about adjusting colour balance before or after using Piccure, although I believe that so long as I know the colour temperature, it shouldn't make a big difference if I fix the WB after using Piccure.  The number of variables are small and while the processing requirements are significant when set to highest quality, you get good and visible results.  It does not correct out of focus shots, it corrects for camera micro shake - just as promised.  In my test images the amount of shake was very small but Piccure did the corrections and so long as I followed the Handbook, I got consistently good results.

What I Would Like to See Improved

Number one for me would be to not have to drop the gamut to sRGB when going to Piccure.  I'd much rather be able to have Piccure work properly with ProPhotoRGB gamuts.  I am guessing that the architects understood that sports shooters might be candidate customers and pro shooters tend to shoot in JPEG regardless because they need to upload to their services on the breaks and a decent JPEG is fine for wire services and web broadcast.  That would be a reasonable business decision but it's not me.  I never shoot in JPEG unless I have screwed up.

In the end, I have Photoshop CC and Adobe's Camera Shake Reduction algorithm is very good and there are no restrictions on colour spaces when using it.  If I did not have Photoshop CC, I'd be buying the Piccure plugin because it works, and because Lui advised that addressing the colour space limitation is on their roadmap.  A big thank you to Lui and the rest of the team at Intelligent Imaging Solutions GmbH for building a good tool, and more importantly for caring what prospective customers think and for making a real effort at creating customer joy.  Other software companies could learn from this attitude.

OnOne Perfect Photo Suite 8 is now available

Check it out gang, the newest release of OnOne's Perfect Photo Suite, v8 is available for purchase and download today.  Here's the Press Release

PRESS RELEASE: onOne Software Announces Availability of Perfect Photo Suite 8

New Perfect Eraser for Content-Aware Fill, Enhance and Browse Modules, Perfect Batch Processor, and Re-imagined Effects Module Evolve Popular Plug-In Into a Complete Photo Editing Solution for Every Workflow

Portland, OR – November 26, 2013 – onOne Software, Inc., a leading developer of innovative digital photography solutions, today announced the availability of Perfect Photo Suite 8—the Photographer’s Choice for Photo Editing. Perfect Photo Suite 8 is a full-featured, standalone photo editor that also integrates seamlessly with Adobe Photoshop, Lightroom, Photoshop Elements, and Apple Aperture. It includes all the best tools a photographer needs to create stunning images.

Key new features include the Perfect Eraser, with content-aware fill technology; the Perfect Enhance module for essential photo adjustments; a new Browser that streamlines direct access to images wherever they are located; the Perfect Batch engine that applies presets to multiple images with a single click; and a re-engineered Perfect Effects module, with twice as many adjustable filters, customizable presets, and integrated FocalPoint technology. These new tools and capabilities alongside Perfect Photo Suite 8’s eight modules, one-click presets, tools for automated enhancements, and powerful controls allow photographers to enhance, retouch, and stylize images in a layered workflow, replace backgrounds, create high-quality enlargements, and prepare images for output—giving them the ability to express their creativity and transform their photos quickly and easily.

“We are extremely excited about Perfect Photo Suite 8,” said Craig Keudell, president of onOne Software. “This version is the result of what photographers have been asking for, not only from us but from the industry as a whole. We’re grateful for the contributions and feedback the photography community has invested in our effort and we believe that we’ve created an extraordinarily powerful image editing tool that meets their specific needs in return.”

After a successful public beta program for Perfect Photo Suite 8, many photographers had a chance to try out the new version and give their feedback. “The attention to your user’s needs is unmatched,” said Rebecca Lyyski, owner of Lyyski’s Designs. “As a graphic designer and photographer with an elevated workload, your product has made editing my professional photography a pleasure instead of a chore,” she adds. Greg Lambert, public beta user and onOne Software photo contest winner shared, “Perfect Photo Suite 8 continues to evolve by refining its existing capability, streamlining the interface and providing some new and exciting tools and presets to enable photographers to produce the images they visualize when they press the shutter button.”

The New Perfect Photo Suite 8 Features: • Eight integrated modules – Effects, Enhance, B&W, Portrait, Mask, Layers, Resize, and Browse. Each module is designed to target a specific image-processing task. Together, they help photographers enhance, retouch, and stylize images in a layered workflow, replace backgrounds, create high-quality enlargements, and prepare images for use in various capacities.

• New Module! Perfect Enhance provides essential tools for basic enhancements, such as brightness and contrast adjustments; colorcast, dust spot, and power line removal; and the addition of vignettes. It is an ideal module to start with when using Perfect Photo Suite 8 as a standalone application or when quick corrections are needed.

• New Module! Browse provides convenient and direct access to image files wherever they are stored—whether they are on a computer, an external drive, a connected network, or on a cloud-based storage service like Dropbox, Google Drive, or Apple’s Photo Stream.

• Reimagined! Perfect Effects – As a cornerstone of Perfect Photo Suite 8, the Effects module has been redesigned by adding adjustable filters and customizable presets, making it the most powerful and versatile image stylization tool available on the market today.

• Twice as Many Adjustable Filters to create the most sought-after looks, including:

• Dynamic Contrast – Adds stunning clarity to images and makes them pop by exaggerating the levels of contrast, without sacrificing highlight and shadow detail, creating halos, or affecting saturation.

• Lens Blur – Includes the best parts of FocalPoint technology to create bokeh, tilt-shift, and selective focus effects after the shot.

• HDR – Gives images the edgy look of high dynamic range. Settings are adjustable and create effects that range from subtle to surreal.

• Vintage – Turns photos into a nostalgic memory with retro-style filters.

• Powerful brushes provide the right results for specific editing tasks:

• Perfect Eraser removes objects with content-aware fill technology

• Retouch Brush uses spot healing to remove small distractions

• Clone Brush removes unwanted items by replicating and covering specified areas of an image

• Masking Brush reveals underlying layers or selectively applies effects • Perfect Brush delivers precise edge-detection masking

• Hundreds of Customizable Presets are available throughout Perfect Photo Suite 8 that make it easy for any photographer to instantly create an image they love. Presets can also be used as starting points for creativity and efficiency. Presets are included in the Enhance, Effects, B&W, Portrait, and Resize modules.

• Improved Masking Bug in the Effects and Layers modules make mask creation easier and more intuitive.

• Perfect Batch engine simultaneously applies presets from multiple modules and a watermark to a selected group of images.

Availability and Pricing The new Perfect Photo Suite 8 is now available at www.ononesoftware.com/store. Perfect Photo Suite 8 is available in three editions: Premium, Standard, and for Adobe Lightroom & Apple Aperture.

The Premium Edition works with Adobe Photoshop, Lightroom, Photoshop Elements, Apple Aperture, and as a standalone application. It is priced at $179.95. Owners of previous versions of Perfect Photo Suite Premium Edition can upgrade for $99.95. For a limited time, orders of Perfect Photo Suite 8 Premium Edition will include a special collection of Professional Presets and The Essential Video Guide to Perfect Photo Suite 8, which provides a comprehensive collection of getting started training videos for Perfect Photo Suite 8—for free ($80 value). This offer ends on December 3, 2013.

Perfect Photo Suite 8 for Adobe Lightroom & Apple Aperture works with Lightroom, Aperture, Photoshop Elements, and as a standalone application. It is available for $129.95; upgrades are $79.95. The Standard Edition works as a complete standalone photo editor and is available for $79.95. For more information on Perfect Photo Suite 8, please visit http://www.ononesoftware.com. A 30-day Money Back Guarantee backs all onOne Software products.

About onOne Software onOne Software, Inc., is a leading developer of innovative software tools and apps for digital photography and offers time-saving software solutions for photographers of all levels, from enthusiasts to professionals. Leveraging its extensive history as successful plug-in developer for Adobe Photoshop, Photoshop Elements, Photoshop Lightroom, and Apple Aperture, and continued development of cutting-edge technology, onOne publishes unified solutions that offer both full-featured photo editing capabilities and the flexibility of traditional plug-ins. Founded in 2005, onOne Software is a privately held company located in Portland, Oregon. For additional information, visit www.ononesoftware.com.

Is Piccure Your Next Plugin Purchase?

I was listening to a recent This Week in Photo episode #TWIP and heard about this plugin called Piccure.  It was described as a tool to help correct camera shake.  There's a 14 day free trial so I thought I would download it and give it a shot. NOTE :  Since this initial review, I received some guidance from the manufacturer directly and applied it.  I got better results.  After reading this post, head on over to http://thephotovideoguy.ca/?p=1487 for the follow-on

Most folks know that Photoshop CC has a camera shake correction and it's quite good.  Not everyone has Photoshop CC and sometimes a dedicated plugin can be the answer, particularly for people who do all their work in Lightroom.  Piccure comes as a plugin for both Lightroom and Photoshop.  At time of writing there was no support for Aperture.

Initially I feared that the tool would simply do some fairly aggressive sharpening, using a high pass filter style algorithm and punch the contrast up to make it look like it was correcting for camera shake.  So for my tests, I used images that were already corrected in these ways and where extra sharpening and contrast would really make the shot look crispy.

I've netted this down to a single image for the sample pics in the article to make it clearer what is happening.  Please know that I am not making my valuation based solely on a single image test.  What is shown here is consistent with what I saw on all tests.

Piccure really does seem to do some significant math to determine where movement has taken place in the frame.  The default settings of Medium for shake and middle ground for sharpening produced really horrible results with the test image.  They were already pretty sharp.  It's definitely doing something.  I got a warning that because the image was large, it could take a while.  While processing, all eight cores in the Mac Pro were quite busy.

For point of interest, the test shot shown has the following EXIF.

  • Canon 1D Mark IV
  • Canon 70-200/2.8L IS II
  • 175mm, IS mode 2
  • 1/400
  • f/2.8
  • ISO 2500
  • EV +1 2/3
  • Shot handheld, unsupported

When you launch Piccure from Lightroom, you do so as with most all other plugins.  Right click, choose Edit In and select Piccure.  The defaults are sRGB and 240 dpi.  I reset those to ProPhoto RGB and 300 dpi as those are my common defaults.  The Piccure window looks like this;

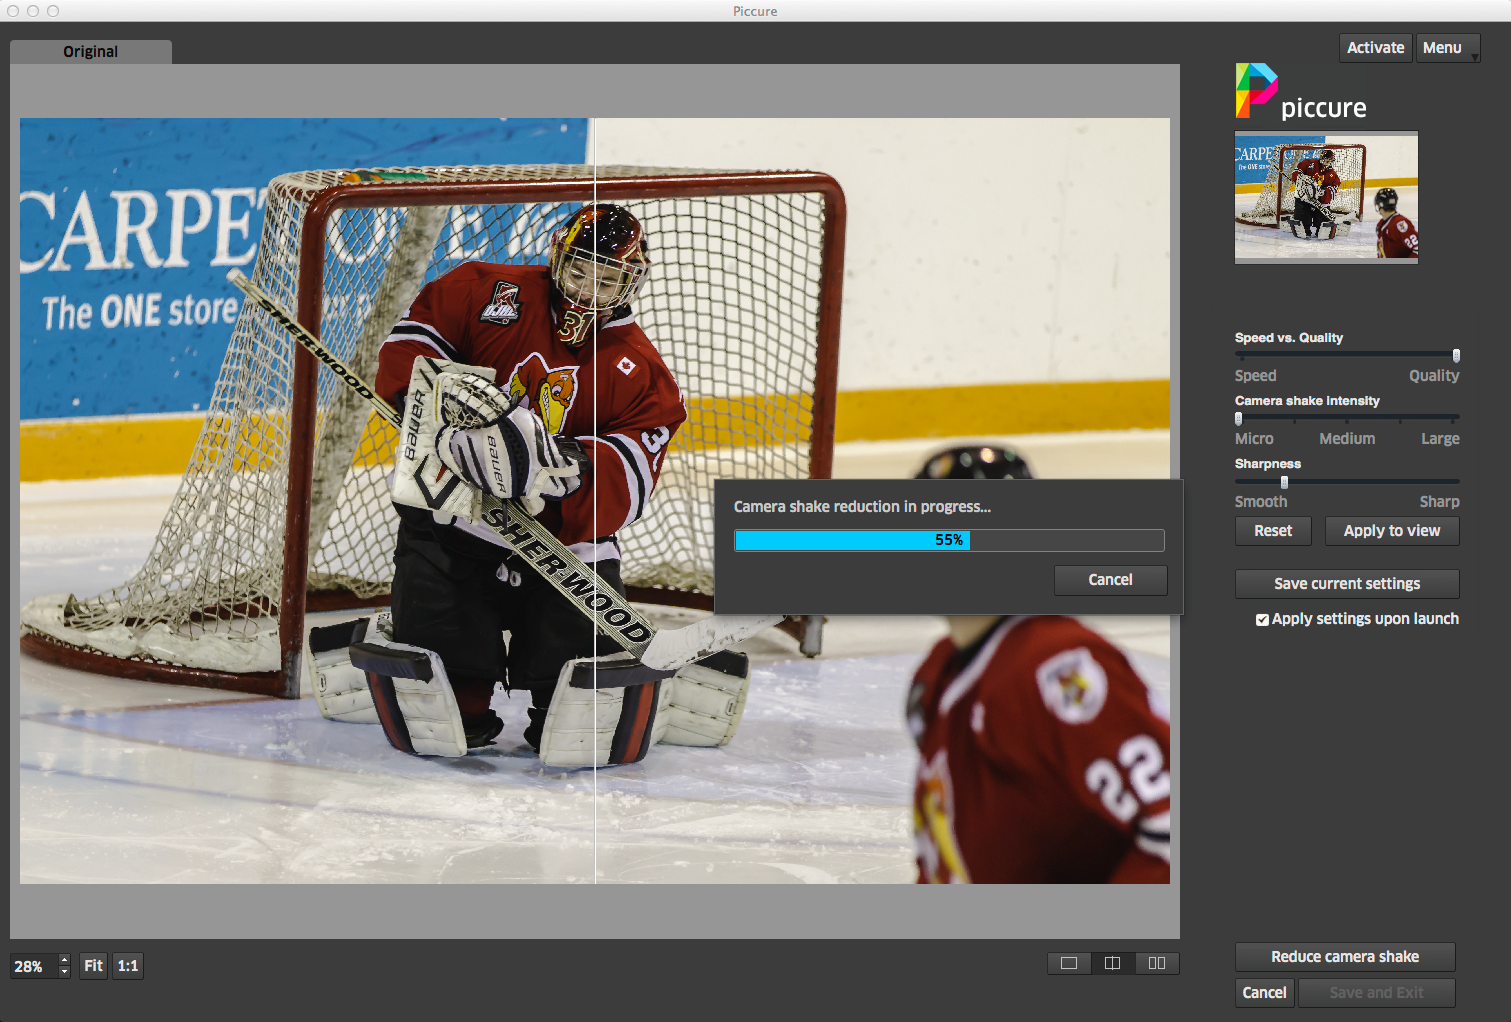
PIccure_Process


You can see that it gives you a look at what it's going to do, a processing indicator and three sliders.  The first controls the balance of speed of work vs quality.  Default is full quality.  Second defines the amount of camera shake to correct for.  Default is medium.  Since there was near negligible camera shake, the results were ghastly.  I've moved it all the way to micro correction.  The third slider is called Sharpness varying between Smooth and Sharp.  In every experiment I end up with this all the way over to Smooth to prevent edges you could cut yourself on, along with a lot of duplication.

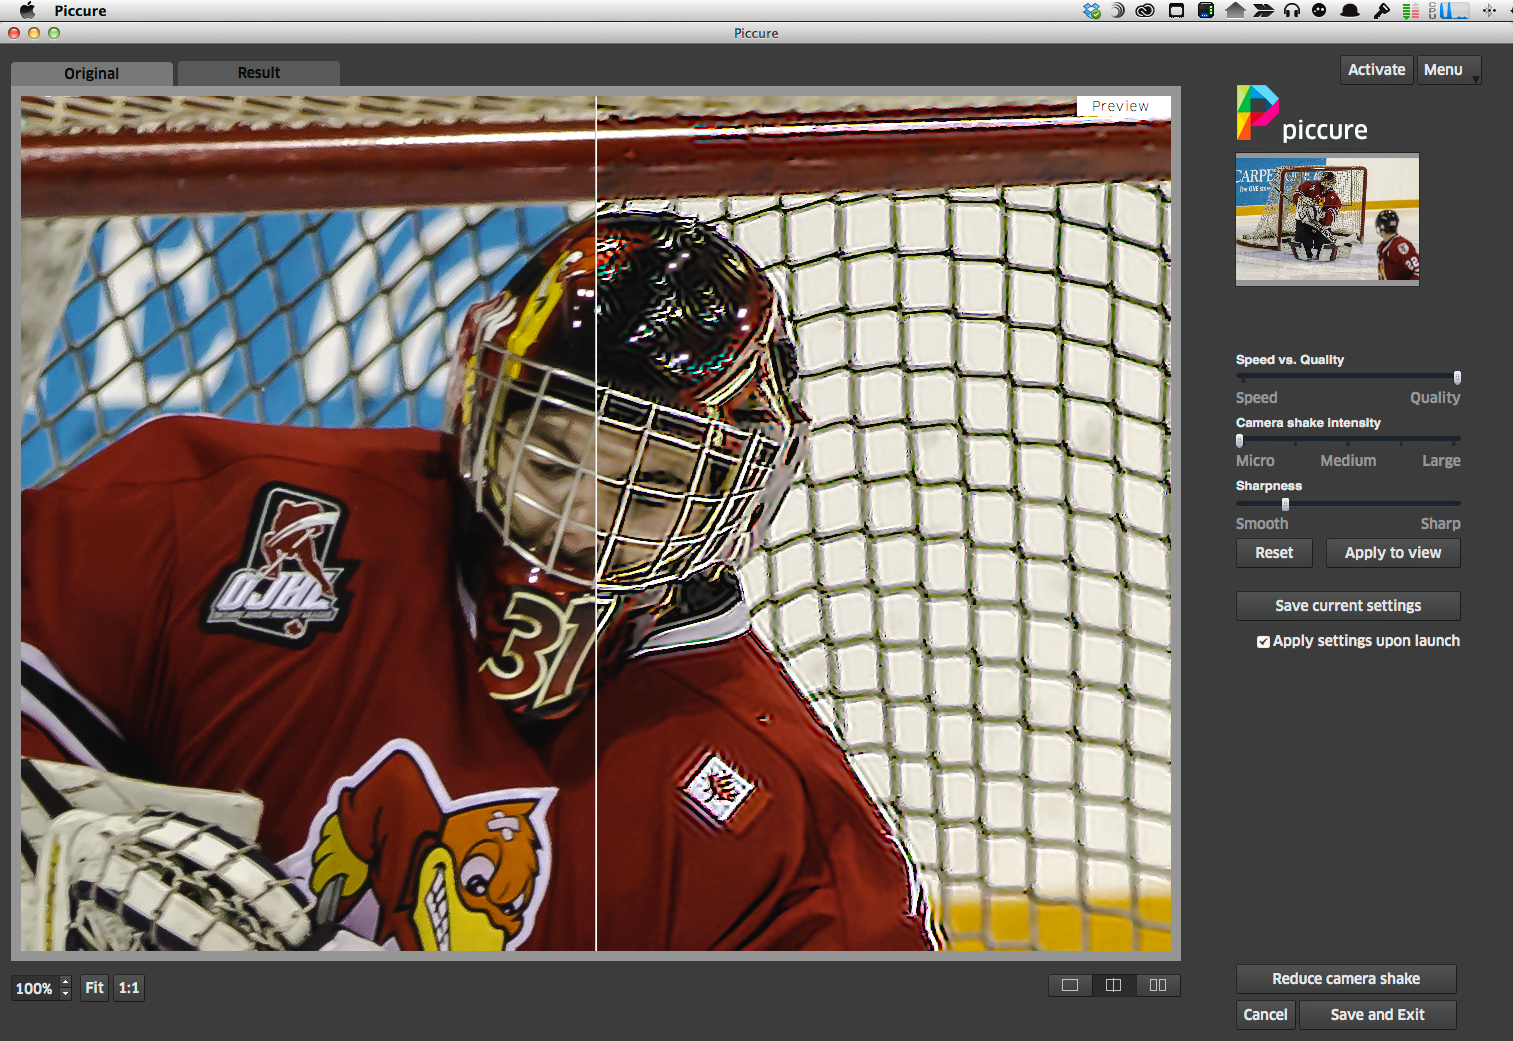
In the second image, I've zoomed in to 1:1 and you can see the Piccure proposed fixes on the right side.  The Canadian flag is nearly unrecognizable the goaltender's face cage is blown out and has black halos.

Piccure_2-2

It's pretty brutal so I backed off the Sharpening completely.  In the next two images, I've shifted the display to show first the goaltender's face "corrected".  Look at how shattered the OJHL logo becomes in the processed side.  Then I shifted the image to show the goaltender's face without the processing.  The difference, even with the sliders for shake and sharpness backed full off is substantial.  I admit I don't like what I am seeing.

Piccure_3-2


Piccure_4-2


I didn't give up at this point, but let Piccure do its thing.  To my disappointment, the image is very edgy, the colour saturation is compressed, the contrast is way up and adjustments made in Lightroom have been crushed.  You can see this in the next sequence.  The first image is the export direct from Lightroom without using the Piccure plugin at all.  The second is what came back to Lightroom directly from Piccure and the third is after re-adjusting the Piccure image.

LR Adjustments Only

Piccure No Correction

Piccure Adjusted

I'm sorry to say that even while the Piccure plugin has done some camera shake adjustment, I feel like I've lost more than I've gained.

By now, you've figured out that I'm not really blown away by the plugin.  You're right.  For $80, I'd like less crispy and less overall image loss.  I need to be fair, there was very minimal camera shake involved in the original image, but these are the ones I would want to tighten up.  If the shot is blur city, it goes to the trash.

As a final point of comparison, here's the LR edit passed through Photoshop CC invoking the Camera Shake Reduction filter and returned to Lightroom before export.  Consider that Adobe now has Lightroom and Photoshop CC for $10 a month.  You can have both programs for half again what the plugin costs on its own.  I hope the folks who make Piccure continue to enhance their product.  I won't be buying a license at this stage.  I can get better results using the tools that I have.  Fortunately software is an evolutionary business and they can continue to improve.  And perhaps Piccure is exactly the right thing for people who may not care to spend as much time in post-processing as I do, or who have more shake evident in their images.

Photoshop CC Shake Reduction Filter Applied


Q & A : The Best Lens for Hockey

To ask a question of The Photo Video Guy, send an email to ross@thephotovideoguy.ca Janet writes; "I am getting into sports photography because I spend so much time in arenas since my son and daughter both play hockey.  I have a Nikon D5200.  It came as a kit with two lenses.  One is the regular lens and the other is a telephoto zoom lens.  The zoom says Nikon DX Nikkor AF-S 55-200mm1:4-5.6 G ED.  The person at Best Buy said it was perfect for hockey but my shots are all blurry.  I use the camera in the fully automatic mode.  I want to get nice pictures of my kids but don't have a lot of time to learn all about photography.  Is this a good lens?  Is this a good lens for hockey?"

Well Janet, hockey is pretty challenging.  Most amateur arenas have horrible lighting, the sport is pretty fast, and you have somewhat limited shooting positions.  When I was doing the TV show with Bryan Weiss we had OJHL Director of Photography Brian Watts on the show and he talked about the gear he uses.  Brian is a professional, but his advice is, I think, very good.  I also agree with him.

To make good pictures in the arena, you are going to have to do a few things.  It will be easiest if you come off auto mode and set your camera to aperture priority (it's the A on the top dial).  Then set your ISO to 3200.  You have a great camera with a very new sensor and it will do a good job at ISO 3200.  This high number tells the sensor to be more sensitive to light.  You will get a bit more digital noise at higher ISOs but if you are sharing on the web or making prints up to 8x10 this is going to be just fine.  You will also want to set your camera to continuous auto focus that Nikon calls AF-C.  I don't have a D5200 handy but this is usually a switch on the body, often on the front near the lens.

There are two more setting that you will want to make.  First put the camera in continuous shooting mode.  CL will give you up to 3 frames (pictures) per second, and CLH will give you up to 5 frames per second.  Second, find the control for Exposure Compensation and set it to +1.5 or +1 ⅔ depending on how your camera is setup.  You want to overexpose a bit because of all the white ice.

I suppose I should also mention to have a large fast SD card in the camera, so you don't have to wait while the buffer empties or you don't run out of shots before the game is over.  When I shoot hockey, I average about 200 shots per period.  Most of them aren't keepers, I expect a very high discard rate.  Better to shoot and throw away than not shoot and miss the shot you want.

Now to your last question, about the lens.  It's a good lens particularly for outdoor work.  But without trying to upset you, it's really not the right lens for hockey.  The focal length (biggest amount of zoom) in this case is 200mm.  On a crop sensor body such as you have this is like shooting with a 300mm lens on a professional grade camera like the Nikon D4.  This is good because it reduces size and weight.  Unfortunately the lens you own is optically very slow, too slow in my experience for success inside arenas.

If you still have return privileges, I would pack the lens up neatly and get your money back.  I don't mean to disrespect Best Buy, I'm sure that there are nice people there, but they likely don't know photography.  Head in to a photography specialty store and look at the Sigma 70-200 f/2.8 lens.  It's physically bigger than what you have and weighs a bit more, but at 200mm it lets in two more stops of light than the lens you have.  Without a bunch of techno-babble that means FOUR TIMES as much light.  That will make a huge difference for you.  The lens is often on sale, and as this is being written in November, holiday and Black Friday sales are going on already.

In Canada, where I live, Sigma offers a 7 year warranty, no need for extended warranties on this stuff.  Do get a quality protective filter for the lens.  A Tiffen UV is a great filter and much less expensive than some of the other brands.  I won't kid you, expect to pay about 5x for the Sigma what you got the Nikon kit lens for.  If you cannot afford this you can use the lens you have but I am concerned about having enough lens speed for good hockey images.

Once you have the lens on the camera, you've made the other settings I mentioned and you are heading into the arena, use the camera's controls to set the LOWEST aperture number the lens can deliver.  On the Sigma, this is f/2.8 at all zoom levels.  On the Nikon it will be f/5.6 at 200mm, dropping to f/4 at 55mm.  This is called opening up the lens or shooting wide open.  You want as much light as you can get.

Now put your AF focus point on your player of choice and hold the shutter button part way down.  In Continuous AF, the focus will adjust as you and the player move.  It's very effective.  When you think you have a shot, press through gently and let the camera take 3-5 frames.  Hockey is tough because sticks, hands and other players can get in the way. In a great hockey shot, you can see the player, the stick, the puck and the player's eyes.  As I tell my students, repetition is the mother of skill.  Shoot a lot, throw away the ones that didn't work out at home and keep refining.

I tend to recommend shooting in RAW instead of JPEG, but you indicated that you don't want to spend a lot of time learning photography.  In this case, it's probably easiest to set your camera to large JPEG and the Picture Control to Standard.  If you have a program that can convert your RAW images and you are happy doing some editing, shoot in RAW.

As a final tip, since you are shooting your own kids, don't miss a great play because you are scanning through the pictures or deleting bad shots on the camera LCD.  The time between periods is your best time to review, not while the game is ongoing.  Every game I hear a photographer moan when he or she misses a goal because he or she was looking at the back of the camera.

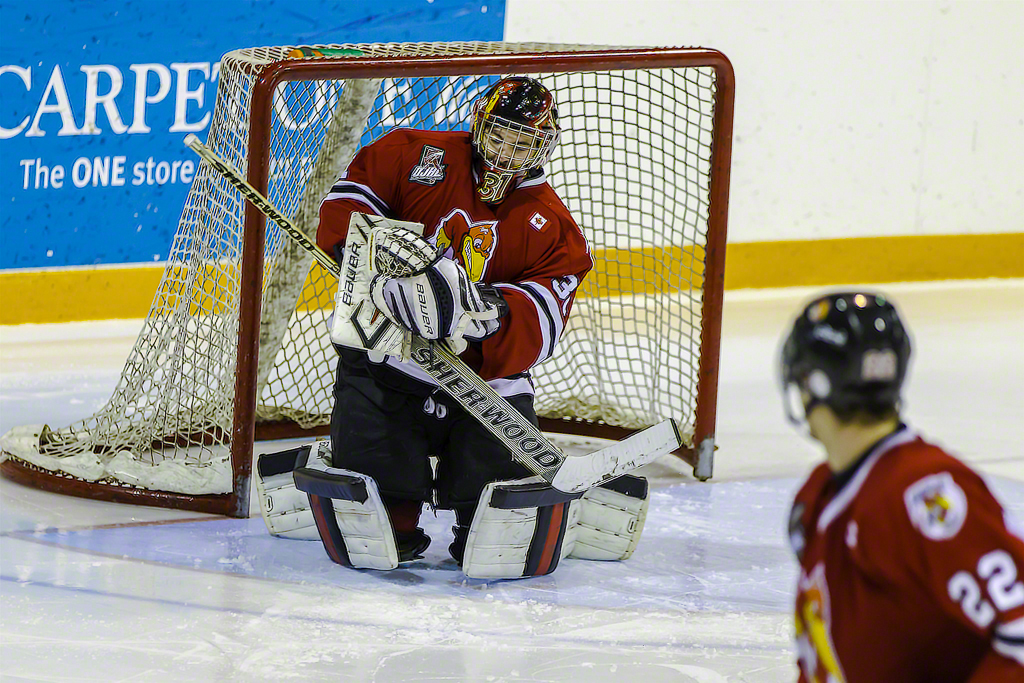
It is absolutely possible to get great pictures of amateur hockey in your hometown arena.  Here's an example from a couple of weeks ago that I shot in my town.

Thanks for writing in, I hope that this article helps!

Hurricanes-Spirit-276

An Open Letter To Canon Asking For Professionalism

Yes, this is directed to Canon, but if you are a Pro or using Pro level gear from other manufacturers, feel free to change the name and model numbers because it applies to you too.

Dear Canon,

Why do you insist on treating those people who spend the money on your Professional or near-Professional equipment with such disgusting disrespect?

I am a Canon Professional Services member.  I own a 1D Mk IV (expensive), a 1Dx (expensive) and a C300 EF (even more expensive).  If I want wireless connectivity, I can spend $849 retail for a chip in a hunk of plastic to do slow WiFi for file transfer.  If I had gone to a 5D Mark III, I would get the privilege of paying over $1,100 for WiFi connectivity.

Considering that your entry line of point and shoot cameras as well as multiple of your non-Professional grade cameras have built-in WiFi, how can you even consider justifying the Highway Robbery of the prices charged for WiFi for your Professional level gear.  Don't tell me it's about the quality.  Your expensive products perform no more better than the Bob's Wifi I can buy for $24.99 for the laptop at the local computer store.  In fact they have lower performance and poorer user interface.

It's thievery pure and simple.  You charge Pros more for less because some turd in Marketing decided that the market would bear it.  Find that idiot and fire him or her or the entire committee that made this stupid decision.  Immediately drop the price of wireless to under $100 and do your highest paying clients a service instead of a disservice.

We use your pro level gear.  We spend more on a single lens than your average customer spends on three cameras.  We upgrade more often and your reputation gets enhanced because of the quality and commitment we put into our work.  Please stop screwing us on the accessory front.

You don't need to prove you can treat pro level users as badly as Nikon does.  They charge $899 for the WiFi adapter for the D4.  They also charge $70 for the same capability adapter for their consumer lineup.  Just because one major Japanese manufacturer screws their customers doesn't mean you have to as well.

I challenge Canon to DO THE RIGHT THING.  I have no optimism that you will, but I'm throwing the challenge in front of you regardless.  I DARE YOU TO RESPOND.

Sincerely,

Ross Chevalier

The Photo Video Guy

Episode 80 - The Photo Video Guy Podcast

Nikon announces the DF, lots of noise, preorders not as strong as expected.  Nikon revenues are down, company drops full year forecast.  Nikon releases new firmware for the D3100, D3200, D5100, D5200 and P7700.  D610 is oil spot free.  Nikon updartes NEF to 1.20.0   Canon to release the SL-1 in white.  Canon releases and then pulls firmware for the C300.   Gordon Laing reviews the Sony A7/A7r.  Fuji releases E lenses firmware updates.  Ricoh announces ultra wide for Q.  Adobe has release candidates for ACR 8.3 and LR 5.3.  Blackmagic updates firmware for Pocket Cinema Camera.  Apple updates RAW converter and patches Aperture.

Q & A : Lens Size and Image Circle

To submit a question to The Photo Video Guy Q & A send an email to ross@thephotovideoguy.ca Another query from Darren;

"On a full frame camera the image circle has to be large enough to encompass the full size of the image sensor.  My question is: On a full frame mirrorless camera can the size of the lens be smaller?  On a DSLR camera the lens has allow for the mirror. On a mirror less camera the lens does not have to allow for the mirror.  Does this mean a lens like the 70-200 f2.8 can be made smaller for a mirrorless camera??"

The answer to this question is a qualified "yes".

The size of the image circle is an exercise in optical physics.  The arrangement of lens elements in a lens is designed to accomplish the goals of the lens designer, one of which is to define the placement of the image circle to the focal plane.  It's a common understanding that the size of the lens dictates the size of the image circle.

This is not necessarily so.  The size of the lens is also impacted by the distance the lens to the focal plane.  For example. the lenses on my Hasselblad have to create a larger image circle than the lens for the Canon full frame.  The Lenses are physically larger.  Back when I was shooting medium format film, the lenses for my Mamiya RX67 were much larger than for the Hasselblad 500CM.  Both arrangements had to deal with allocating enough space for a mirror.

However, on the Sinar which is a large format camera where the lens board is connected to the focal plane by a bellows, the lenses are actually quite small.

Thus one can conclude that lens size is only partially related to image circle size but also must take into account the distance from the rear element of the lens to the focal plan.

In looking at mirror less camera / lens combinations, we find that most mirror less lenses are physically smaller than their counterparts for APS-C and Full Frame.  This can be attributed to the lack of requiring space for a mirror, a considerably narrower camera body and the requirement for a much smaller image circle.

Creating a larger image circle where the lens mount distance doesn't change and the amount the rear element can enter the camera body is not limited by the presence of a mirror requires that the work must be done optically.  While this could mean elements larger in diameter, it could also mean elements with more radical curvature, the use of more dispersion managing elements and the use of more aspherical correction in the elements.  Lens speed in terms of maximum aperture is also going to be a big factor in physical lens size.  Building that 70-200/2.8 for the full frame mirror less could result in a physically smaller lens, but it may not.  That decision is going to be up to the lens designer.

My guess is that they will work towards smaller and lighter at the cost of maximum aperture.  In the case of full frame mirror less the aperture is a direct comparator when it comes to depth of field whereas f/2.8 on a full frame has less depth of field than f/2.8 on a micro four-thirds built lens when images are compared.

So the answer is a qualified "yes" but only the lens designer will have the final word.

Q & A : Explain the difference between Relative Colorimetric and Perceptual Rendering Intent in Printing

To submit a question to Q&A at The Photo Video Guy, just put your question into an email and send it to ross@thephotovideoguy.ca Darren writes "Does anyone have an answer for the Rendering Intent to use? I researched found Relative Colorimetric is more accurate but may produce some Banding. Perceptual will not result in banding but the color may not be as saturated or accurate. In a Henry's printing class, using  A Canon 9000 and Canon paper, I was told to have everybody use Relative Colorimetric. Everyone's prints looked like monkey poop. When I had them switch to Perceptual their prints looked much better. Most of their prints had greens and green foliage."

I think this is a great question because it confuses many photographers printing at home and because the explanations are often not very useful as I have seen.  I'll take a shot at this.

Let's agree that different mediums display colour differently.  The old CRT produced colours that look different from the IPS LED LCD displays of today.  Images that are backlit look different from those that are projected.  Prints look different based on the surface texture and finish of the paper.

I've written lots about the importance of profiling your display before you edit, and recently answered a question from Denis on printer profiling.  Darren's question comes out of that answer.

When we edit on our computers and have calibrated the display, we are working with an image that is as close to "real" as we can get.  When we go to print the image, even when the printer and paper are profiled or we are using an ICC profile, occasionally an image looks, to use Darren's words, like monkey poo.  This typically results from the rendering intent being selected.  I did a quick direct survey of folks I know who print on which of relative colorimetric and perceptual that they choose and got a resounding "Yes, if the first one looks good I stop,  If it looks bad, I try the other one."  Effective but hardly scientific.

It's All About the Gamut

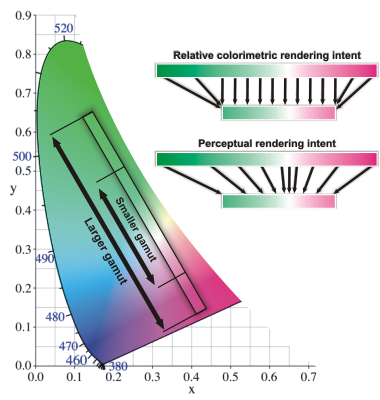
What is gamut?  Gamut means the complete range or scope of something.  In an image, we typically think gamut when we think of the complete range of colours.  Printing paper has less colour gamut than a backlit LED powered LCD display.  This is why an image that screams at you on screen can have less power when printed.  Glossy papers typically have a wider gamut than matte papers, hot pressed papers typically have a wider gamut than woven papers.  I use the word typical because it means true most of the time but not always.

In this example, we see the gamut for the different colour spaces we could use in editing.  This image comes from a great document on Adobe's site called Color Managed RAW Workflow.  It was written by the inestimable Jeff Schewe.  You can download the document here.  The document was written to help people make better prints using a much older version of Photoshop so it is a bit dated.  The concepts contained therein remain absolutely viable.

Schewe_Horseshoe-2


We can see the horseshoe shape of visible colour and we can also see the gamut limits of the three main editing colour spaces along with an overlay of the gamut response of 2200 Matte Paper.  Plainly, working in the sRGB colour space is going to produce severe out of gamut situations and the image is going to look crappy.  If we were to use the Adobe RGB colour space, there's only a tiny bit of out of gamut area, in the yellow/orange area.  If our image doesn't have much in those colours we might be ok, but if it does, a little tuning can adjust it to fit the capability of the paper.

We work very hard editing our images using Curves, Tonal Mapping, HDR and push pull tools to maximize the dynamic range (number of stops rendered) and colour space.  Most serious editors know not to edit in sRGB or even Adobe RGB but to instead use  ProPhoto RGB.  These are all good steps but it could start to fall apart when we go to print.

Rendering Intent

Inks and papers will sometimes not have the gamut of the final image.  This translates to mean that the colour range of the image extends beyond the capabilities of the media to represent it.  While there are four rendering intents in general, only two are worked with when making photographic prints.  They are Relative Colorimetric and Perceptual.

The question you as the artist has to determine is what you want to happen when the gamut of the original exceeds the capability of the media.  There are two options provided.  In the first option, called Relative Colorimetric, we accept that there are out of gamut colours and are comfortable with losing them.  Just has excessive overexposure causes highlight clipping, we can say that in this model we have colour clipping.  The colours that are in gamut for the media are rendered accurately but colours outside the gamut are lost entirely.  This can produce images that don't look complete, or overly flat.  The colour is right, but there is stuff missing.

The alternative is Perceptual.  This is the equivalent of compression.  We take the image gamut and compress it to fit into the gamut space of the media.  We don't lose any of the colours, but we concede colour accuracy as all the colours get shifted subtly to make space for the entire image gamut in the more limited gamut of the media.   This is the generic default when your printing application doesn't ask you which one you want.  The colours are not bang on right but as much of the colour gamut as possible is preserved through the compression.  Colours towards the middle of the gamut, (see the illustrations) shift less than colours towards the edges.  If your image is composed of a lot of colours toward the gamut edges you aren't going to like it much.

perceptualrelcolIn the image at left you can see the clipping that occurs with out of gamut colours when using Relative Colorimetric.  You can also see the compression of colours that occur with Perceptual.  The graphic is from a longer article by the great people at Photozone.de.  Click here to read it.  Selecting the rendering intent is often done first.  I propose doing it last.  Let me tell you why .


Getting to the Print

In Adobe Photoshop Lightroom 5, Adobe added Soft Proofing.  It's in the Develop module and users sometimes get very confused why it isn't in the Print module since you are using it for printing.  The rationale to put it in Develop, according to Adobe folks I spoke to at Photoshop World, is that making a proof is like making a unique edit.  They're right, because I have printed the same image on vastly different papers and ended up with different edits for different papers.

Basically you do your edits and when you are ready to print, and have set up the Print module, you jump back to the Develop module and click the button to turn on proofing.  Then you MUST select the ICC profile for the printer / paper you intend to use.  If you don't do this, don't even bother going through proofing.  What Adobe has done, is to attempt to show you what the printed image is going to look like and how it will be different on different papers using the printer you selected.

What this function will do is show you where your image and rendering intent will work and where they will start to fall apart.  You can now start moving your edit sliders and curves around to pull the proof image back into a pleasing output.  It's really very powerful.  Where it frustrates people is when they have punched clarity, saturation, blacks, whites, hues and sharpness very hard to get a screen image they like only to discover it will look like turtle puke when printed.  This is a great tool as well to help decide what paper you will print on.

Let's start with a RAW image right out of the camera.  No processing done to it at all.  It's not a particularly interesting image but it does have areas of high colour saturation, one of the first places where gamut boundaries get exceeded.

RAW-2


Note the red berries.  Even with no editing done, we could have a gamut problem as we will see when we switch to a Soft Proof view of the same image.

SoftProof-2


Even in a low quality web image you can see that the soft proof will not look the same as the RAW image.  The colours are flatter, and I've turned on the gamut output device warning so those red berries have a marker on them to show that with the current image settings, this print will be out of gamut.

Blown_gamut-7

In this smaller image you can see the out of gamut warning indicators on the berries themselves.  This means that if we were to print this as is, the berry colours would be out of gamut.  They're out regardless of which intent we use, but the flattening will be greater if we choose Relative Colorimetric.  If we were to choose Perceptual the entire image colour palette will be compressed.

Softproofpanel-2Take a look next at the Soft Proof panel that appears when Soft Proofing is selected.  Here we can see the paper ICC profile being used, in this example Red River Paper's wonderful Polar Pearl Metallic using the driver for the Epson 4900.  We see that the intent being displayed is Relative Colorimetric and that we have set Lightroom to simulate the paper and ink.  That last setting is critical to be able to do the next step in making a great print that doesn't cross an out of gamut threshold.  And it is incredibly easy.


Next we see a capture of the full Lightroom screen.

Edited_for_Print-15


I've made a Proof Copy to start.  This allows me to start with my edited version and makes a new Virtual Copy specifically to be adjusted using Soft Proofing to correct for out of gamut conditions.  In addition to the basic development settings, I draw your attention to the use of the Targeted Adjustment Tool (TAT) in both the Tone Curve and HSL panels.  By placing the TAT on the areas being flagged as out of gamut, I can make specific adjustments to correct these areas without changing the entire image.  Here even thought the out of gamut warnings are still active, they are not showing up because I have been able to leverage the point selection power of the TAT to subtly manipulate the Tone Curve and the Saturation by colour.  I always try to manipulate the image to achieve an intent of Relative Colorimetric first because it holds all the colours and keeps them accurate.  If I cannot get there entirely, that's when a flip to Perceptual will typically bring everything in line.  It's subjective at this point of course.

The really good news is that now when I print this image on the Red River Polar Pearl Metallic, it will look like it does on the display.  I find the paper and ink simulation to be very good, as close as one can come when the edit is backlit and the final print is reflective.  It's still a boring shot, but now at least it has good colours with no colour out of gamut.

I want to thank the great people who came before me and shared their knowledge such that I could teach myself and eventually share my learning with others.  And if you have questions, don't forget to send them in to ross@thephotovideoguy.ca


First Look : Nikon AW1

Nikon_1_AW1___Waterproof__Shockproof__Freezeproof_Advanced_Camera_with_Interchangeable_Lenses.jpg

Nikon_1_AW1___Waterproof__Shockproof__Freezeproof_Advanced_Camera_with_Interchangeable_LensesThe first run of Nikon's 1 series cameras has been a questionable success. The J1, in local experience, had a huge number of returns related to customer satisfaction. I liked the V1 although I called it the 688 given its resemblance to a Los Angeles class submarine. The J2 lasted about a week. The J3 doesn't seem a lot different from its predecessors and the V2 is, well it has a face only its mother could love. When I heard about the AW1, a waterproof 1 series camera, I first had to cry because the "credible" writer indicated it was the first underwater camera with interchangeable lenses. This is of course a complete load of poo given that Nikon themselves brought the world the Nikonos line of very serious and very credible underwater cameras and lenses.

I was more intrigued because of the possibility of a compact system camera with very good glass, a much better than PS sensor and hardened system. As readers know, I work part time at a camera store and we have the AW1 in stock. It was a bit slow today and I had some short time to play with the AW1.

The Good

AW1_Rear-2This feels serious. Construction is very solid. There is plenty of metal involved. The O Ring system that makes a seal for the lens when mounted is simple and yet very innovative as it doesn't preclude using other 1 mount lenses on the AW1, but does add the ability to use the waterproof 11mm-27.5mm lens that comes with the body. Everything is solid.

The shutter button is clean and actuates smoothly without any rocking. Same is true for the video start / stop button. The rockers on the back of the camera have similar feel and the rear LCD is bright and easy to read. The seals for the battery / memory card area look robust and the locking mechanism is both effective and easy to use.

Despite the CX sensor being the smallest of the Compact System Camera sensors, it still produces very good images.  I confess that I shot it as the buyer would out of the box, default of JPEG medium and that is never anything to write home about, but easily as good an image as one would get from an M43 sensor.

There is a simple yet effective finger grip ridge on the front and a slightly tacky thumb pad on the back.  Surprisingly there is a built-in popup flash and the spring deployment is quite aggressive so it should still deploy effectively underwater.

AW1_Top-2The zoom ring on the 11-27.5 lens is pleasantly stiff.  It's not screaming fast, at f/3.5-f/5.6 but with a top ISO of 6400 should be more than suitable for the use cases.  For those who think in full frame focal lengths, as I do, the lens is like a 30mm to 75mm.  Decent but not really compelling.  I suspect that the limited range is due to the constraints of making the thing waterproof.

That the little AW1 can shoot 15 fps with autofocus for each shot is very impressive.  The AF is blazing fast and the multiple focus points are very usable.  You can actually get up to 60 fps if you let it lock focus and just fire away.

As one would expect, the camera shoots HD video at up to 1080i.  Video is decent, like any camera of similar sensor size.

Battery has a CIPA rating of 220 frames which is quite good considering the small size of the Li-On battery.

Given the camera's use cases, I will forego my typical bitching about the lack of a proper viewfinder.  It gets the job done.

The AW1 comes in white, black and silver.  None of which is particularly useful if the thing gets away from you in the lake or the ocean but pleasant enough out of the water.  The web site does show some fluorescent orange gel type cover.  You don't need it but it would be a good idea if you were going to dive with this thing regularly.  And by dive I mean no more than 50 feet, which in most cases is not going to be a problem.

The Not So Hot

Nikon is not a software company.  I and many others find their menu layout to be designed with the apparent intent of unintelligibility.  The AW1 is nowhere near as horrible as the Android powered point and shoot, but it could be so much better.  Too much time wasted on graphics could be better spent getting to the point.  It's a small camera, so the buttons are small.

I am not a diver, but would be inclined to use the camera in cold and wet weather and I'm not sure that I could manipulate the buttons with gloves on.  I also believe I would inadvertently move the rocker while wearing gloves.

The flash is going to be of limited value underwater.  A guide number of 5 isn't going to drive much light at all.  Certainly no worse than any of the underwater point and shoots, but no better either.

It would have been nice if the zoom range was a bit greater.  The underwater PS market is typically 4x or 5x optical zoom, this lens is less than 3x.  Not a lot of versatility.

While the autofocus is blazingly fast, I did find that when face tracking engaged it slowed down a fair bit.

While I like that the camera has built-in GPS, the fact that you have to go off-board to get WiFi is just plain goofy.  Having to use the DSLR designed WU-1b WiFi adapter takes goofy to the level of stupid.

Why Go This Route

My Canon 1Dx is a professional grade camera.  I shoot it in crappy conditions.  But if I want to make GPS encodings on the images, I need to buy an insanely expensive add-on that gets in the way.  If I want WiFi transfer, same deal.  Stupidly high price for a nothing piece of kit.  I would consider putting one of these things in the bag and grabbing the first shot at a location with it for the GPS and also for quick updates for field level work.  The lens is Nikon, so sharp and with great contrast and the little beast is surprisingly tough.  It actually feels like Canon's EOS-M in construction quality but with autofocus that doesn't suck.

I haven't yet gone the route of a compact system camera.  Technically, the Leicas are mirror less cameras but I don't think of them the same way I might think of a Sony NEX or Lumix.  I like the GX-7 and the Olympus OM-D EM-5 very much, but not so much that I would drop coin on either of them.  I do think that the AW1 is overpriced in its space, but it will likely drop in price as Nikon gets the market sizing right.  This is a very spiky vertical marketplace.  At $799 it's a tough sell.  If they could get it to $499 it would slay the other vendors by adding use cases beyond the "smaller lighter interchangeable lens" banner.

The three sample shots here are literally fully auto JPEGs right out of the camera.  Had I more time, or better mentally engaged, I would have switched over to RAW or at least JPEG Fine.  Given ISO selections between 800 and 1250 by the camera, noise is well handled and contrast is ok.  I did NO processing on these shots at all, and am confident that working in RAW I could get significantly better colour and contrast even at higher ISOs.

DSC_0004 DSC_0005 DSC_0007


Thanks to Henry's of Newmarket for letting me use the camera for this First Look

Specifications courtesy of Nikon

Type

  • Type

    Advanced Camera with Interchangeable Lenses
  • Lens Mount

    Nikon 1/Nikon Waterproof 1 Mount

Image Sensor

  • Picture Angle

    Approx. 2.7x lens focal length (Nikon CX format)
  • Effective Pixels

    14.2 million
  • Sensor Size

    13.2mm
     x 8.8mm
  • Image Sensor Format

    CX
  • Image Sensor Type

    CMOS
  • Total Pixels

    15.13 million
  • Dust-reduction system

    Dust Shield
  • Image Area (pixels)

    Normal Panorama, horizontal pan (40:7 aspect ratio) 4,800 x 920
    Normal Panorama - vertical pan (8:25 aspect ratio) 1,536 x 4,800
    Wide Panorama - horizontal pan (80:7 aspect ratio) 9,600 x 920
    Wide Panorama - vertical pan (4:25 aspect ratio) 1,536 x 9,600
    Still Images (3:2 aspect ratio) 4,608 x 3,072 3,456 x 2,304 2,304 x 1,536
    Still images (taken during movie recording; aspect ratio 3:2) 4,608 x 3,072 (1080/60i, 1080/30p) 1,280 x 856 (720/60p, 720/30p)
    Motion Snapshot (16:9 aspect ratio) 4,608 x 2,592

File System

  • File Format

    Compressed 12-bit NEF (RAW) JPEG: JPEG-Baseline compliant with fine (approx 1:4), normal (approx 1:8), or basic (approx 1:16) compression NEF (RAW) + JPEG: Single photograph recorded in both NEF (RAW) and JPEG formats
  • Storage Media

    SD SDHC SDXC
  • Card Slot

    1 Secure Digital (SD)
  • File System

    Compliant with DCF (Design Rule for Camera File System) 2.0 DPOF (Digital Print Order Format) EXIF 2.3 (Exchangeable Image File Format for Digital Still Cameras) PictBridge

Viewfinder

  • Viewfinder

    LCD

Lens

  • Lens Aperture

    electronically controlled

Shutter

  • Shutter Type

    Electronic Shutter
  • Fastest Shutter Speed

    1/16,000 sec.
  • Slowest Shutter Speed

    30 sec.
  • Flash Sync Speed

    Up to 1/60 sec.
  • Bulb Shutter Setting

    Yes
  • Shutter Release Modes

    Single-frame [S] mode Continuous Self-timer mode
  • Frame Advance Rate

    Approx. 5, 15, 30, or 60 fps
  • Top Continuous Shooting Speed at full resolution

    15 frames per second
    with AF; 30/60 fps with focus locked on first frame
  • Self-timer

    2, 5, 10 sec. Timer duration electronically controlled
  • Remote Control Modes

    WU-1b Wireless Mobile Adapter

Exposure

  • Exposure Metering System

    TTL metering using image sensor
  • Metering Method

    Matrix Center-weighted: Meters 4.5 mm circle in center of frame Spot: Meters 2 mm circle centered on select focus area
  • Exposure Modes

    Programmed Auto with flexible Program (P) Shutter-Priority Auto (S) Aperture-Priority Auto (A) Manual (M) Scene Auto Selector
  • Scene Modes

    Portrait Landscape Night Landscape Night Portrait Close-up Auto Underwater
  • Shooting Modes

    Advanced movie mode (includes slow motion) Auto Photo mode Best Moment Capture mode (includes Slow View and Smart Photo Selector) Creative mode (including: P, S, A, M, Night Landscape, Underwater, Night Portrait, Backlighting, Soft, Easy Panorama, Miniature Effect, and Selective Color) Motion Snapshot (16:9)
  • Exposure Compensation

    ±3 EV in increments of 1/3EV
  • Exposure Lock

    Luminosity locked at detected value with AE-L/AF-L button

Sensitivity

  • ISO Sensitivity

    160-
    6400
  • Active D-Lighting

    On Off

Autofocus

  • Picture Control

    Standard Neutral Vivid Monochrome Portrait Landscape Selected Picture Control can be modified User-customizable Settings
  • Autofocus System

    Hybrid autofocus (phase detection/contrast-detect AF) AF-assist illuminator
  • AF-area mode

    Single-point AF: 135 focus areas; the center 73 areas support phase-detection AF Auto-area AF: 41 focus areas Subject tracking Face-priority AF
  • Focus Lock

    Focus can be locked by pressing shutter-release button halfway (single AF)
  • Focus Modes

    Auto (AF) Auto AF-S/AF-C selection (AF-A) Single-Servo AF (AF-S) Continuous-Servo (AF-C) Full-time Servo (AF-F) Manual Focus (MF)

Flash

  • Built-in Flash

    Yes
  • Guide Number

    5/16 (m/ft ISO 100, 20°C/68°F) Approx.
  • Flash Control

    i-TTL flash control using image sensor available
  • Flash Mode

    Fill-flash Fill-flash with slow sync Red-eye reduction Red-eye reduction with slow sync Rear curtain sync Rear curtain with slow sync Off
  • Flash Compensation

    -3 to +1 EV in increments of 1/3 EV
  • Flash-ready indicator

    Lights when built-in flash unit is fully charged

White Balance

  • White Balance

    Auto Incandescent Fluorescent Direct Sunlight Flash Cloudy Shade Preset Manual Underwater All except preset manual with fine tuning

Movie

  • Movie Metering

    TTL exposure metering using main image sensor
  • Movie Metering Method

    Matrix Center-weighted: Meters 4.5 mm circle in center of frame Spot: Meters 2 mm circle centered on select focus area
  • Movie File Format

    MOV
  • Movie Video Compression

    H.264/MPEG-4 Advanced Video Coding
  • Movie Audio recording format

    AAC
  • Movie Audio recording device

    Built-in stereo microphone; sensitivity adjustable
  • Movie

    HD: 1920 x 1080/60i HD: 1920 x 1080/30p HD: 1280 x 720/60p HD: 1280 x 720/30p Slow-motion: 640 x 240/400fps Slow-motion: 320 x 120/1200fps Motion Snapshot: 1920 x 1080/60p (plays at 24p) Audio file format: ACC Movie file format: MOV

Monitor

  • Monitor Size

    3.0 in. diagonal
  • Monitor Resolution

    921,000 Dots
  • Monitor Type

    TFT-LCD with brightness adjustment

Interface

  • Interface

    USB: Hi-speed USB HDMI output: Type C mini-pin HDMI connector
  • GPS

    Yes (Built-in)

Menus

  • Supported Languages

    Arabic Bengali Chinese (Simplified and Traditional) Czech Danish Dutch English Finnish French German Greek Hindi Hungarian Indonesian Italian Japanese Korean Norwegian Persian Polish Portuguese (European and Brazilian) Romanian Russian Spanish Swedish Tamil Thai Turkish Ukrainian Vietnamese
  • Date, Time and Daylight Savings Time Settings

    Yes
  • World Time Setting

    Yes

Power

  • Battery / Batteries

    EN-EL20 Lithium-ion Battery
  • Battery Life (shots per charge)

    220 shots (CIPA)
  • AC Adapter

    EH-5b AC Adapter Requires EP-5C Power Supply Connector

Miscellaneous

  • Tripod Socket

    1/4 in.
  • Approx. Dimensions (Width x Height x Depth)

    4.5 in.
     (113.5 mm)
     x 2.9 in.
     (71.5 mm)
     x 1.5 in.
     (37 mm)
    Excluding projections.
  • Approx. Weight

    11.1 oz.
     (313 g)
    camera body only
  • Operating Environment

    14 to 104°F (-10 to 40°C) on land; 32 to 104°F (0 to 40°C) in water Less than 85% humidity (no condensation)