

Histograms and Clipping Indicators
/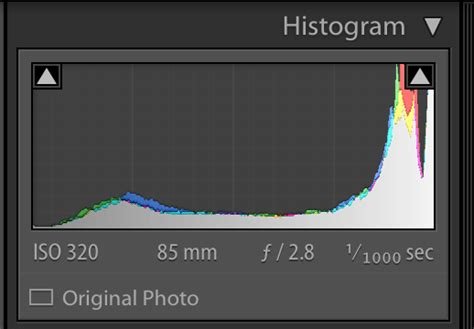
A screenshot of a histogram from lightroom classic showing clipping in the whites and in the blacks
I am fairly confident that we all know that the histogram that we see in our editing software is on its best day, an approximation if I am being kind. The same is true for histograms that appear on the display of the camera. It is based on the 8 bit JPEG preview that is stored in every RAW file or the file itself if the original is a JPEG. At now time in the majority of editors does the histogram represent a converted RAW file when the source is a RAW file.
What The Histogram Tells Us
What it does do is show us the distribution of luminance values from 0 to 255. In some histograms the luminance values are broken down into the specific values for Red Green and Blue. Interesting but being after the fact not particularly useful to most editors.
Clipping Indicators
What can be useful are the clipping indicators. A clipping indicator on the right side indicates that there are luminance values that are blown out completely so there is no data being used there.
A clipping indicator on the left side indicates that there are luminance values that there are luminance values that have no data, essentially, all those luminance values are black with zero detail.
What is a “Good” Historgram
A histogram is neither bad nor good. It just represents, kind of, the distribution of luminance values. Anyone who tells you that a particular histogram shape is better is out to lunch. A proper histogram shows as close to the real luminance value distribution as is really possible. That’s it, that’s all
Dealing With Clipping
The presence of a clipping indicator is not inherently a bad thing. If the histogram is accurate the presence of a clipping indicator simply means that some pixels are falling outside of 0-255. This matters in a JPEG which is only 8 bit but is hardly fatal in a RAW file which is generally 14 bits deep. I am aware of some options for less bit depth in a RAW, but that’s a lot like a really fine chocolate cake, but missing most of the chocolate. Call it generally pointless and move on.
Consequently we can use the tonal controls, commonly whites, blacks, shadows and highlights to move the luminance distribution around. This works most effectively with RAW files but there is still some latitude in JPEGs, just a lot less.
If you are clipping on the right, try slowly moving the whites and or highlights sliders to the left just until the clipping indicator disappears. If by the time you get rid of the clipping indicator, everything looks like dog poop, the photo is unlikely to be salvageable. Live and learn and move on.
If you are clipping on the left, try moving the blacks and shadows sliders to the right, just until the clipping indicator disappears. Again if the adjustment results in crap, so it goes.
Do note, that when you move the blacks and shadows to the right, you are also adding noise because you are trying to full a larger bit space with insufficient data, and you get noise. When you are moving whites and highlights to the left, you are not adding noise. This is why ETTR works and that if you will err, always err on slight overexposure rather than underexposure.
Wrapping Up
The histogram can be an informative tool to the digital editor, but what is perhaps more valuable at the outset are the clipping indicators. They don’t mean disaster, and can often tell you exactly where to spend your editing time.
Please become a member on Patreon to help support this channel. A big thanks to all the existing Patreon members! Send in comments or questions, I read and respond to all. If you shop with B&H Photo Video, please use the link on the main page as it pays me a small commission and does not cost you anything to do so. Thanks again and we will see each other again soon.


