

Continuous Light as a Learning Tool
/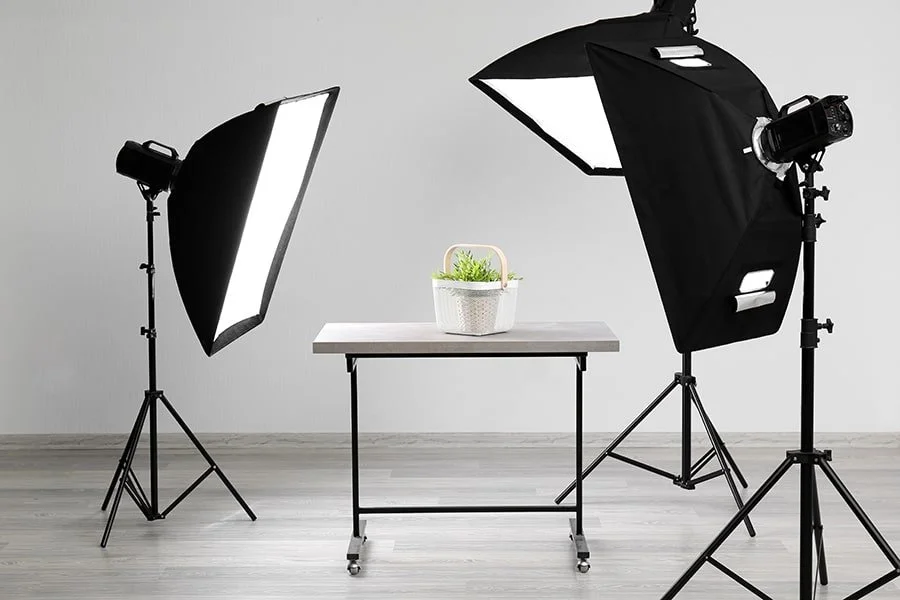
image copyright improvephotography.com
Everyone knows me as the flash guy. I use flash whenever I can find a way to make an image better using supplemental light. It’s got more power relative to its size than anything and getting a great flash exposure whether on camera or off is so easy.
Except…
A concern I continue to hear from folks learning about lighting, is that they won’t know the impact until after the image is made. When I was shooting film, I could better understand this, but we can all see the impact of flash right after squeezing the shutter release.
However…
Let’s say that one is focused on better learning the use of lighting and leveraging its three component factors, distance, colour and quality. While all are possible with flash, one does have to make an exposure and then review it to really see the impact and that can be hard on a small LCD.
To aid in learning about lighting, I am inclined to recommend a continuous light source but one that can be manipulated like and that uses the same light shaping tools as a flash.
As learning and study are not time or portability dependent, I propose an AC powered continuous light that takes standard light shapers. I use Godox continuous lights that have the industry standard S mount for light shapers, aka the Bowens mount. The Godox lights have proven super reliable, very cost effective, have excellent colour control and are well built. The S mount means that one can get a few light shapers that fit without going bankrupt. The 100w SL 150 is an excellent choice that serves your skills development and also practical work.
I do recommend getting as much output power as you can afford, so you can maintain more depth of field, higher shutter speeds and lower ISO as your needs demand. While no continuous light is really powerful enough to freeze moving subjects, they do work for statics, product shots, flowers, and even pets and people if they aren’t bouncing around.
The example image from improvephotography.com is a superb example of what a three light continuous light system would look like. We see three lights on stands, each with its own light shaper, positioned to place the light where the photographer desires, using distance and output controls to set the lighting ratios to achieve the goal.
You can of course do math for lighting ratios, but I recommend playing around and trying different positions as that is far more useful than worrying about whether you have a 4:1 ratio, or something. Long experience shows that moving a light changes the positioning of highlights and shadows and you can see the change right in the viewfinder in real time. It’s quick, it’s easy and what you see is what you get.
In reality, I recommend starting with only ONE light. First, it’s less expensive, second it is least complex and you will see the impact of the light and the light shaper immediately. Do get the light as close to your subject as you can, because while it looks really bright, it actually isn’t and if you want lots of depth of field, you’re going to need all the power that you can get.
Choose a subject with dimensionality. Could be the bowl of fruit that my new students start with because there are lots of textures, light spots and shadows and a healthy snack all involved. Flowers work, and if you have access to children’s toys they are also excellent subjects. A set of salt and pepper shakers work well too.
I’m going to recommend not using highly reflective subjects such as glassware or wine bottles at first because the reflection management gets in the way of the lighting learning. You certainly can if you wish, but they do add complexity to your work.
Don’t expect world class advertising images, or big prints. This is class work, even if you are a class of only one. Make notes for each image, not just the exposure settings, but more the light setup, maybe use your phone camera to snap images of the overall setup and then link them altogether in your skills development book. It’s important during review to not just look at the final image, but what you set up to achieve it.
Wrapping Up
Please become a member on Patreon to help support this channel. A big thanks to all the existing Patreon members! Send in comments or questions, I read and respond to all. If you shop with B&H Photo Video, please use the link on the main page as it pays me a small commission and does not cost you anything to do so. Thanks again and we will see each other again soon.


